Greetings. PENPLE’s!
We just released new updates
for ver. 3.9.13,
which brought some significant
changes to our drawing tools.
Of the newly added features,
today we’re going show you
how to adjust the shape of
different brushes you’d like to use.
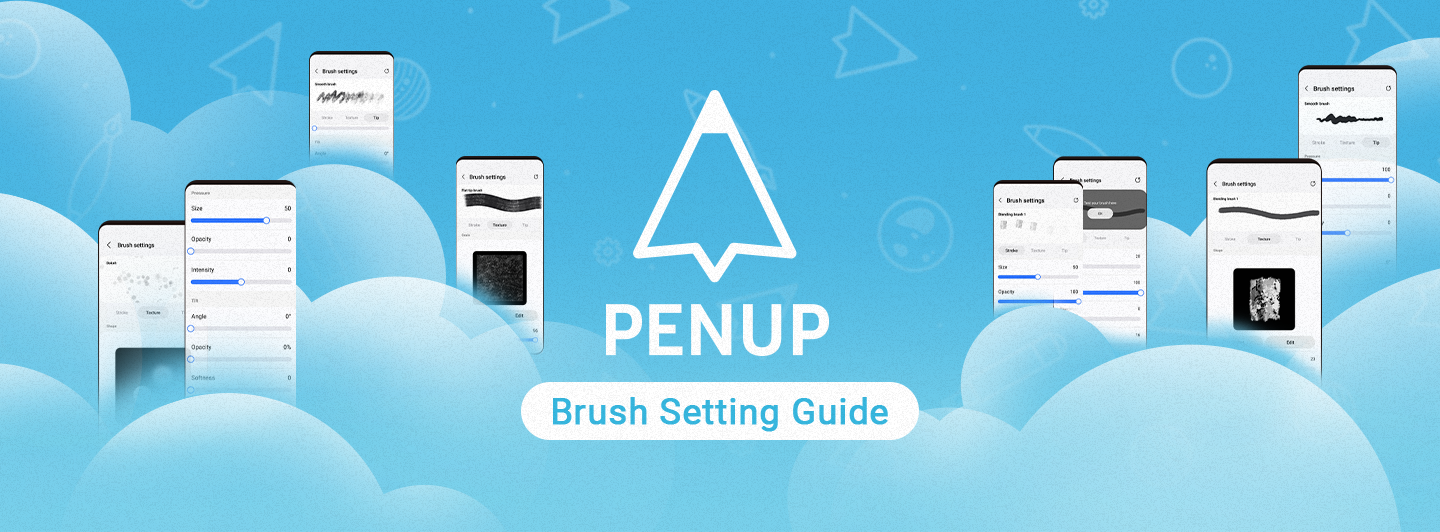
If you press on the brush
you want to adjust,
you’ll be redirected to
a “Brush settings” page.
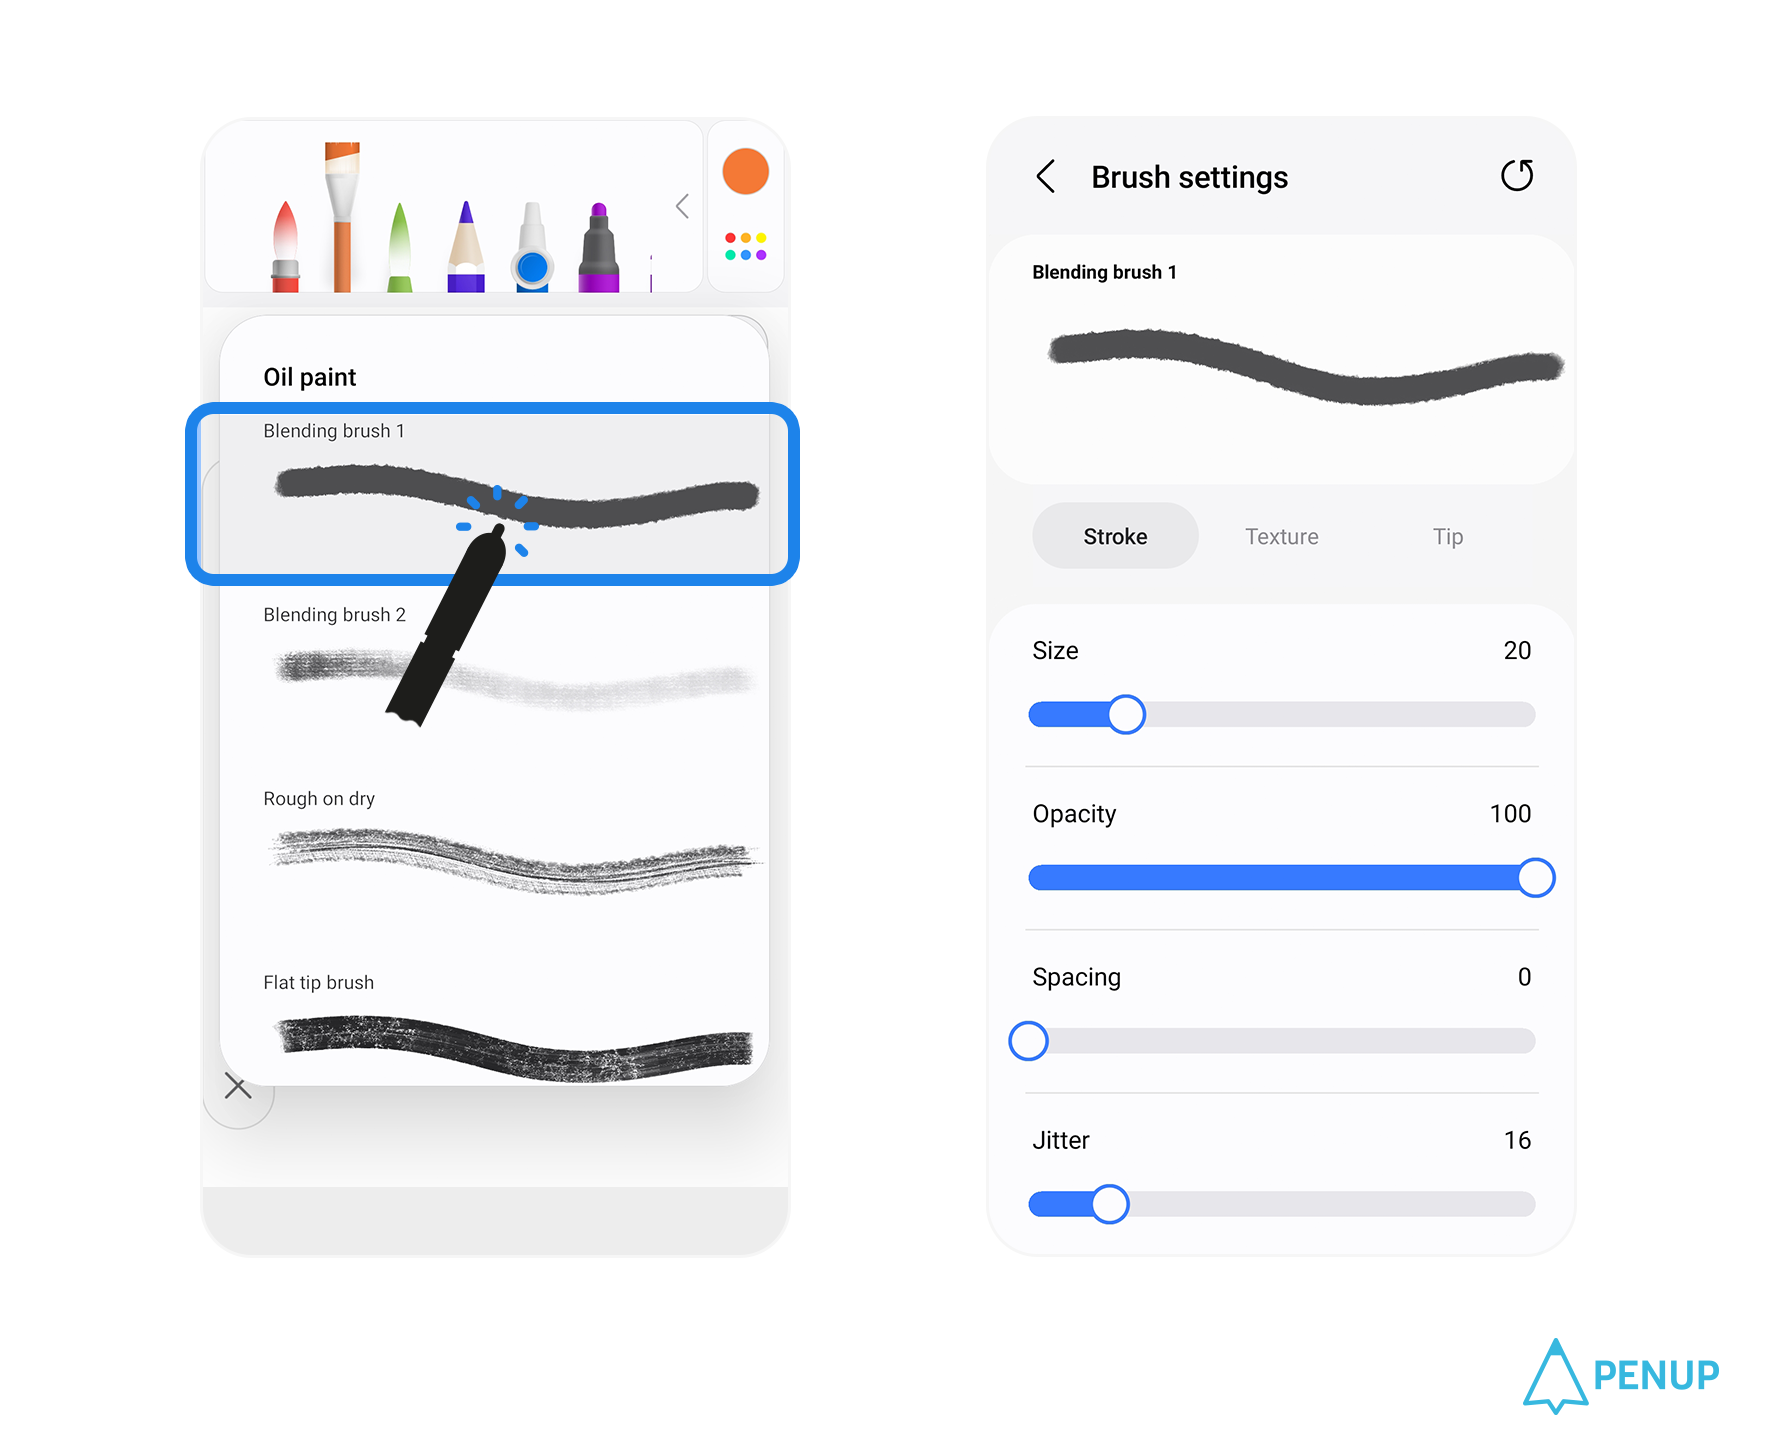
In Brush settings, you can adjust
the ‘Stroke’, ‘Texture’, and ‘Tip’
to create a new brush.
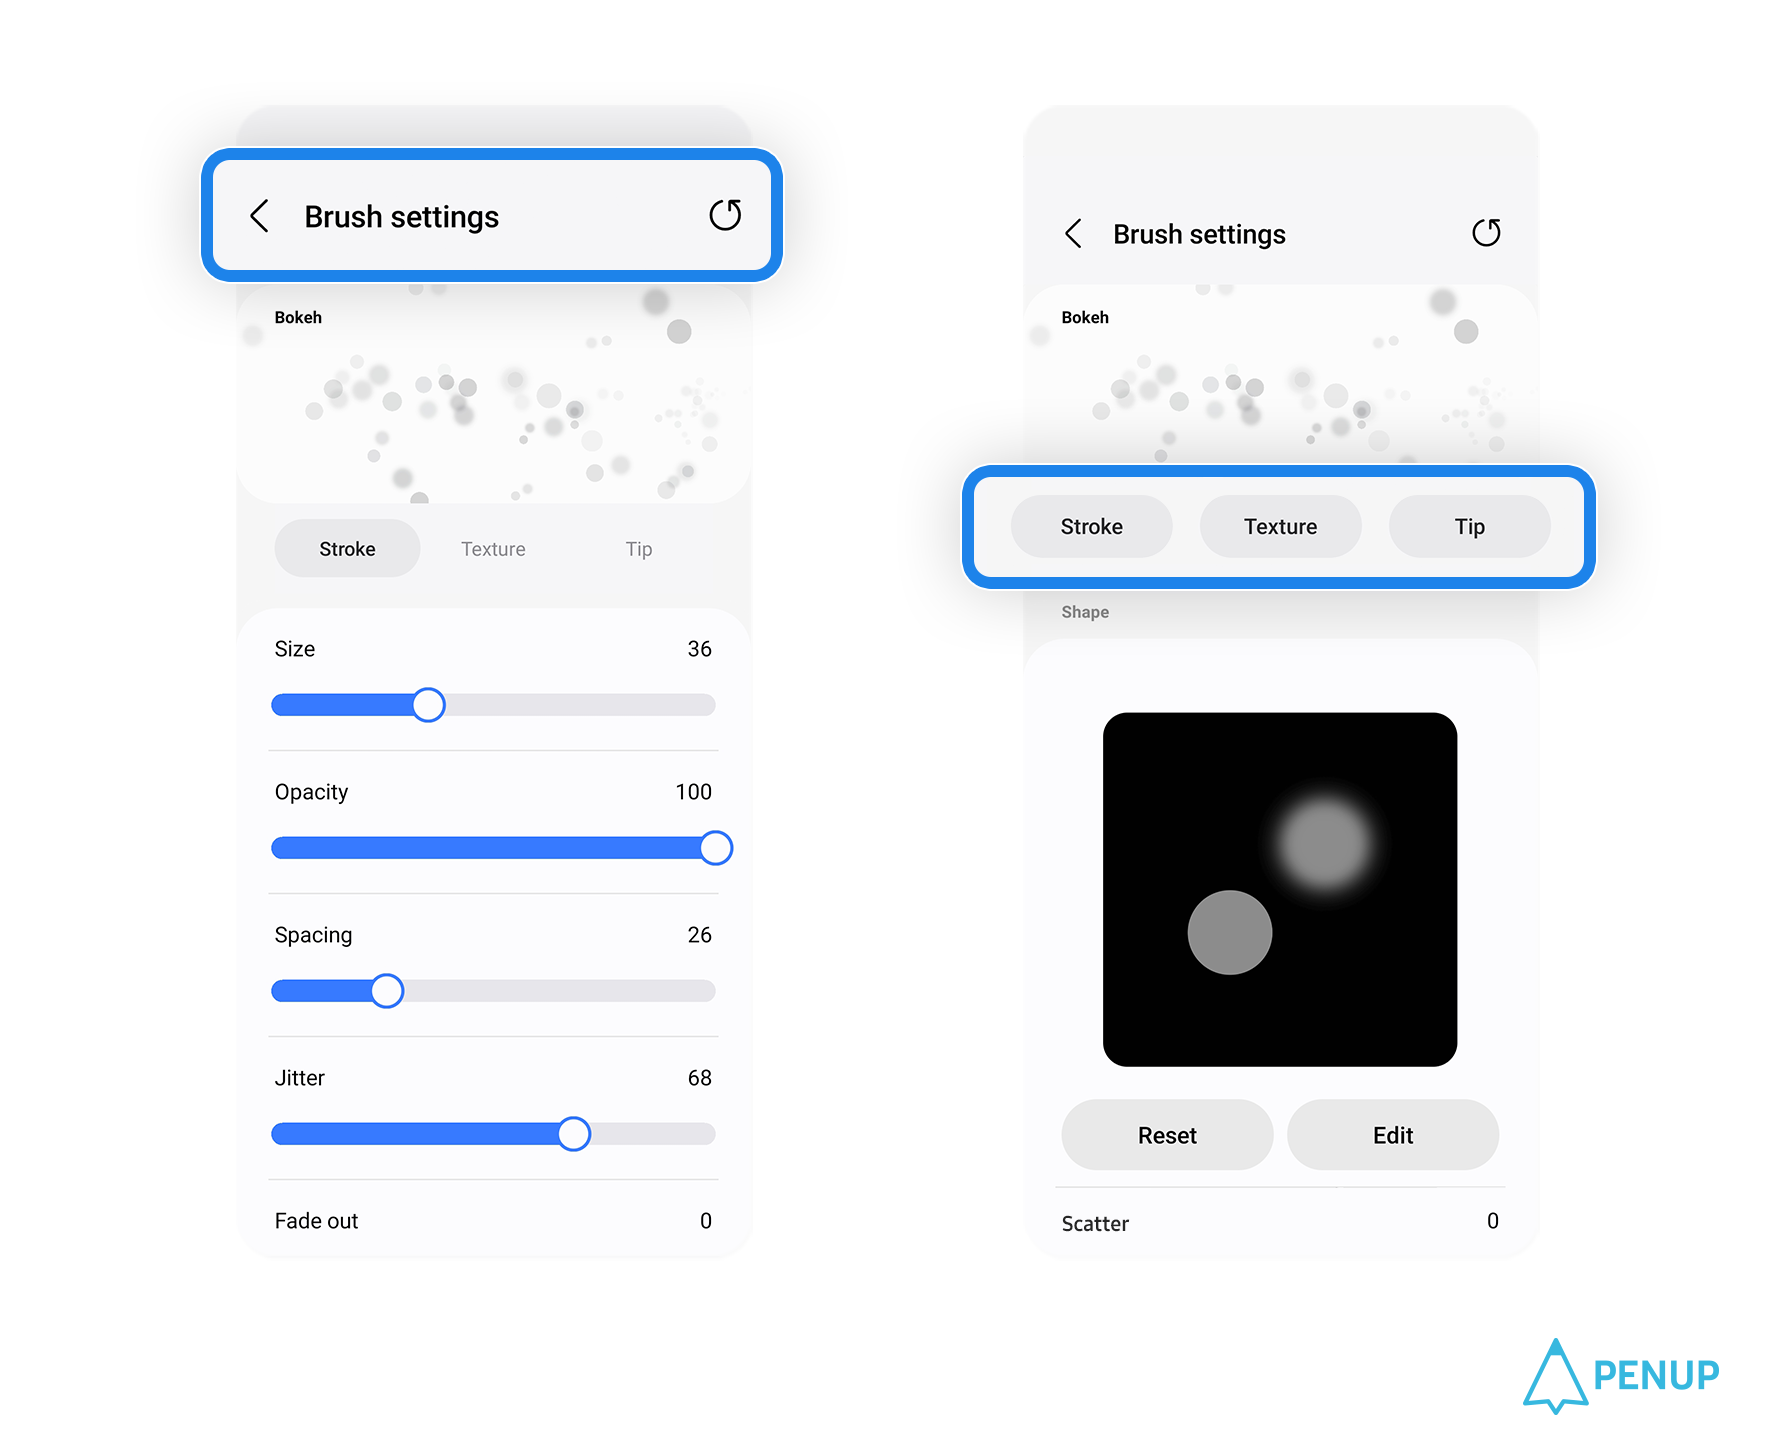
You can preview the changes
you made to your brush using
the ‘Preview’ window at the
top of the Brush settings page,
and test it to see what the results
look like.
Now, follow me to learn exactly
how to change your brush settings
on PENUP.
The first setting option, Stroke
The first thing
you should adjust is the ‘Stroke’.
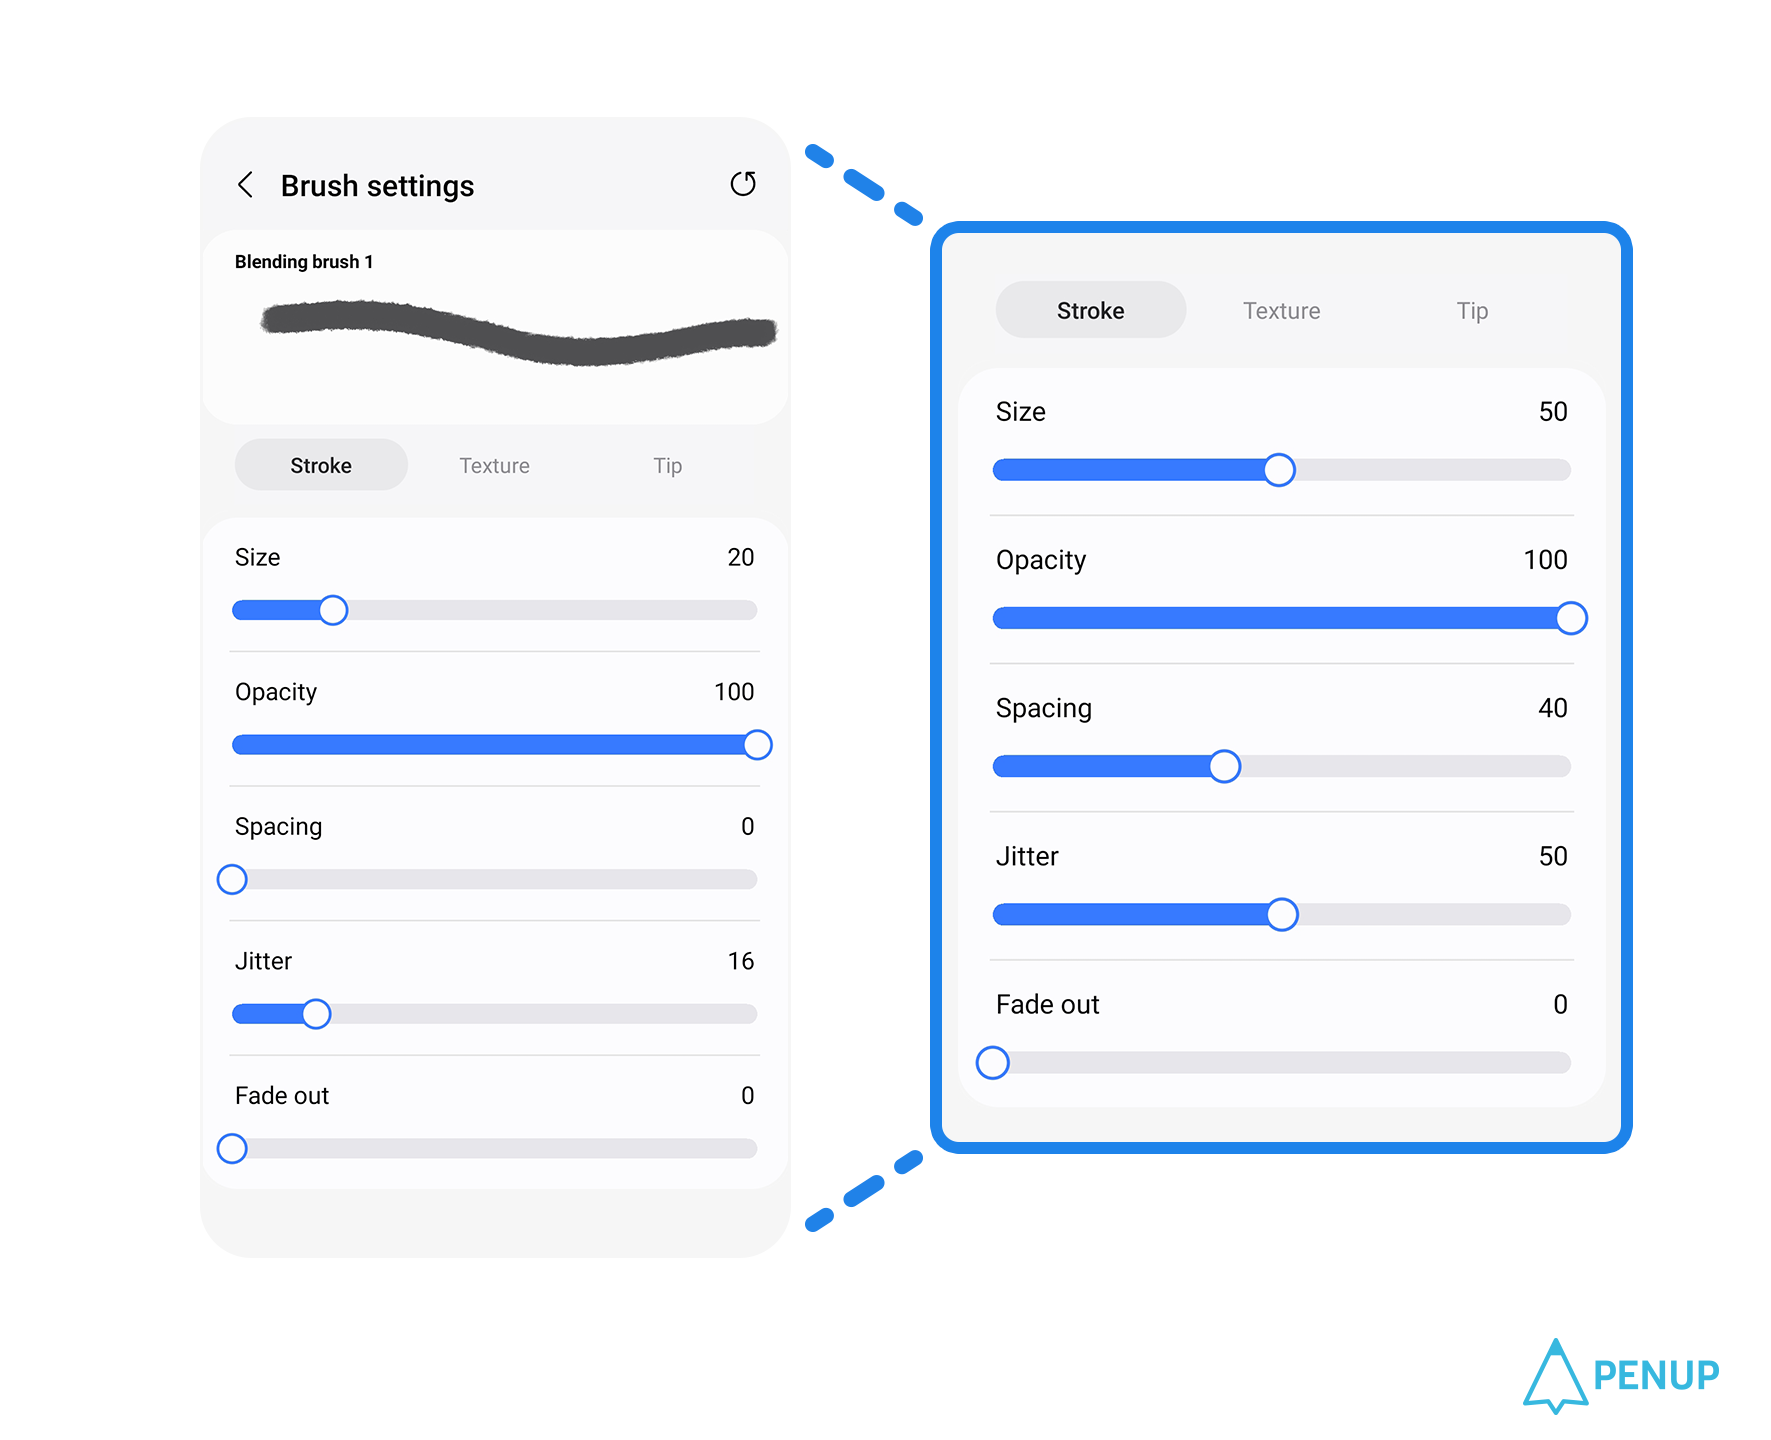
If you press ‘Stroke’,
you can change the ‘Size’,
‘Opacity’, ‘Spacing’, ‘Jitter’,
and ‘Fade out’ to create
a variety of different brushes.
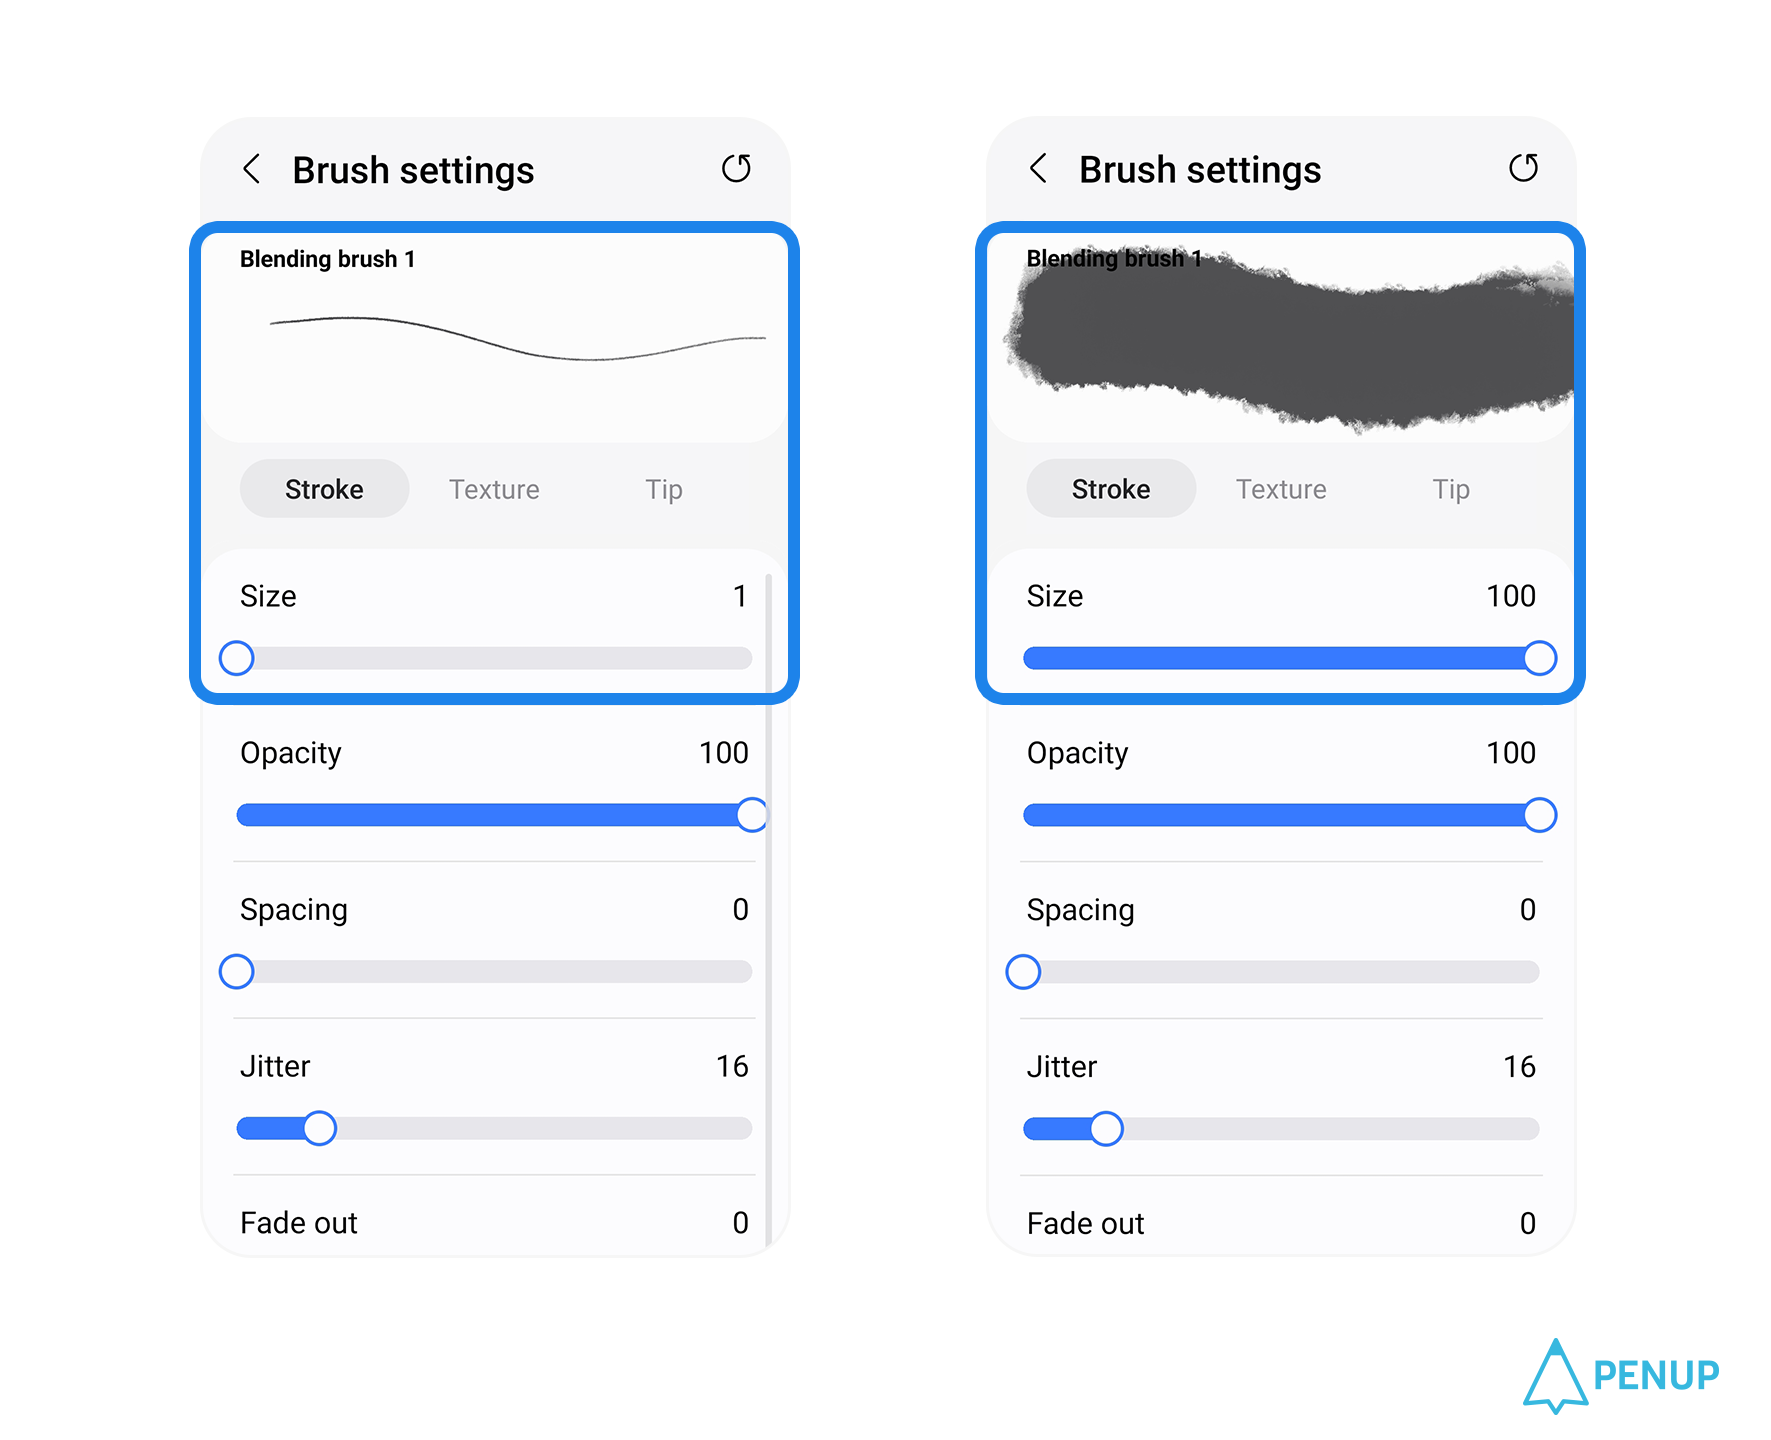
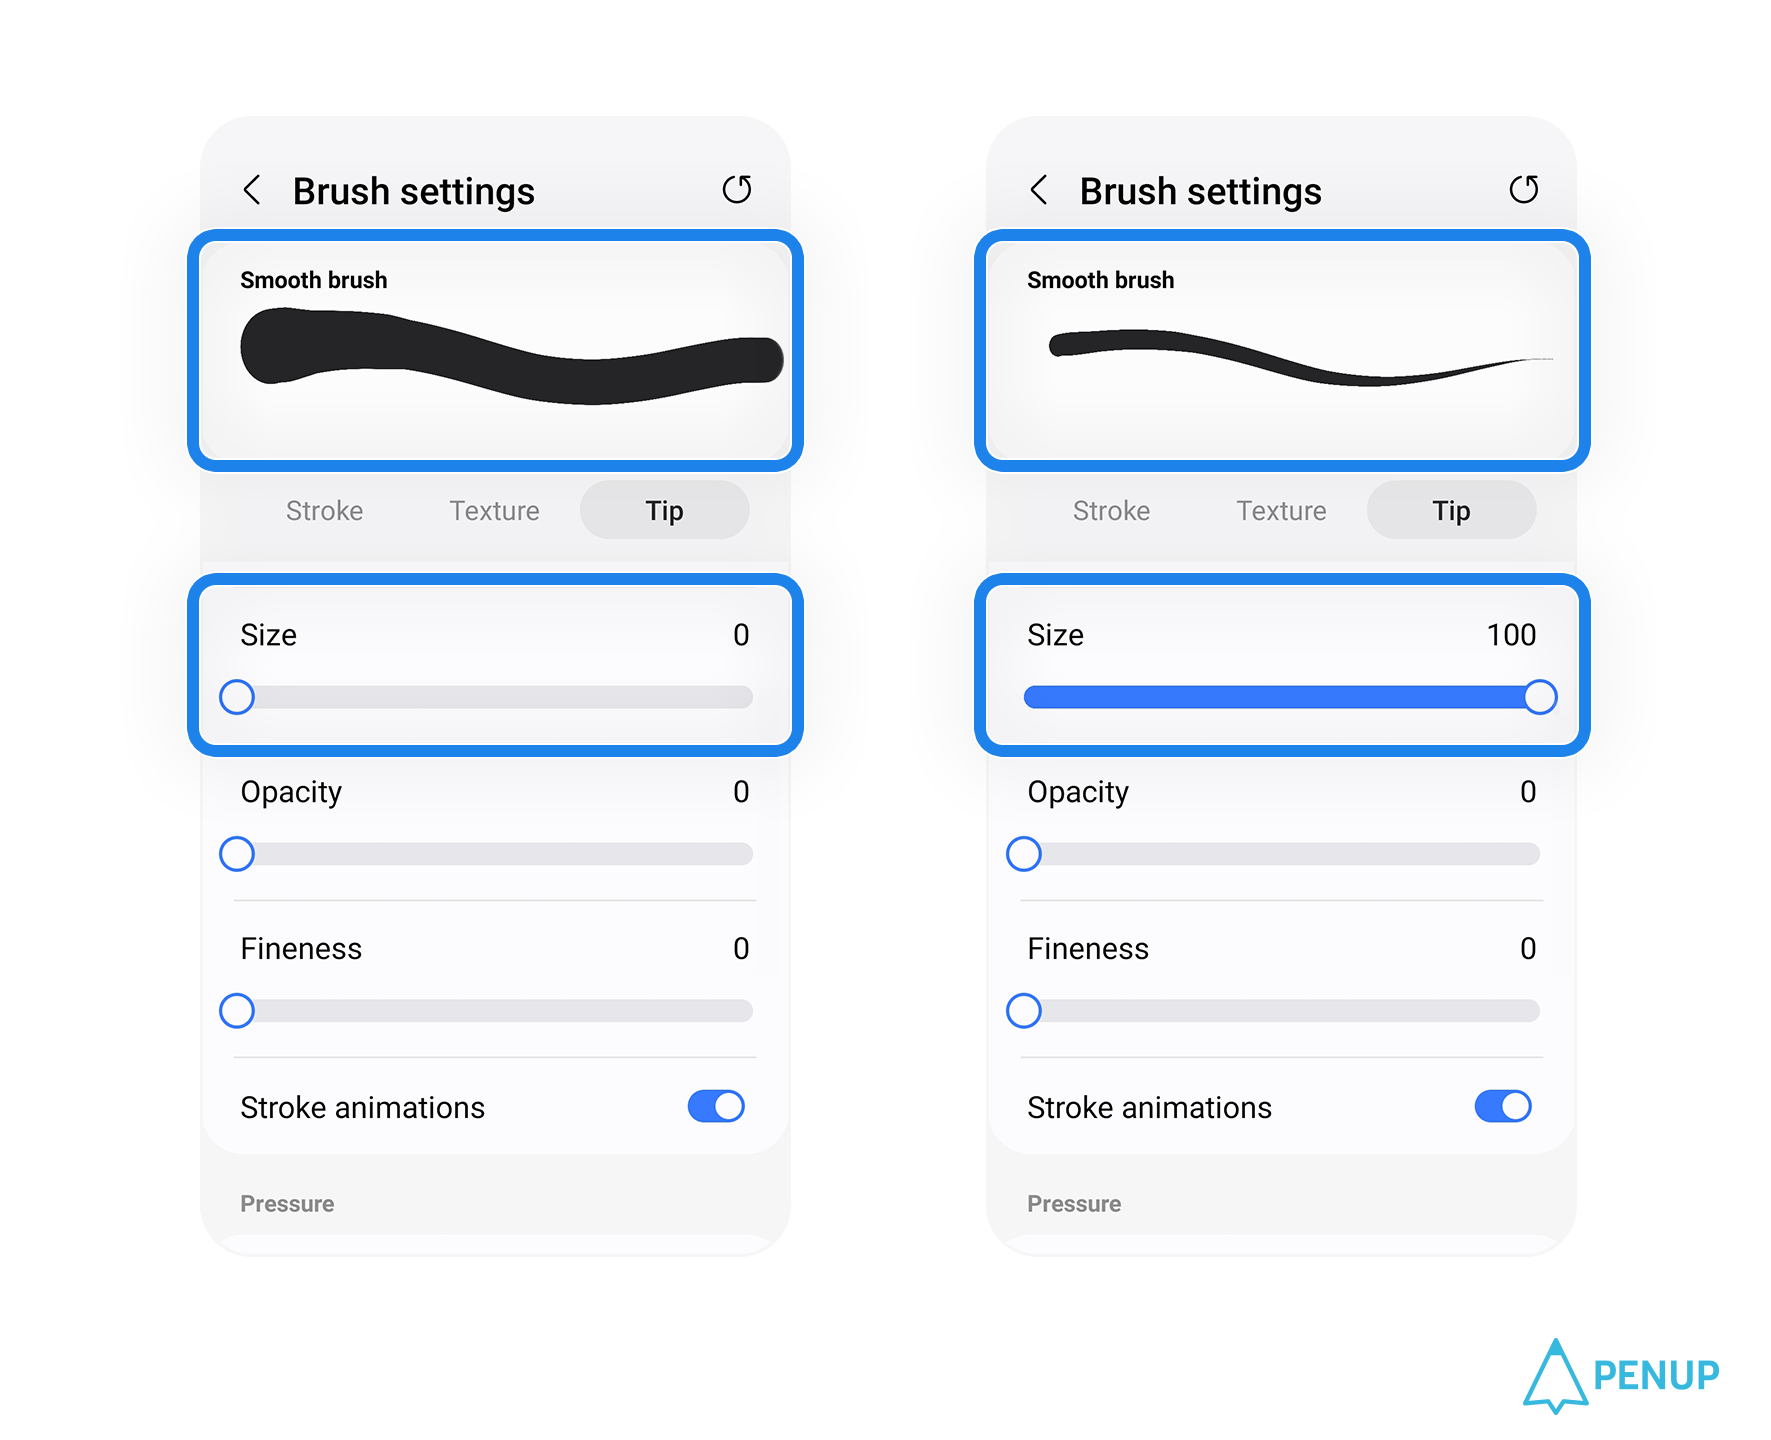
Changing the ‘Size’
will change how thick
your stroke looks.
You can pick any size from 1 to 100.
Of course, the larger the Size,
the thicker your stroke will be.
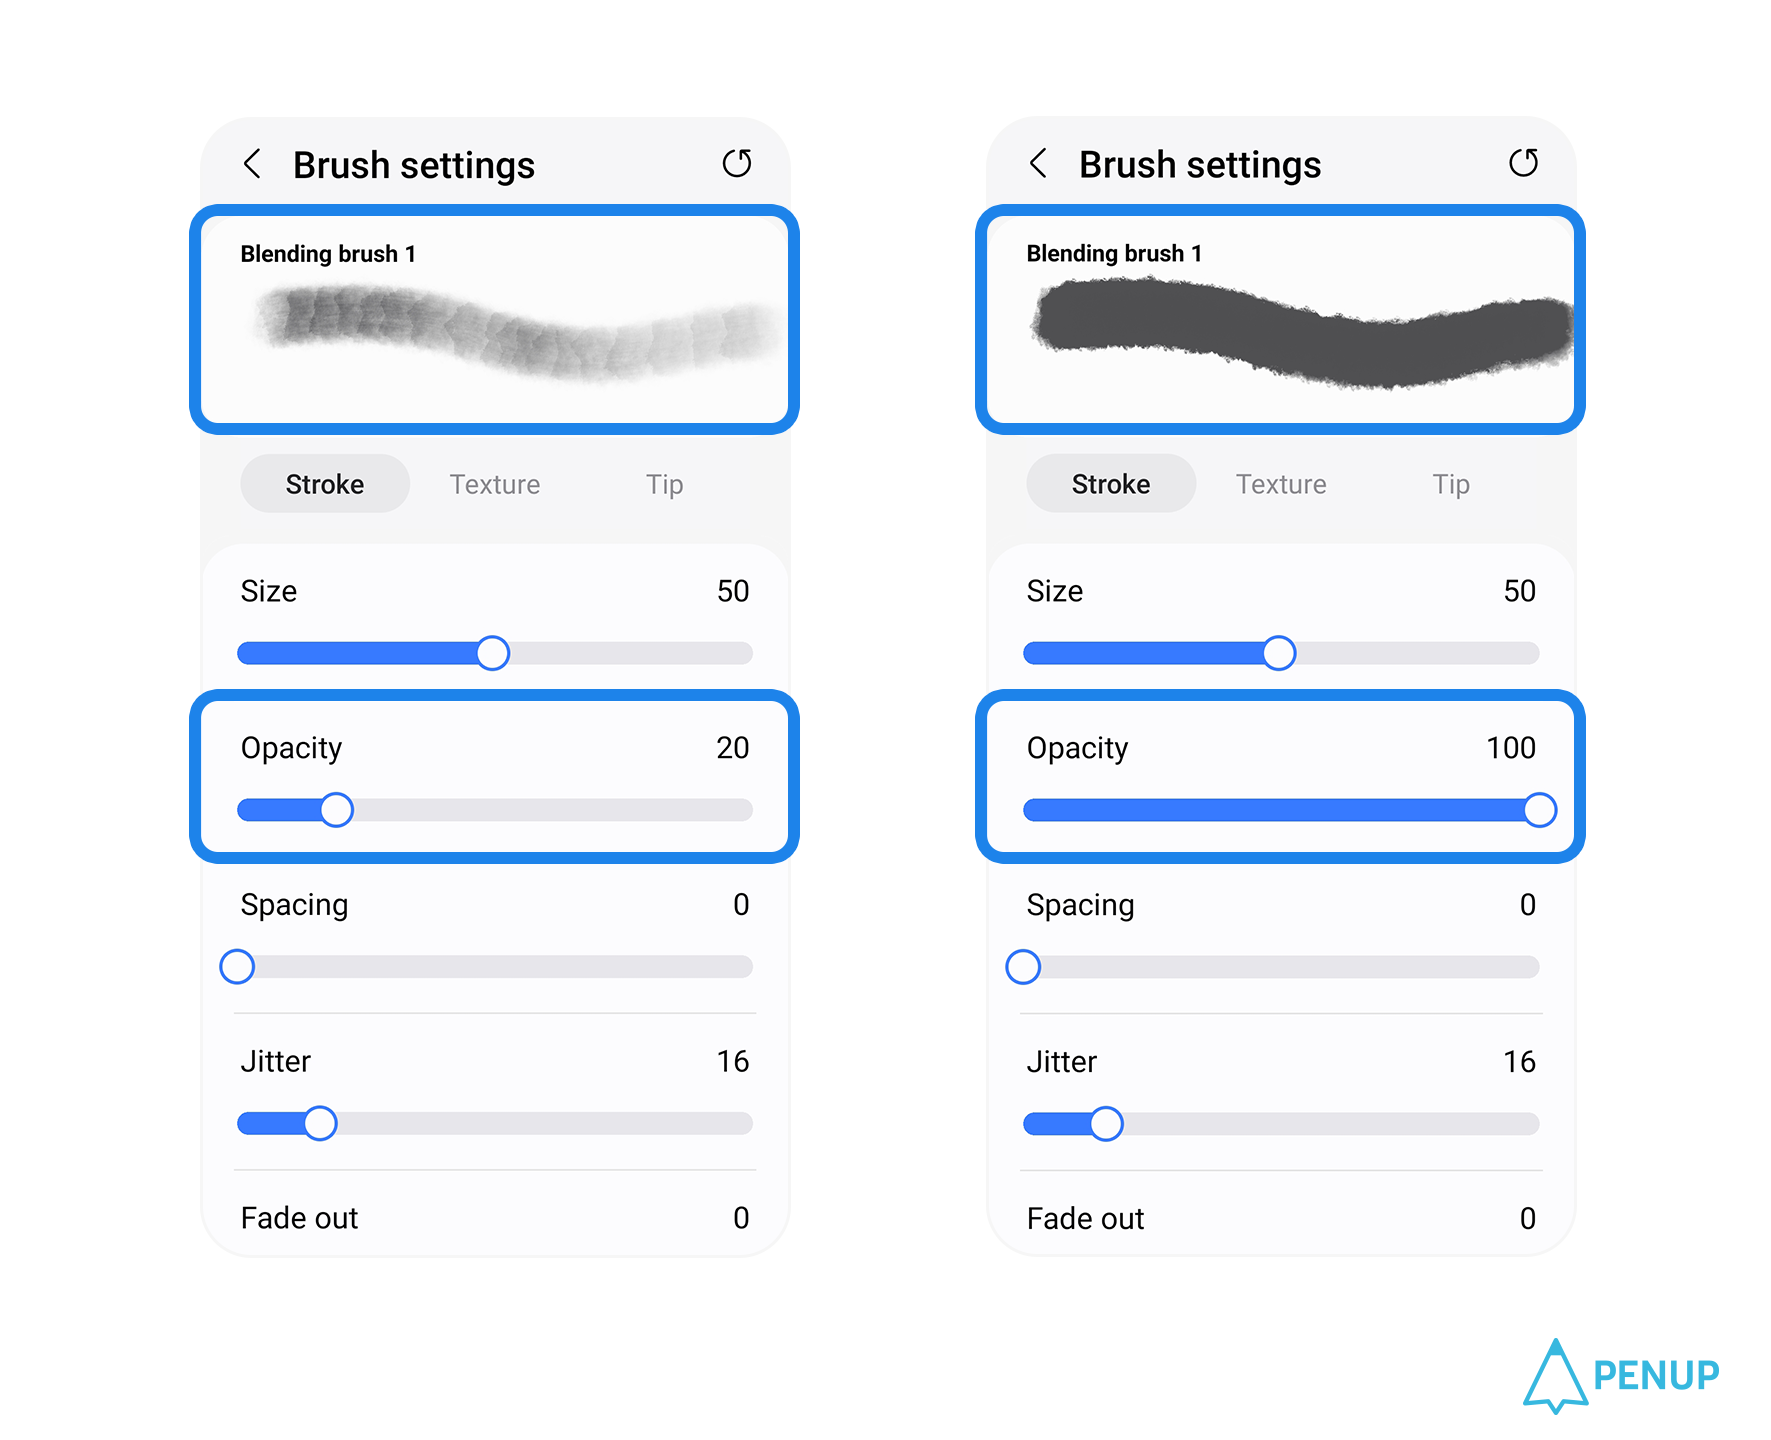
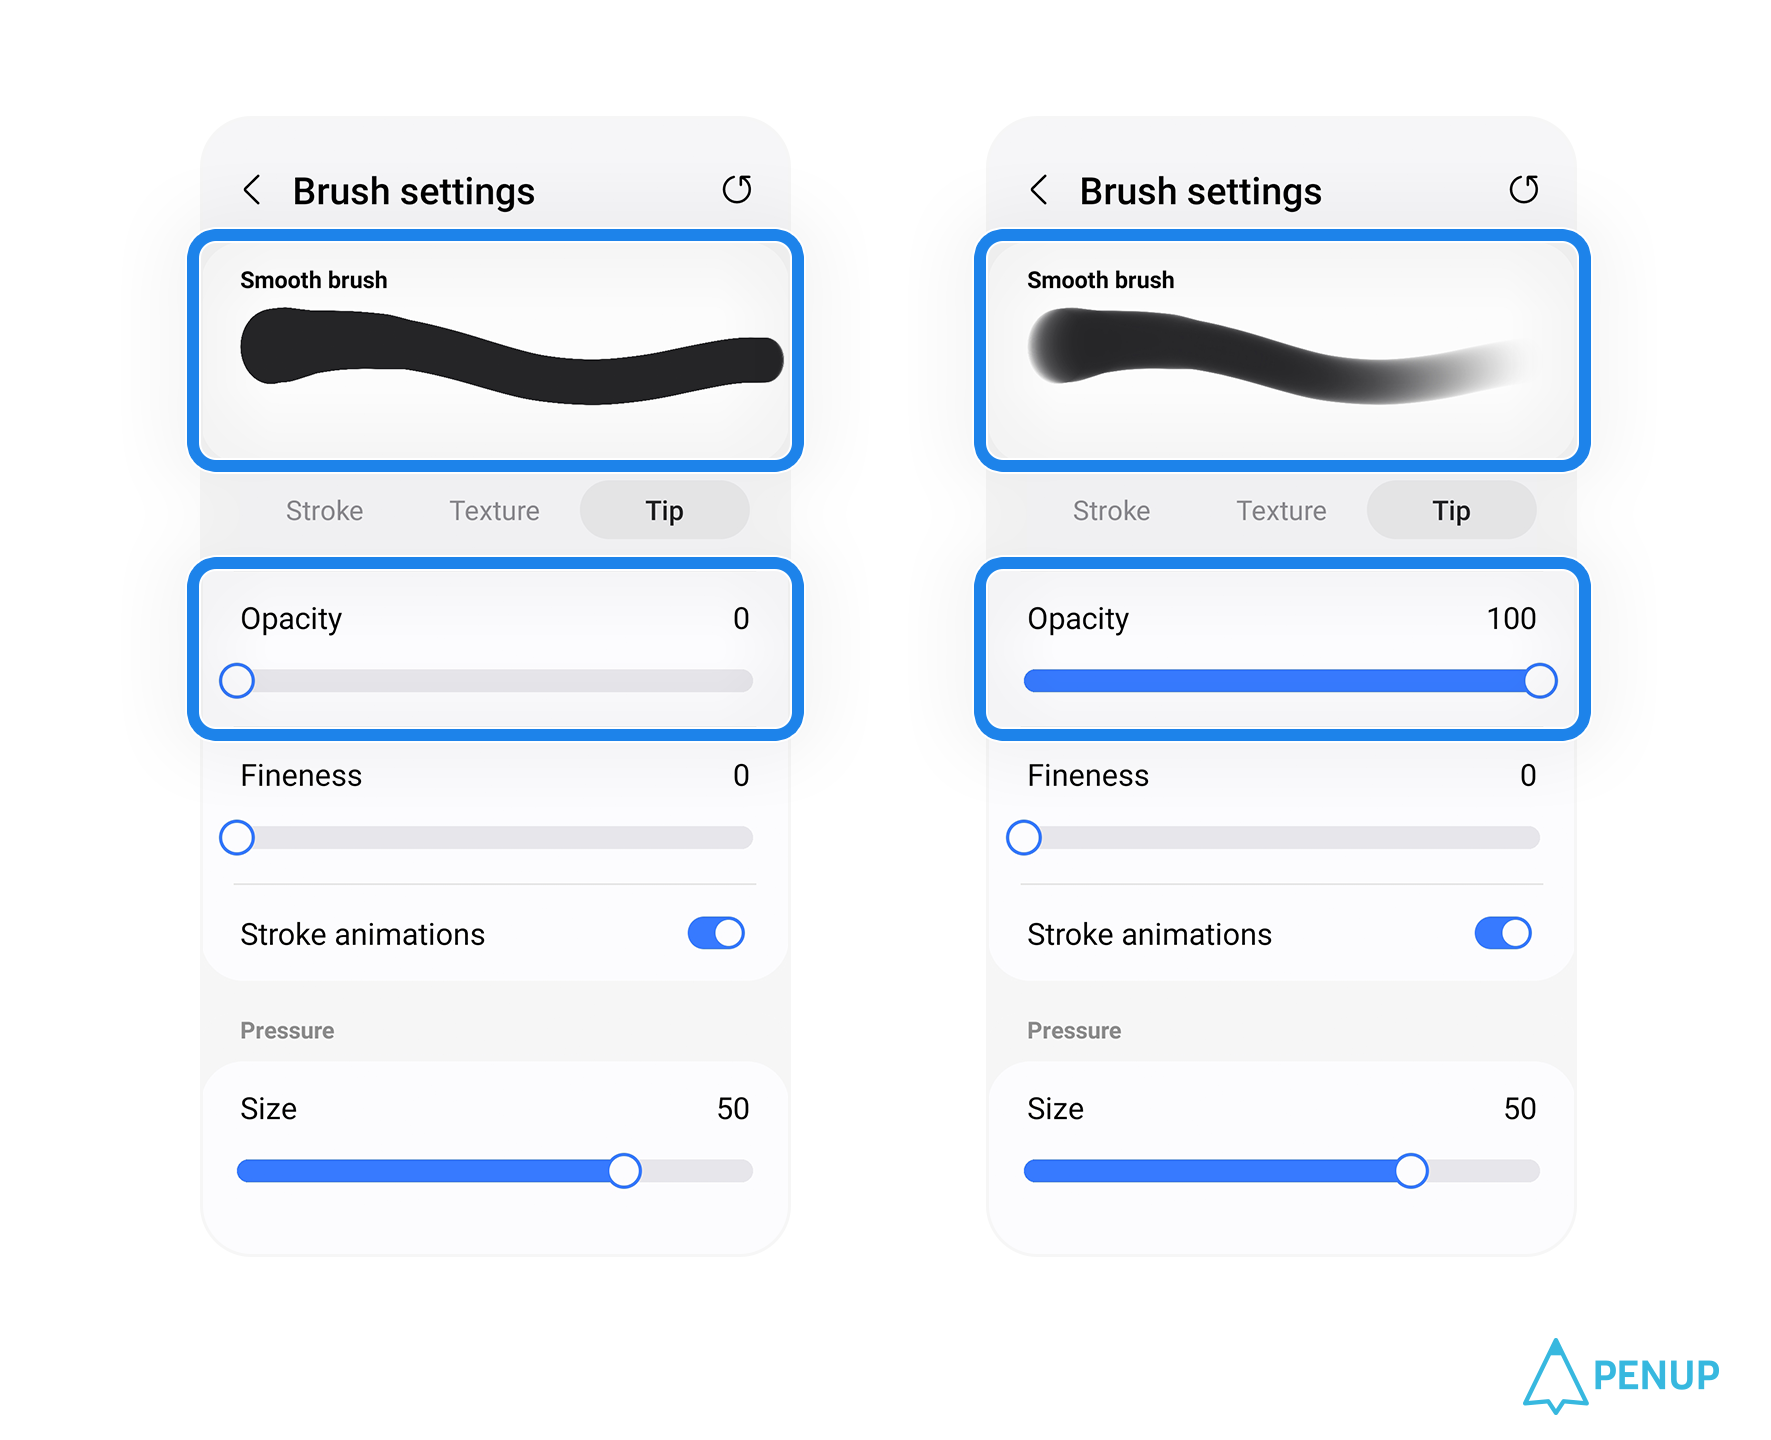
‘Opacity’ turns your brush stroke
either darker or lighter.
‘Opacity’ also ranges between
1 and 100,
and the closer you get to 100,
the darker your stroke will look.

‘Spacing’ helps adjust
the distance between
the string of dots you can create
with your stroke.
A spacing closer to 0
will close out the gap
between the dots and create a line.
A spacing closer to 100
will widen the gap and create a dotted line.
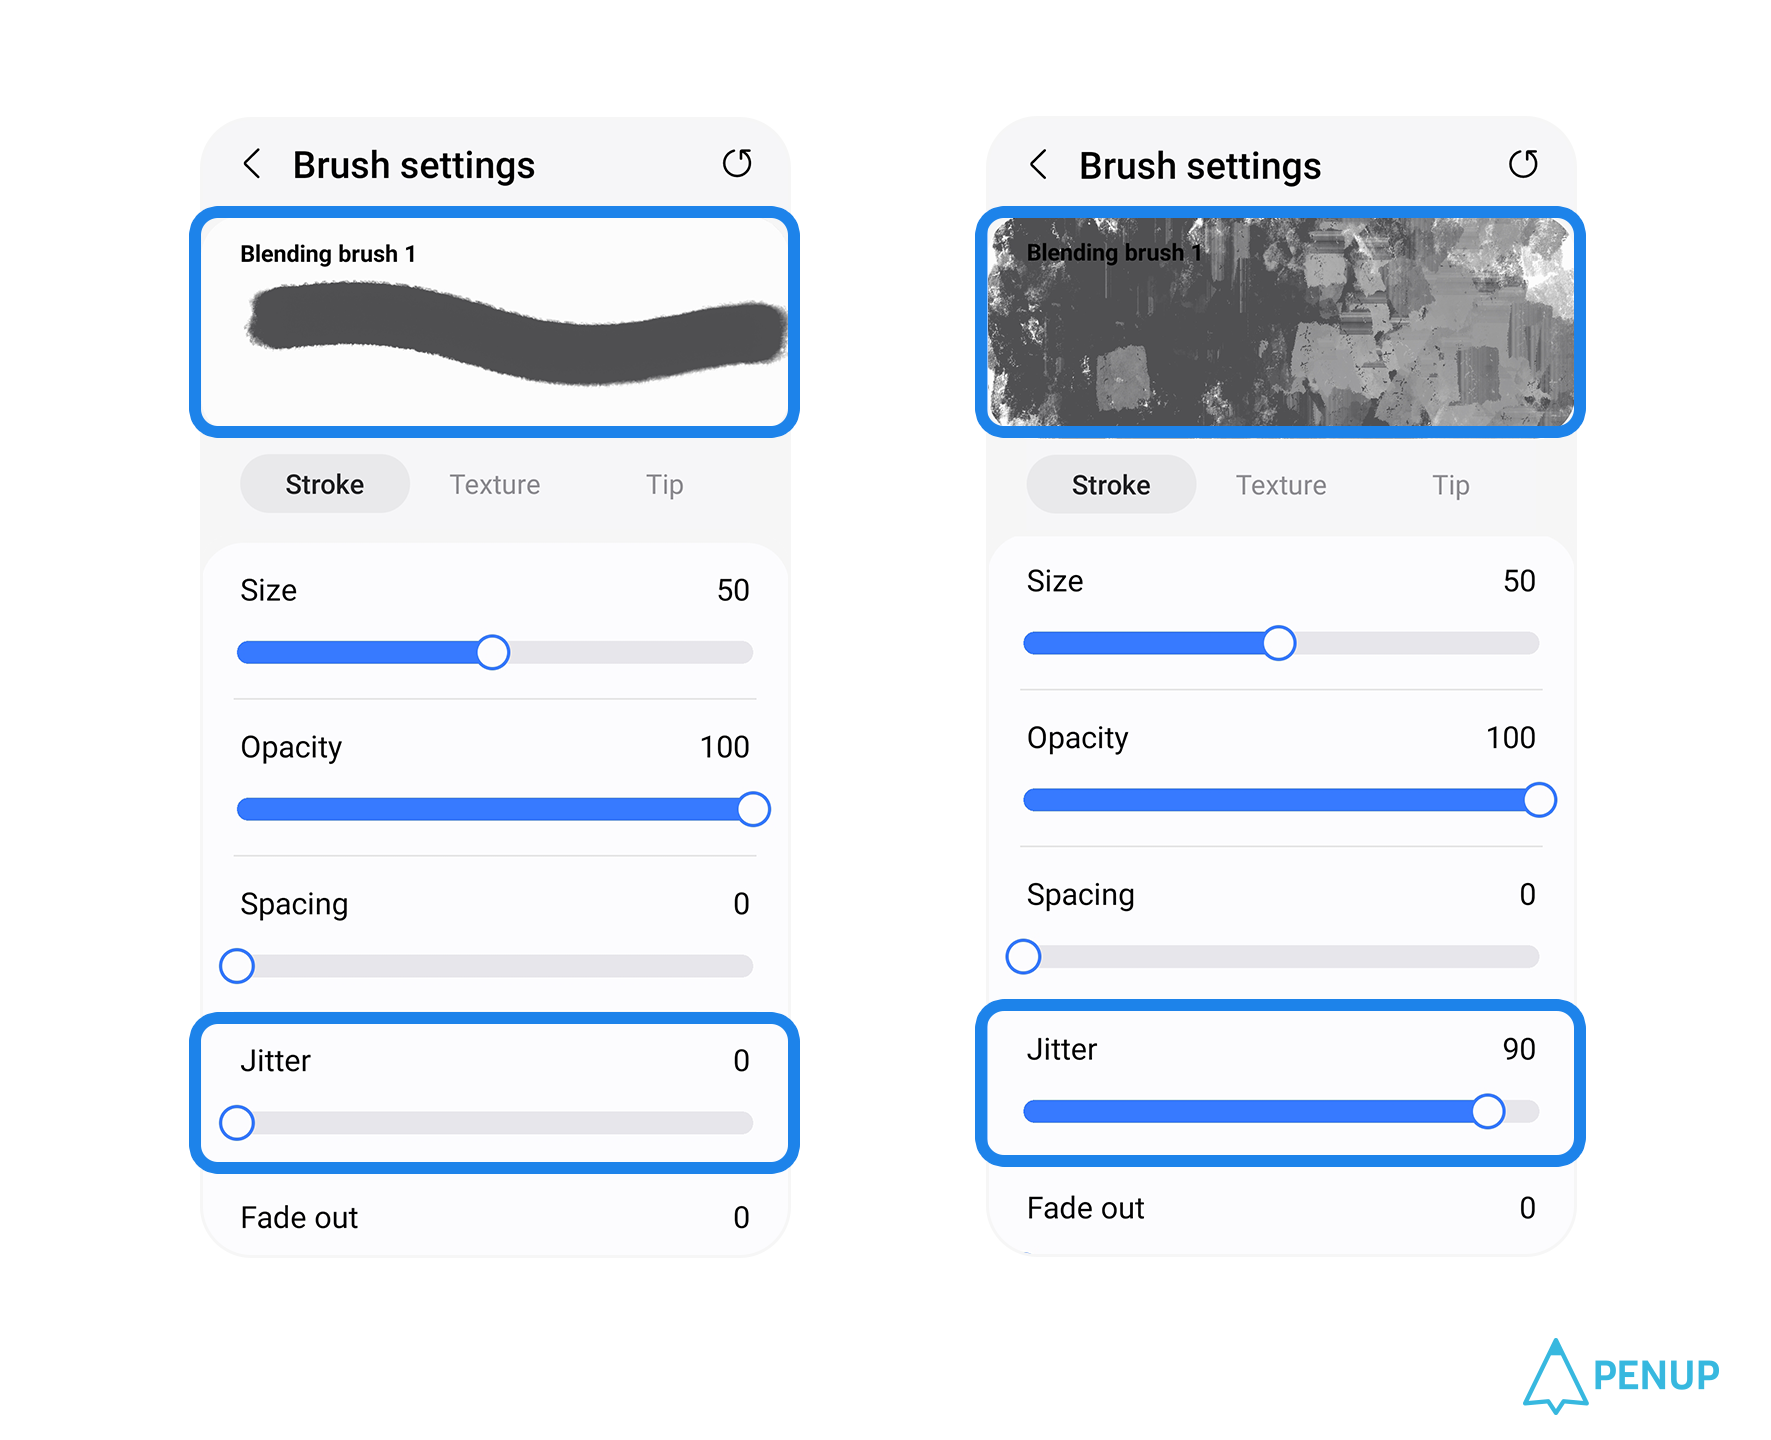
‘Jitter’ essentially adjusts
the distribution of your Stroke.
Jitter runs from 0 to 100,
with 100 being the widest line,
and 0 being the narrowest line.
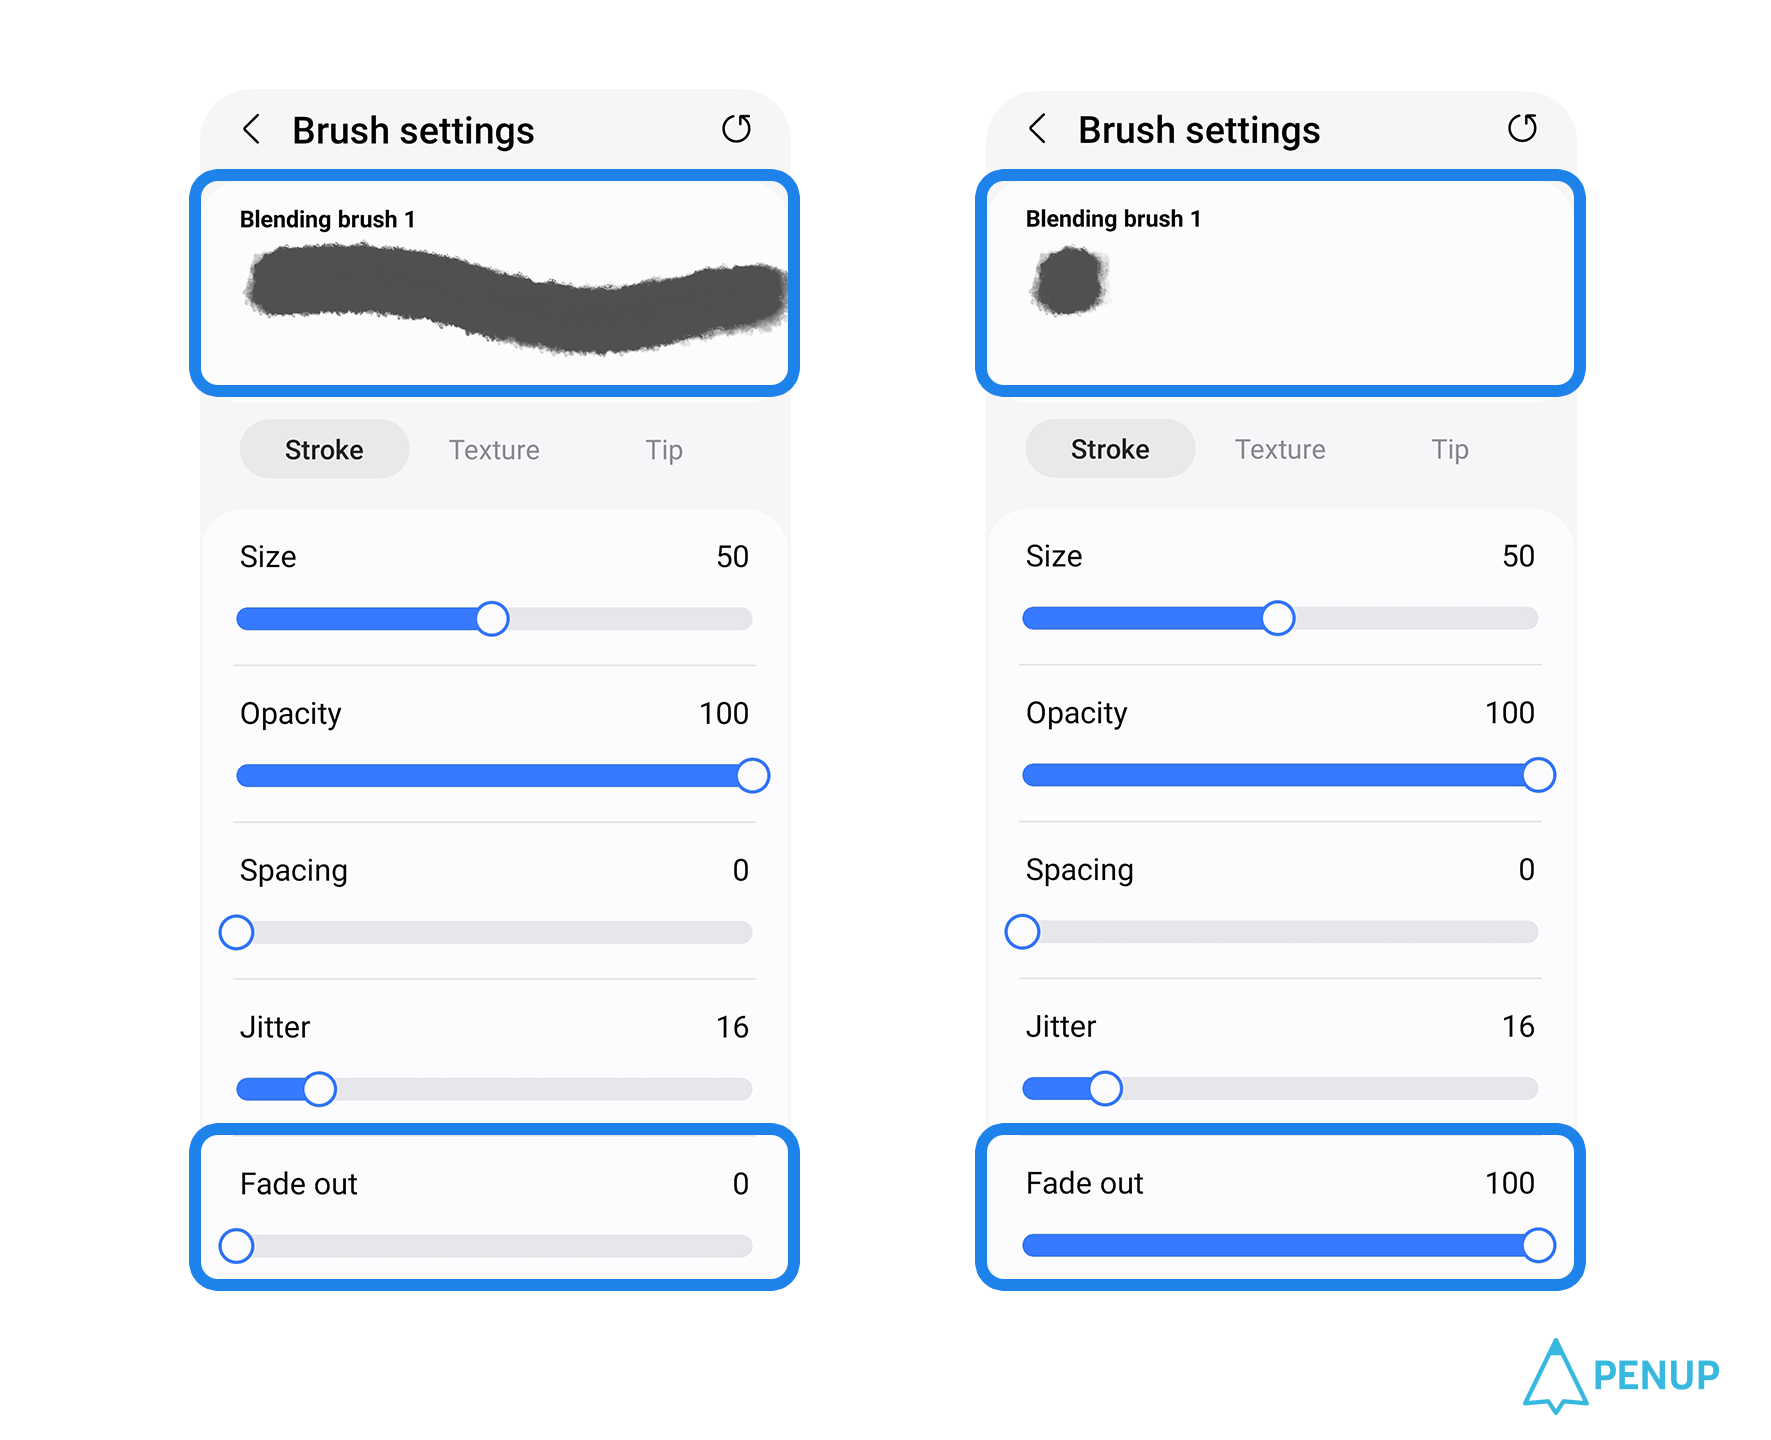
Lastly, 'Fade out' determines
the overall length of your brush.
If you set it to 0,
you’ll get an unbroken stroke,
whereas if you set it closer to 100,
your stroke will fade out
more toward the end.
The second setting option, Texture
The next thing you should look into
is the ‘Texture’.

‘Texture’ determines the grain
that creates the shape and texture
of your brush.
More specifically,
you can change the shape and grain
to adjust the overall texture.
If you press the ‘Reset’ button,
you can revert to the original shape
and grain you started with.
2-1 Shape
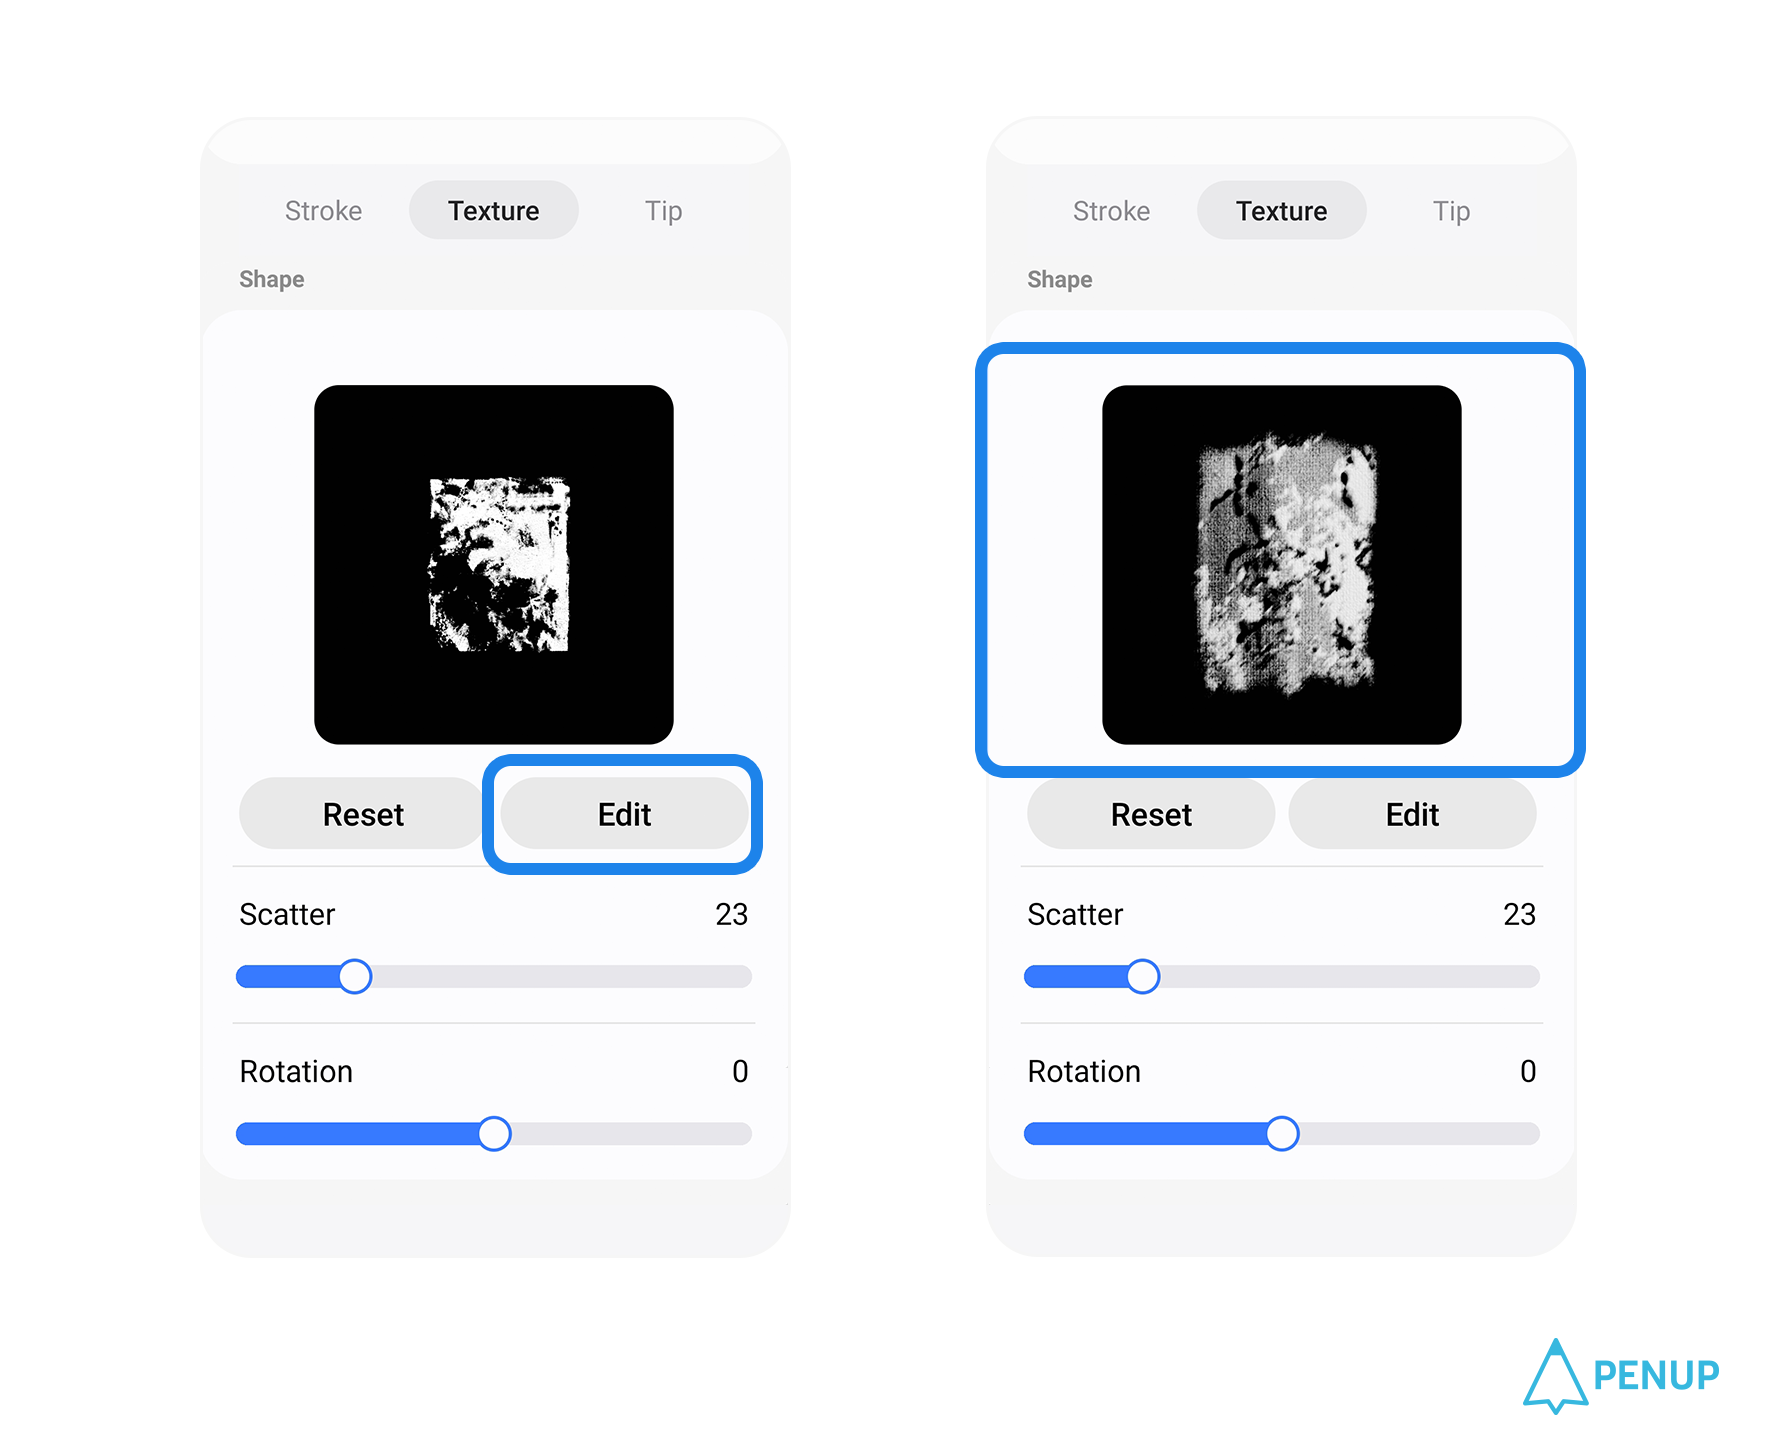
When you press the ‘Edit’ button
in the ‘Shape’ menu,
you can use a photo or image saved
in your gallery app as the shape
of the brush.
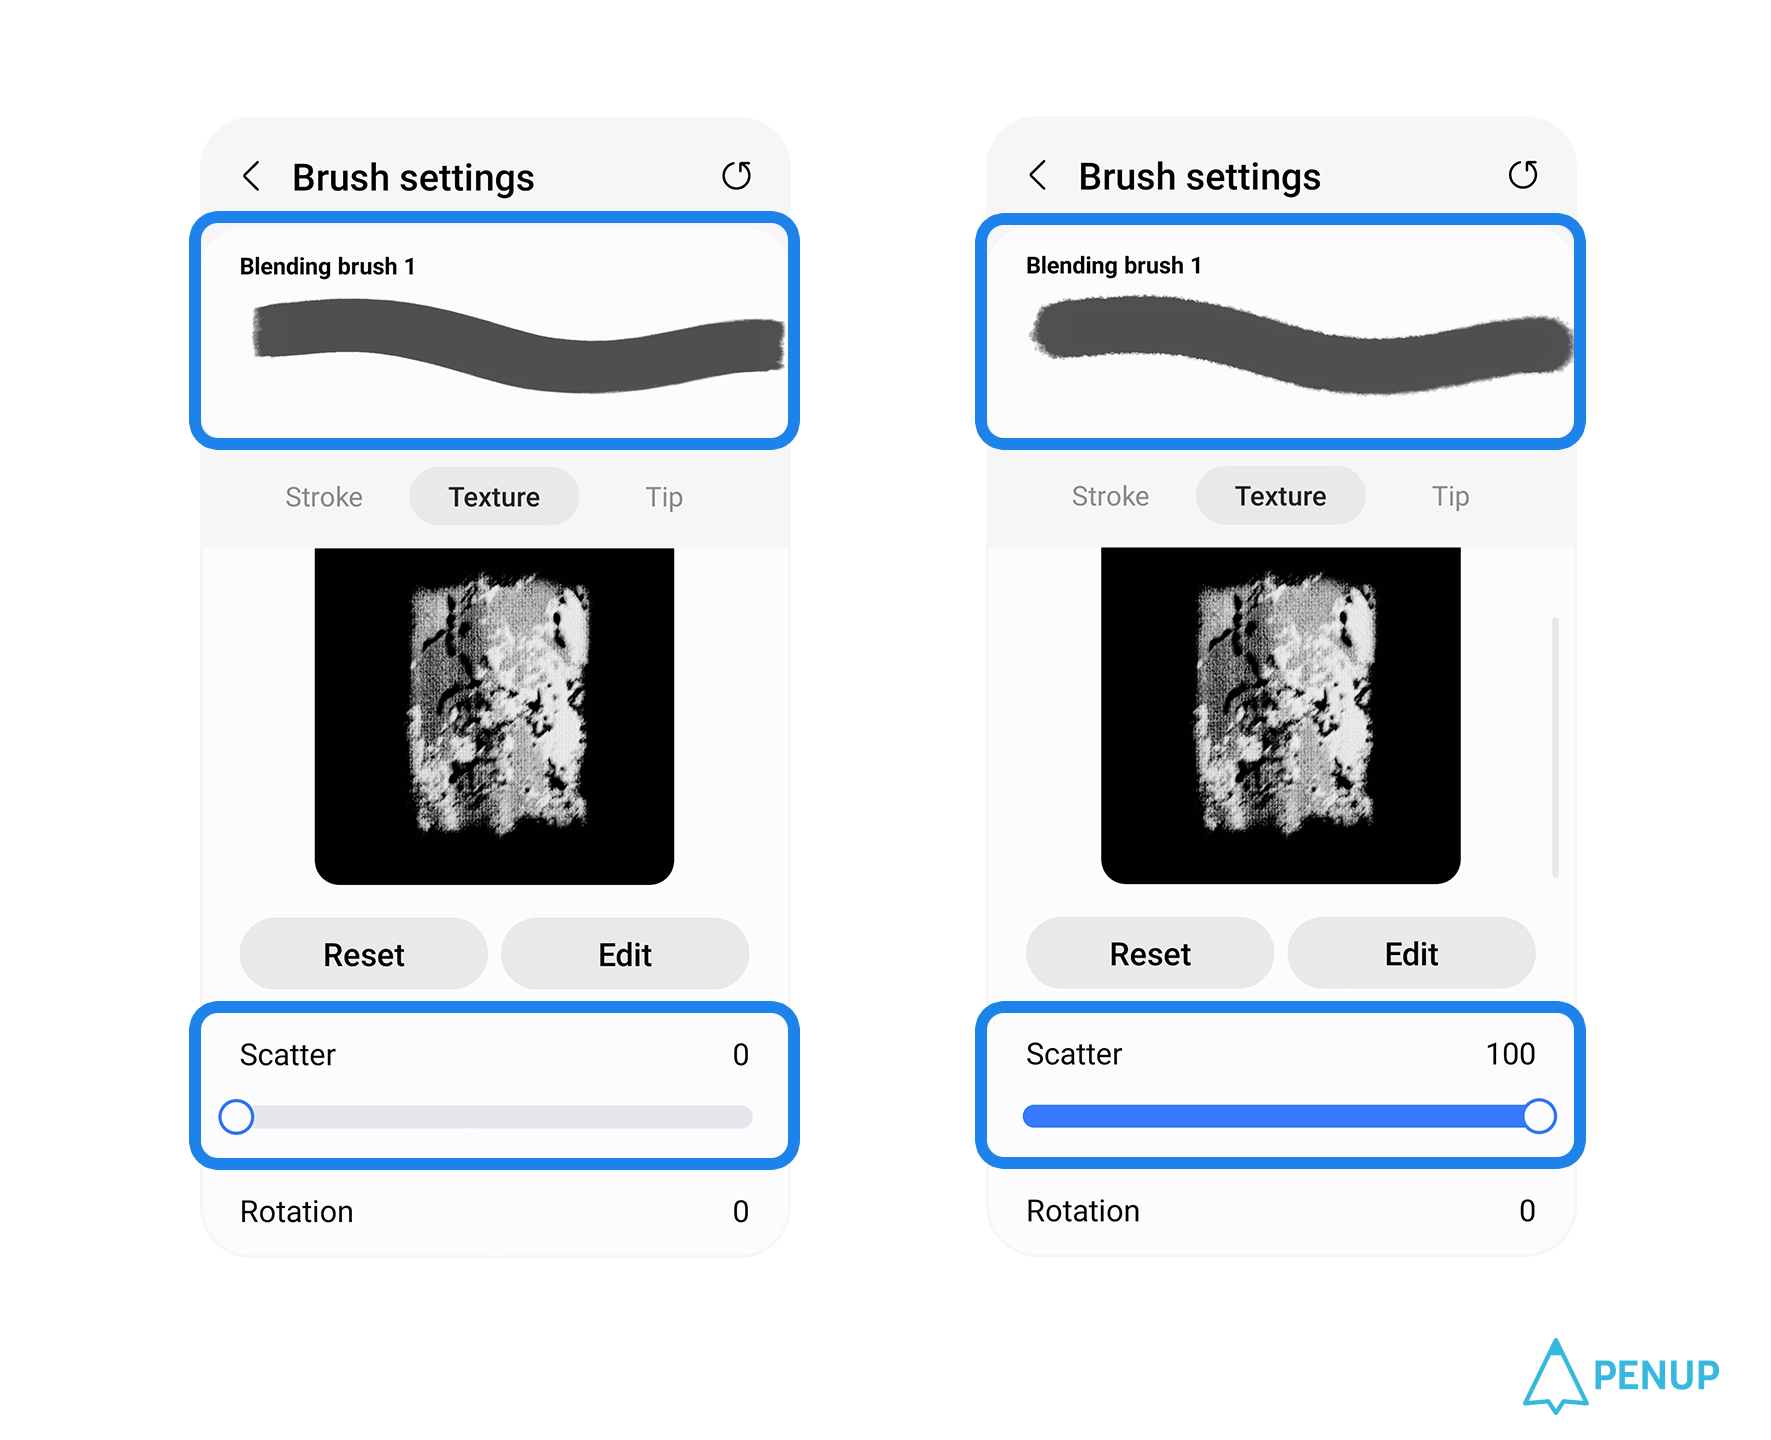
Meanwhile, the ‘Scatter’ option
in ‘Shape’ is a function
that scatters the shape
you have chosen around the stroke.
Scatter can go from 0 to 100,
with 100 scattering the image
the widest.
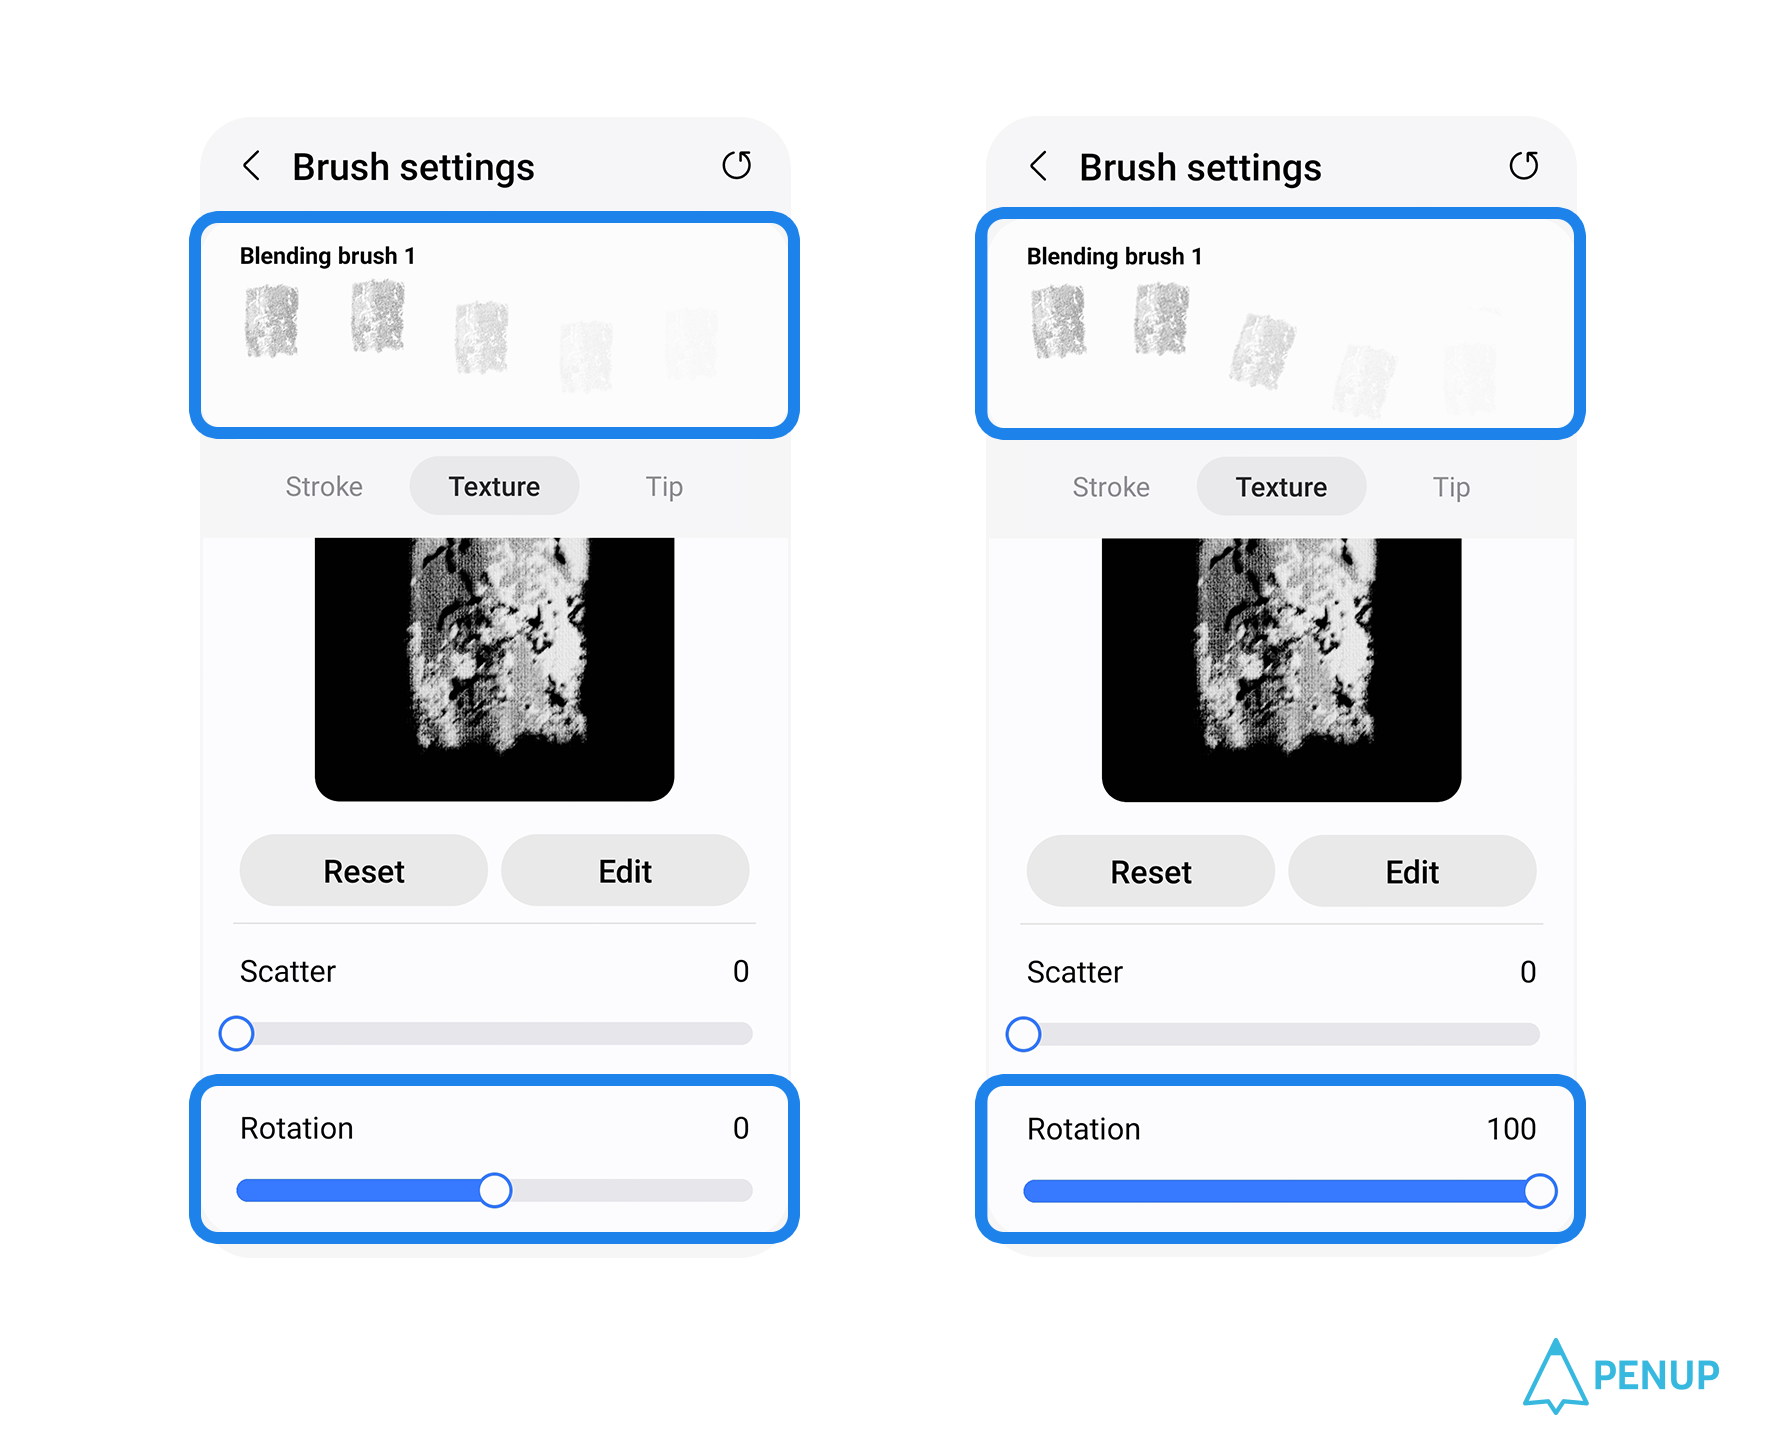
‘Rotation’ can be adjusted
from -100 to +100,
where a plus value rotates the brush
counterclockwise, and a minus value
rotates it clockwise
in the same position.
2-2 Grain
Grain is an item
that determines the specific texture
of your brush.
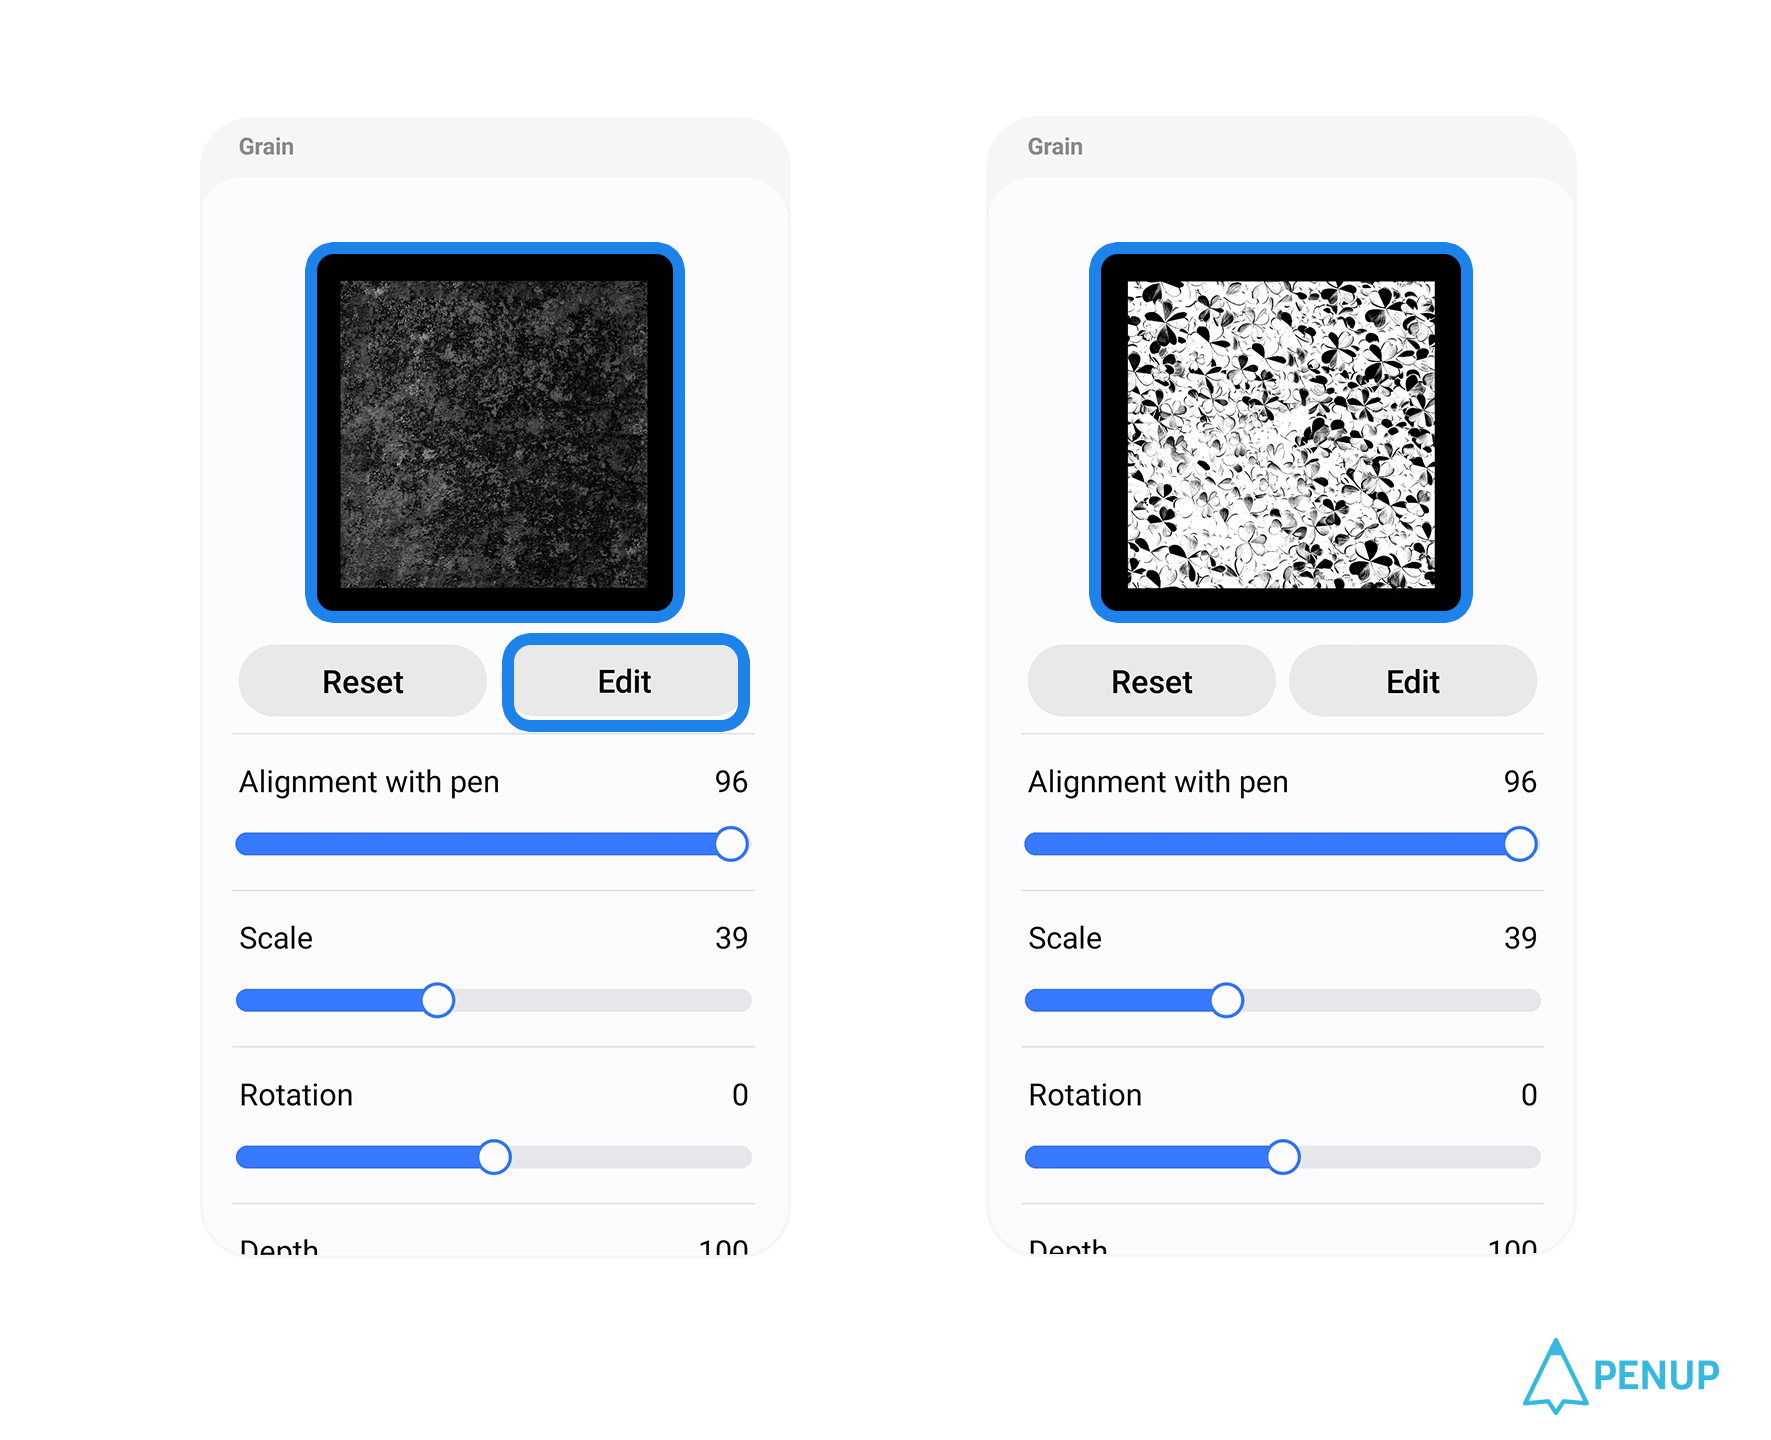
Here,
if you press the Edit button
in ‘Grain’,
you can load an image or photo
to use as the shape of your Grain.
And again,
if you want to return
to your original image,
all you need to press is
the ‘Reset’ button.
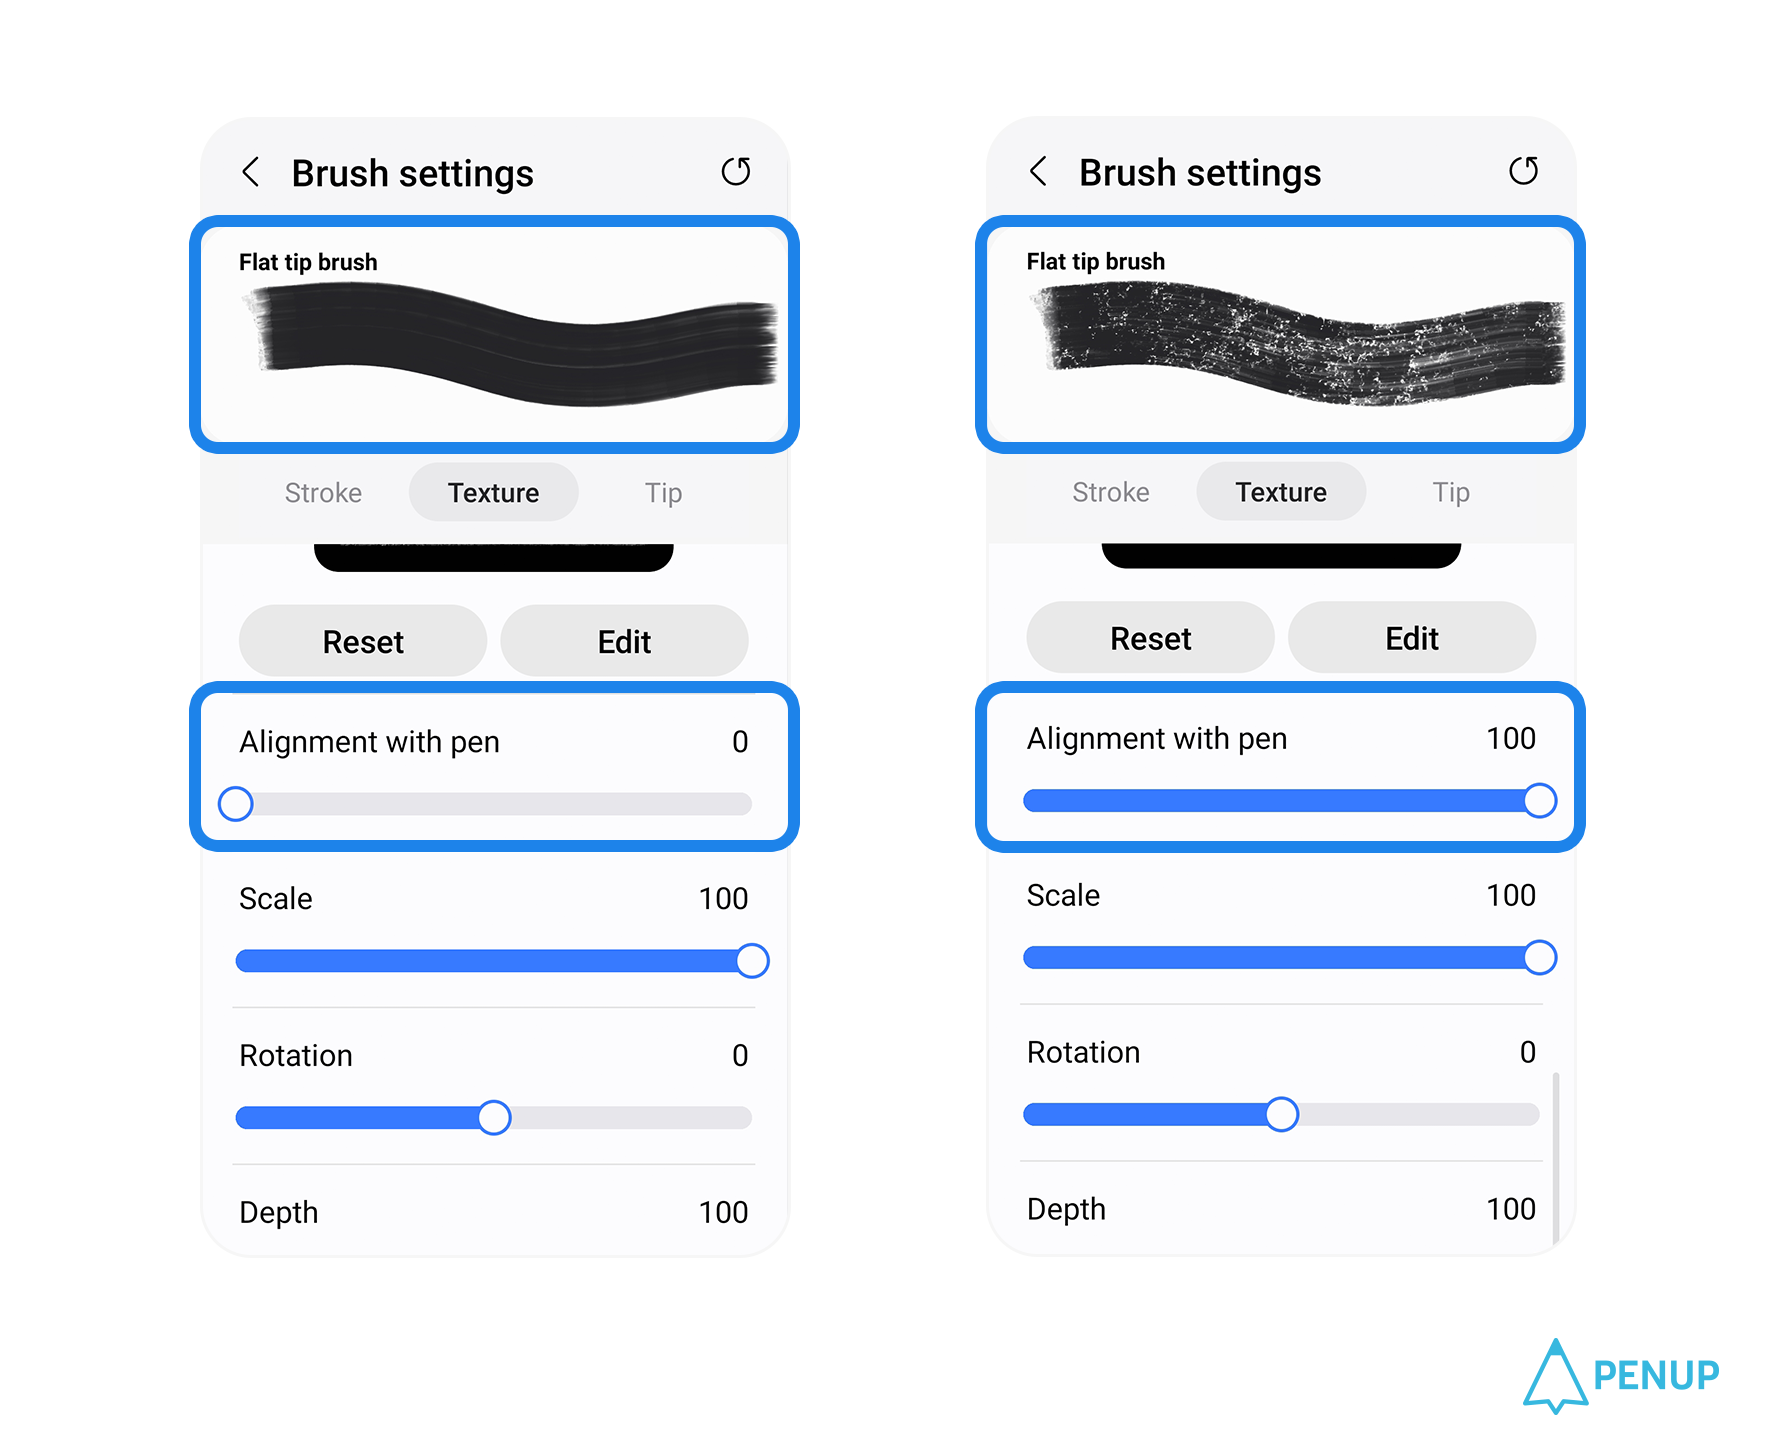
If you adjust
the ‘Alignment with pen’ in ‘Grain’,
You can have the specific shape
of the grain you selected
follow your movement.
Let’s say you've set alignment
closer to 0.
This means a small movement of
your S Pen will end up
moving the grain shape more
(i.e. more smudging)
If you set it closer to 100,
the grain shape will remain
more intact.
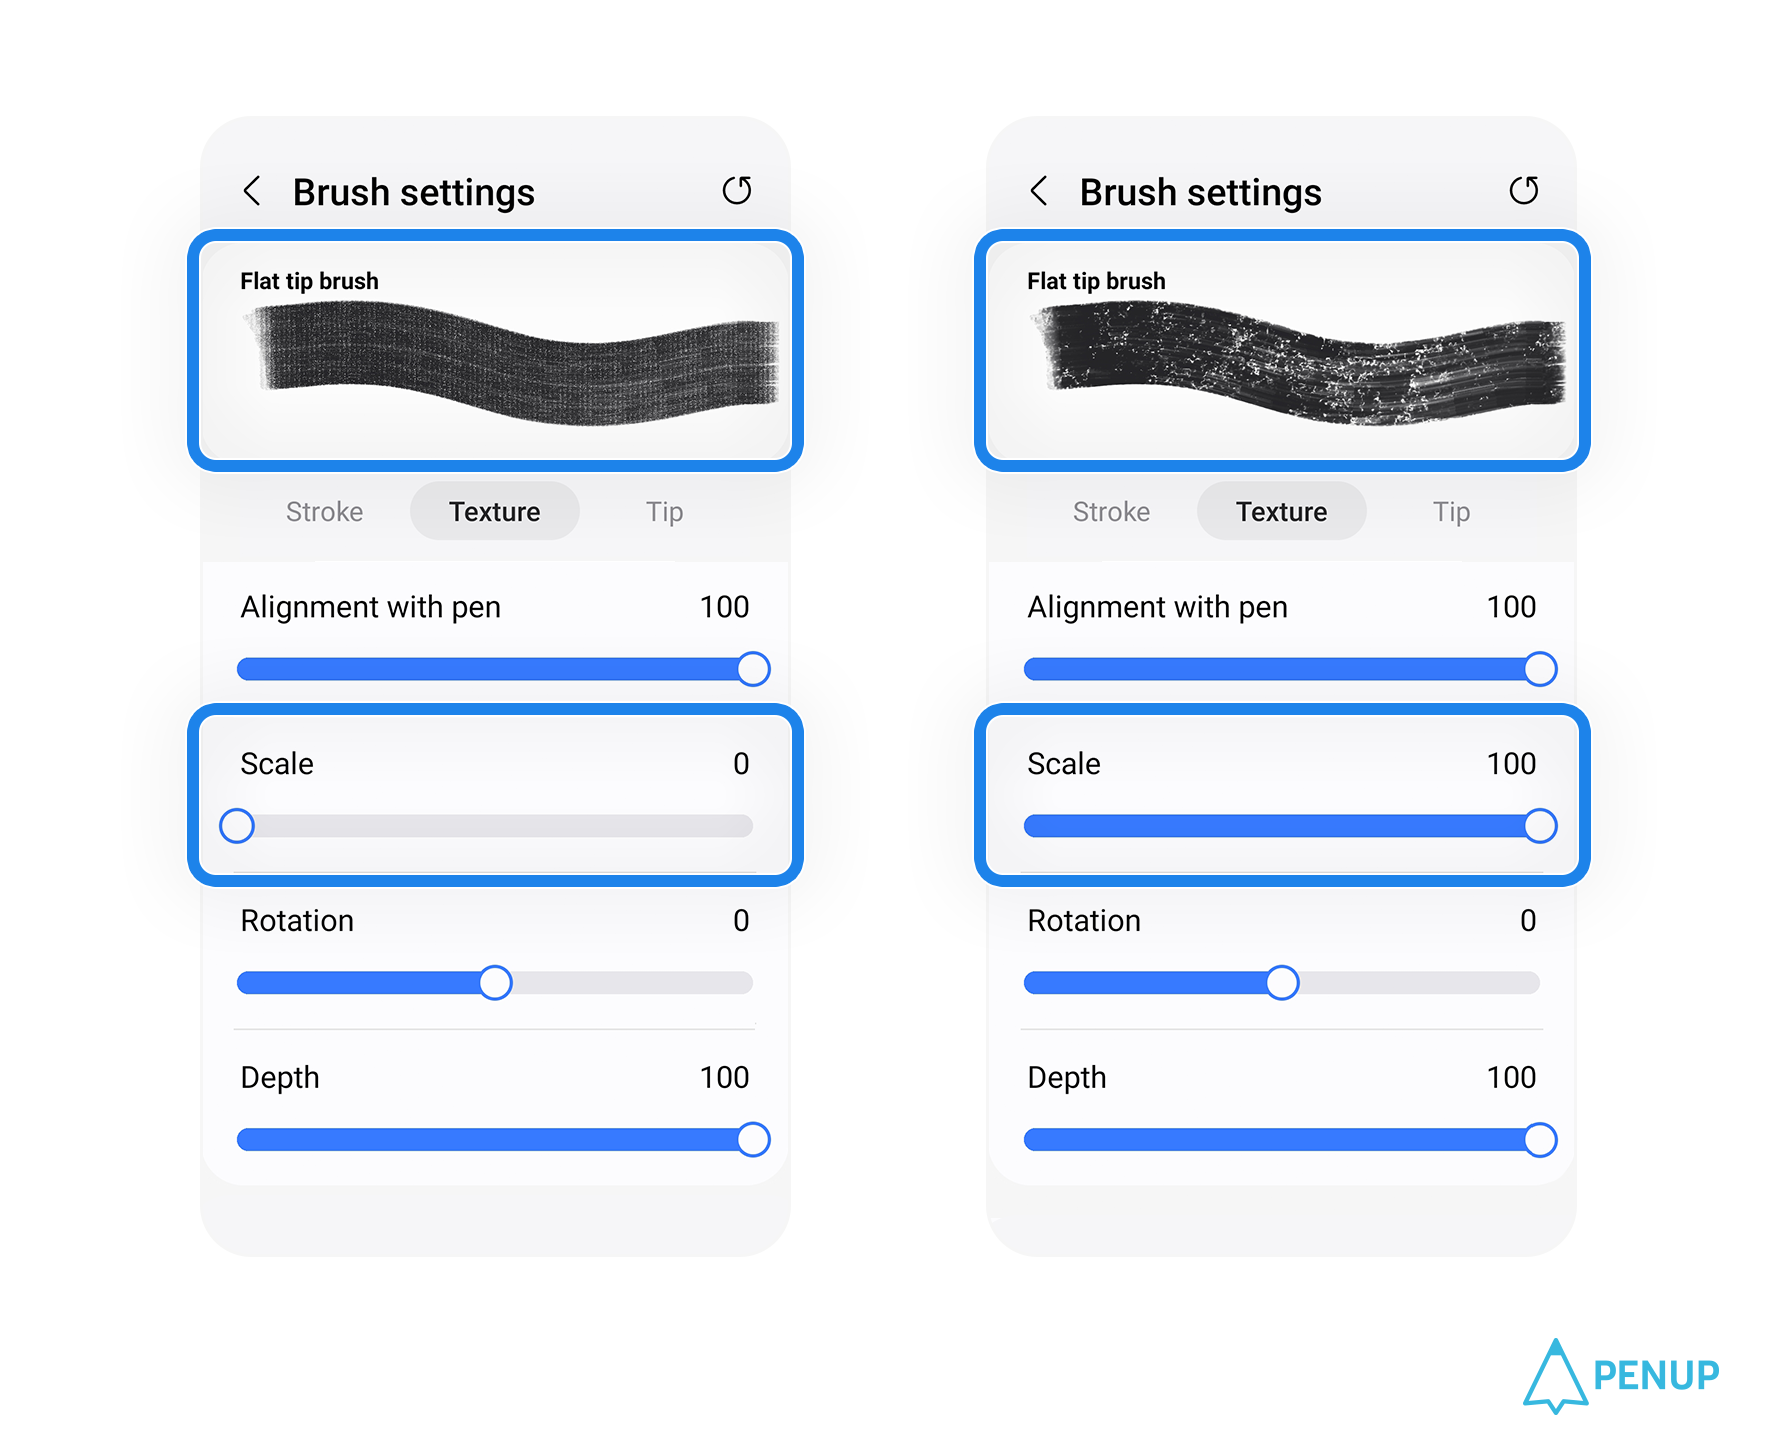
Next, with ‘Scale’,
you can change the size
of your grain.
Set it closer to 0,
and your grain shape
will appear smaller,
set it closer to 100,
and your grain shape will appear
larger within your stroke.
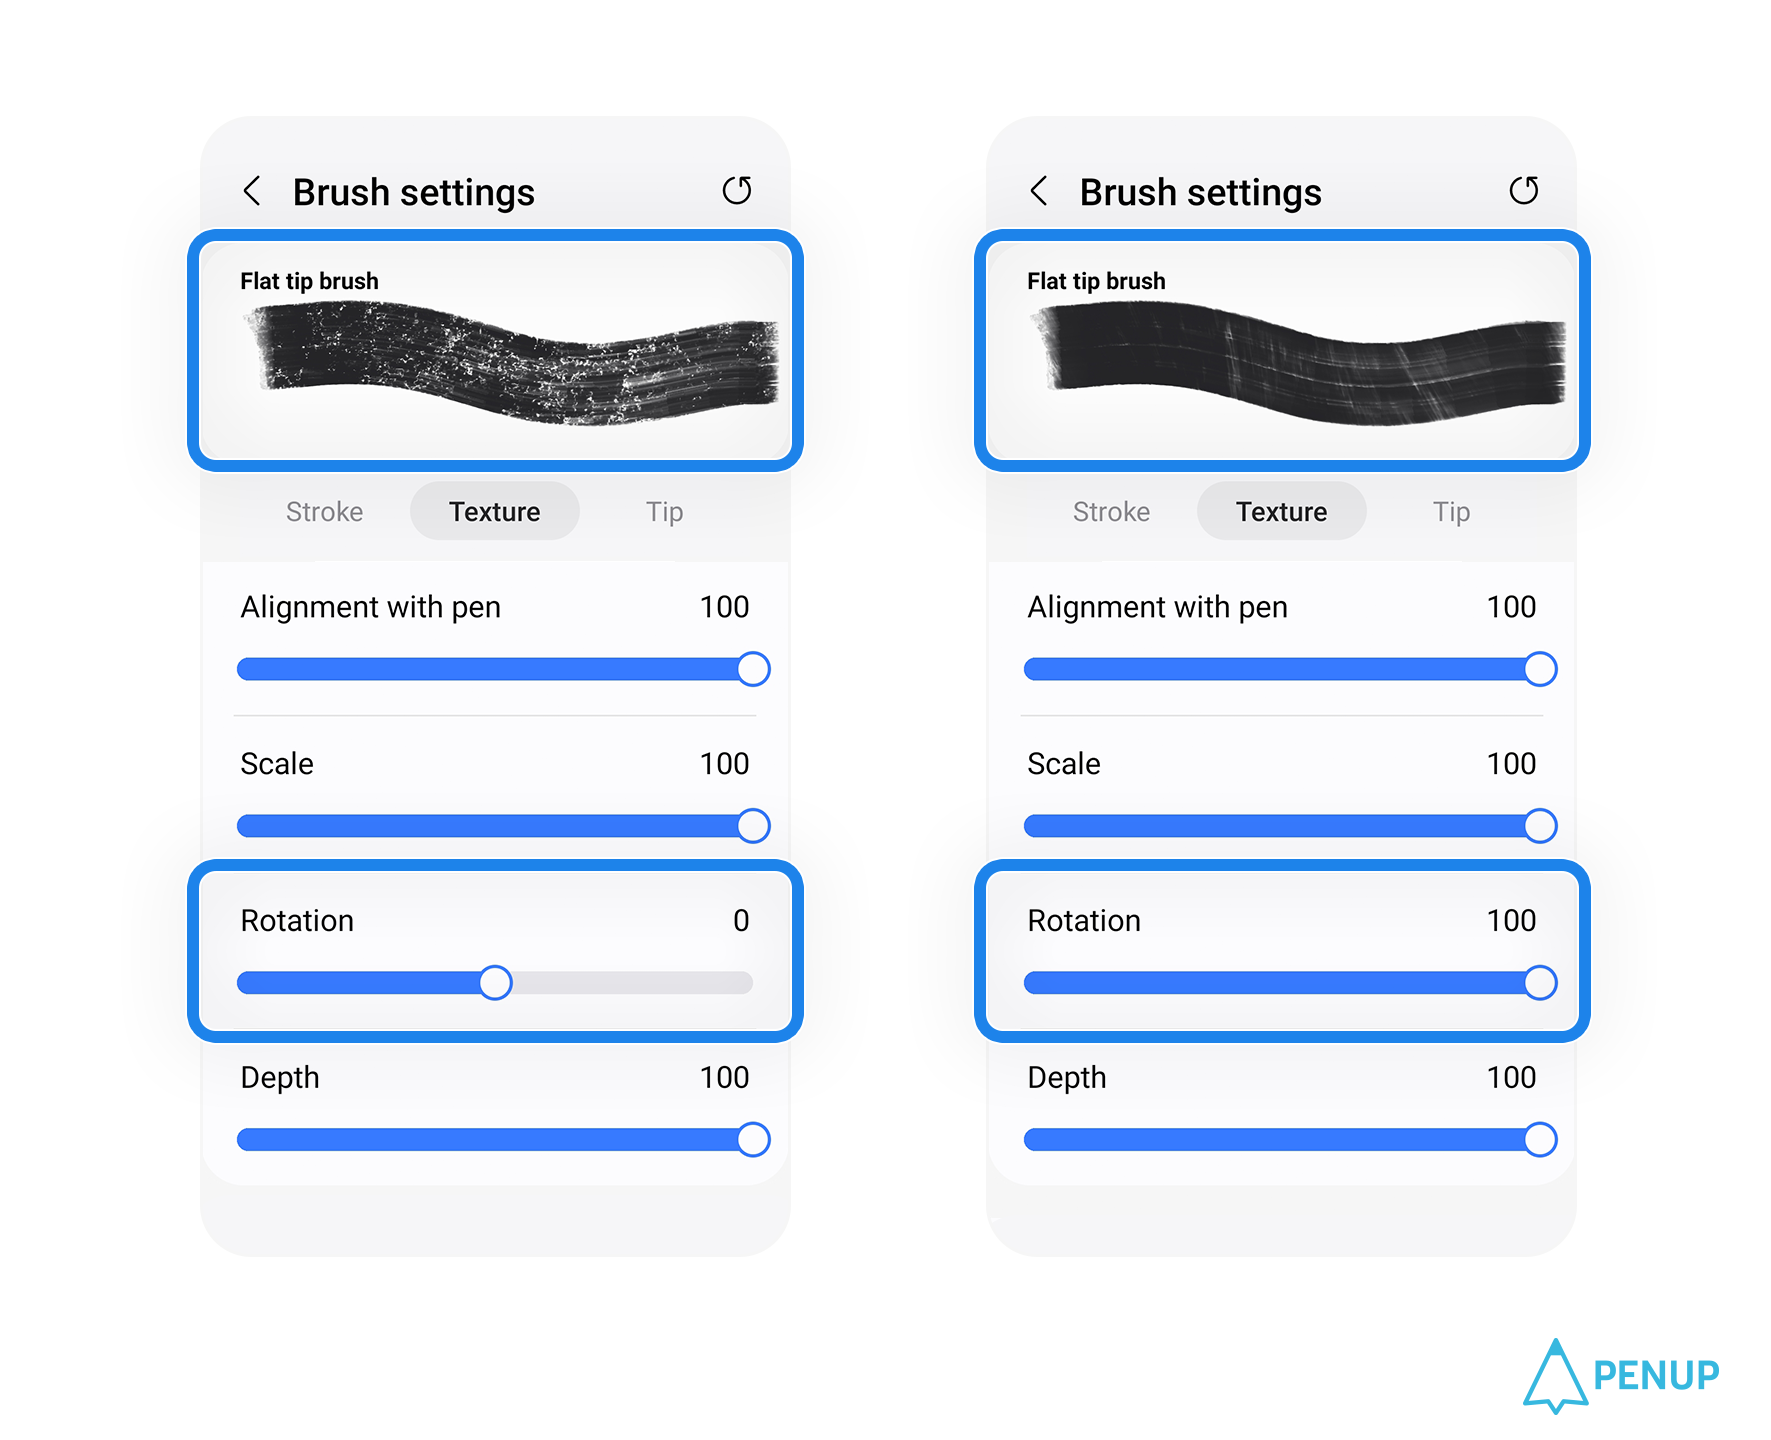
As for ‘Rotation’,
you can choose a value
from -100 to +100.
Again, a plus value
equals a counterclockwise rotation,
whereas a minus value equals
a clockwise rotation.
You can use this to form a path
in line with the direction
of the rotation you set.
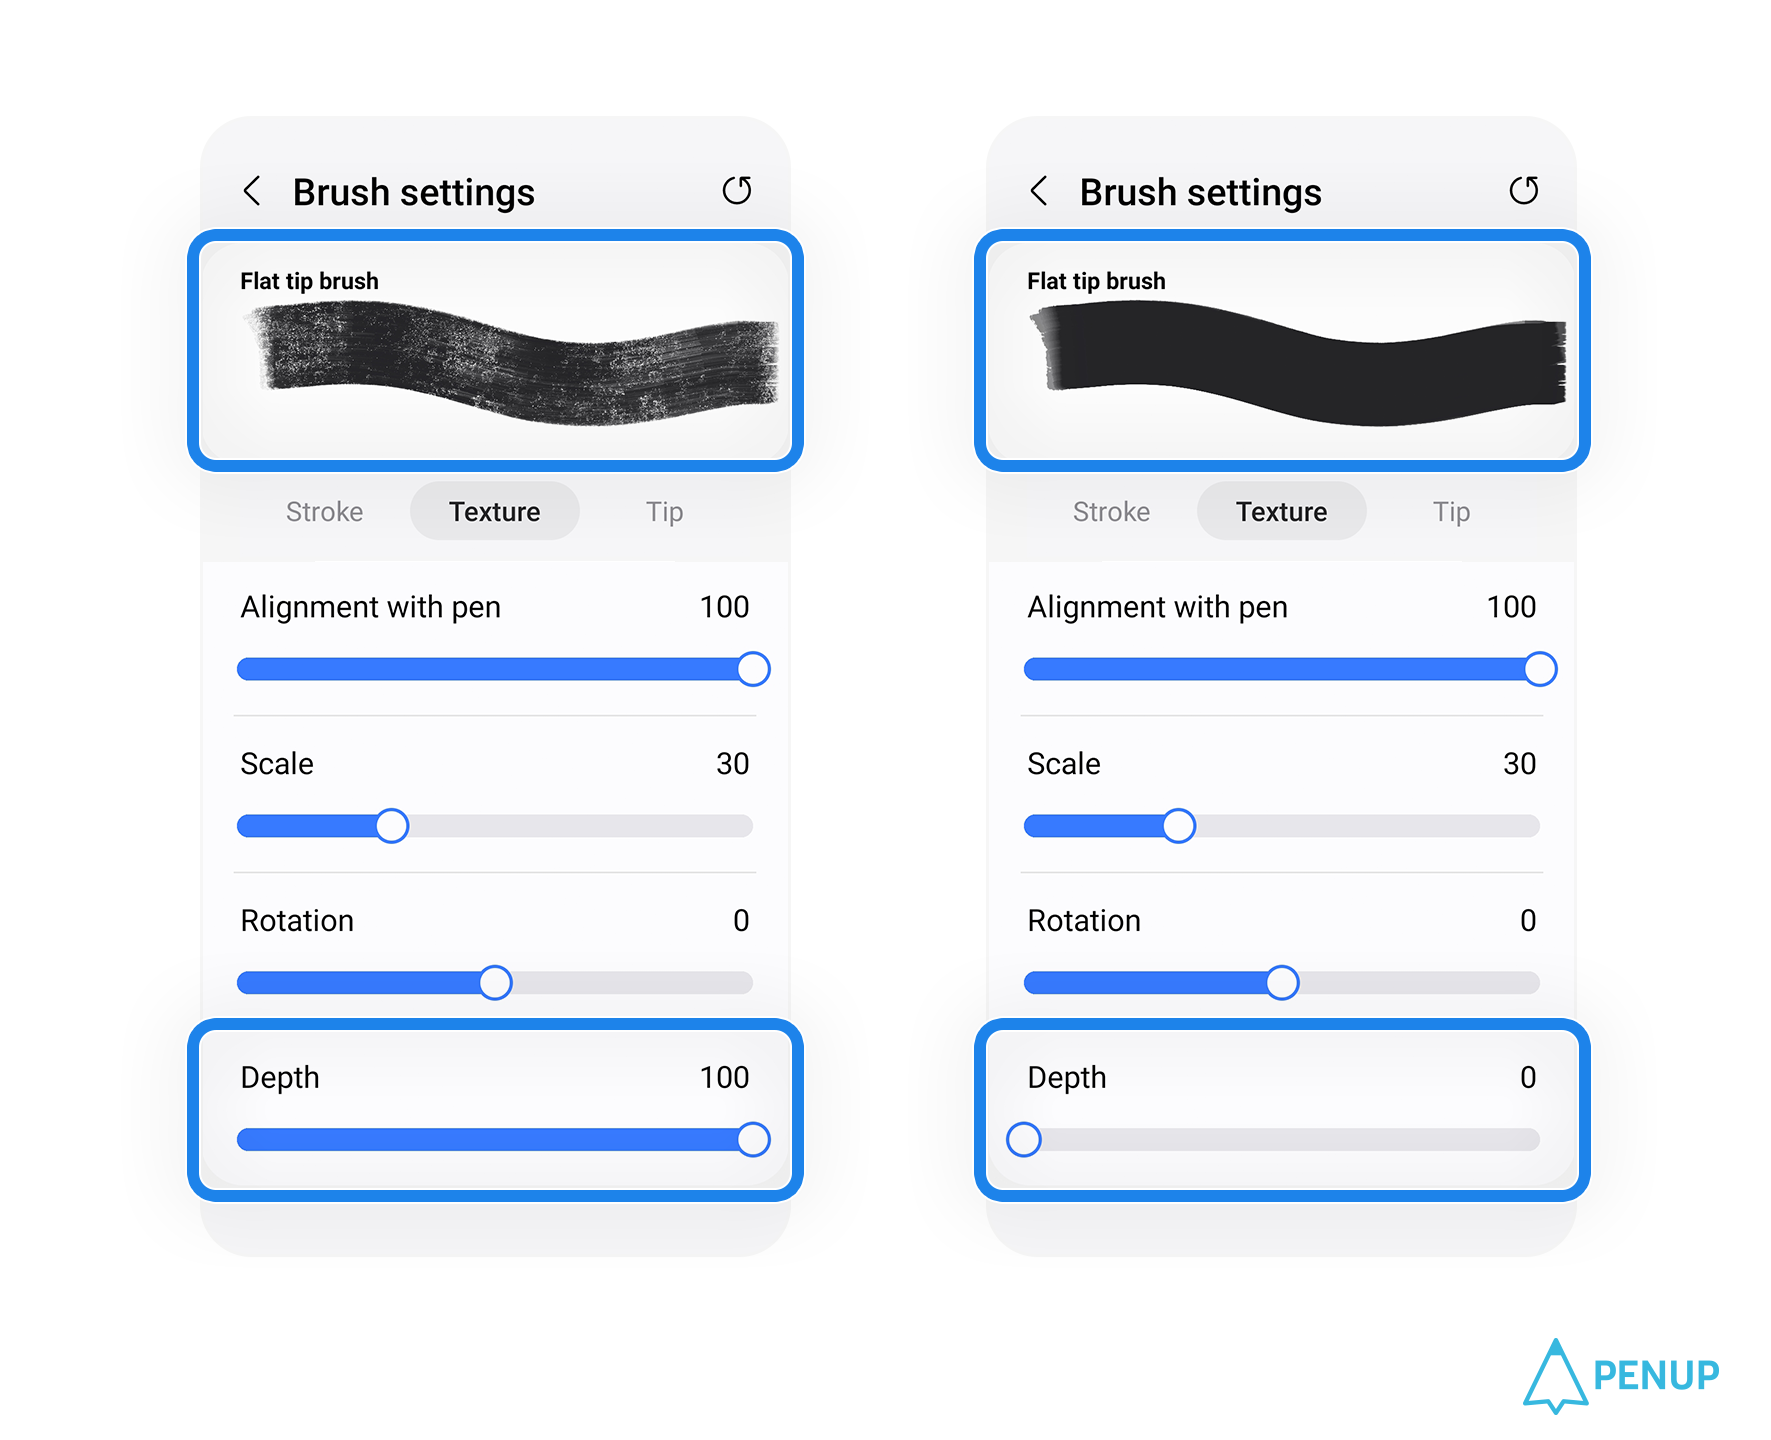
‘Depth’ determines the shading
of your source image/photo.
A value closer to 100
sharpens up the grain shape,
whereas a value closer to 0
turns the darker parts of the grain
become brighter,
making the grain shape appear
relatively ambiguous and unclear.
The third setting option, Tip
The third thing you can adjust
with your brush is 'Tip',
provided that you’re using an S Pen.
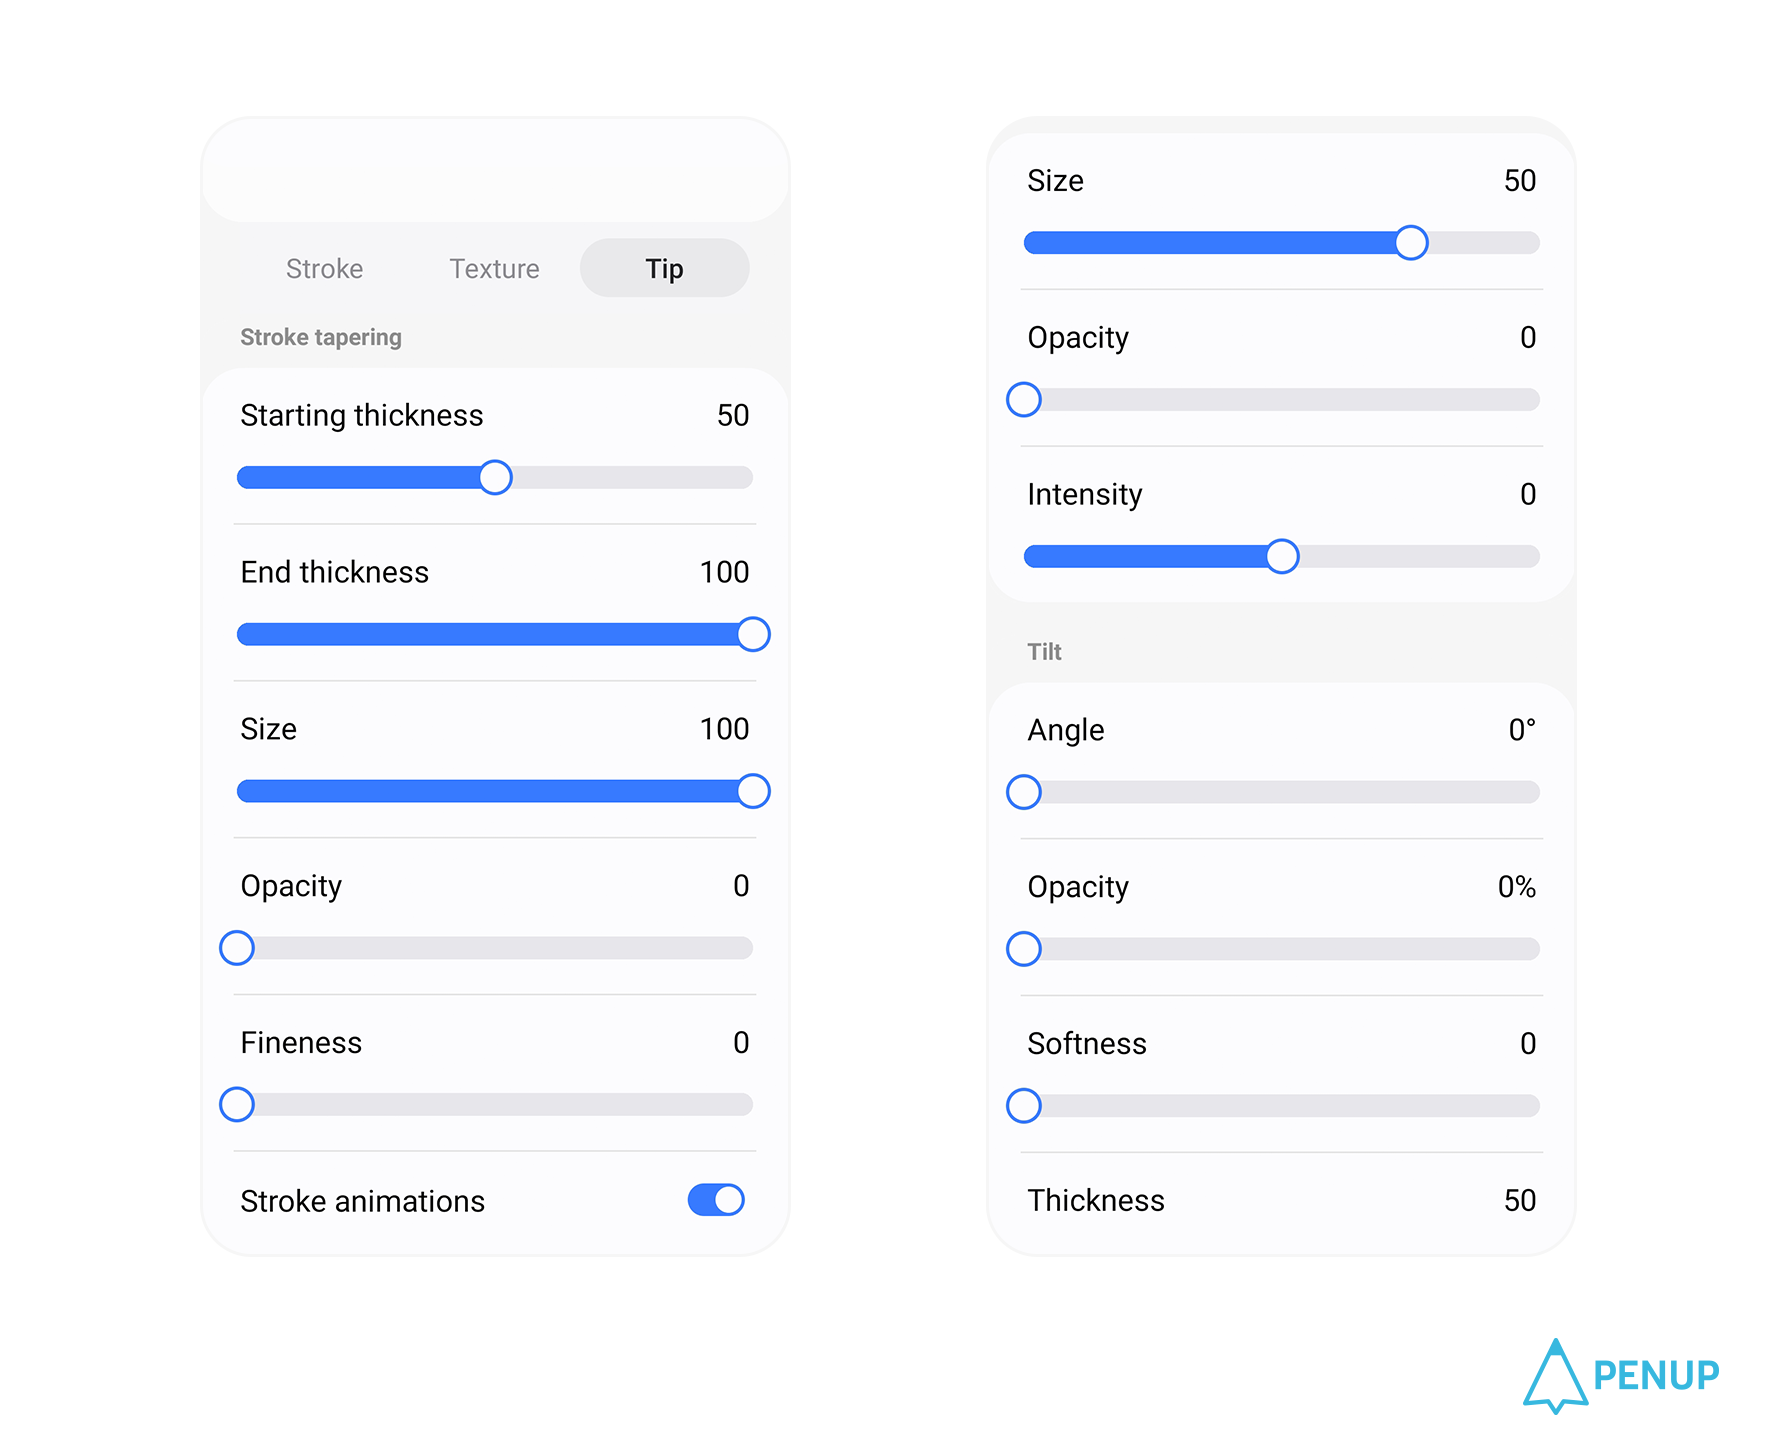
The Tip page is divided into
Stroke Tapering, Pressure, and Tilt.
Remember,
this applies when you're drawing
with an S Pen only.
If you're drawing by hand,
changing things in Tip won’t change
anything or add any effects
to your brush.
3-1 Stroke tapering
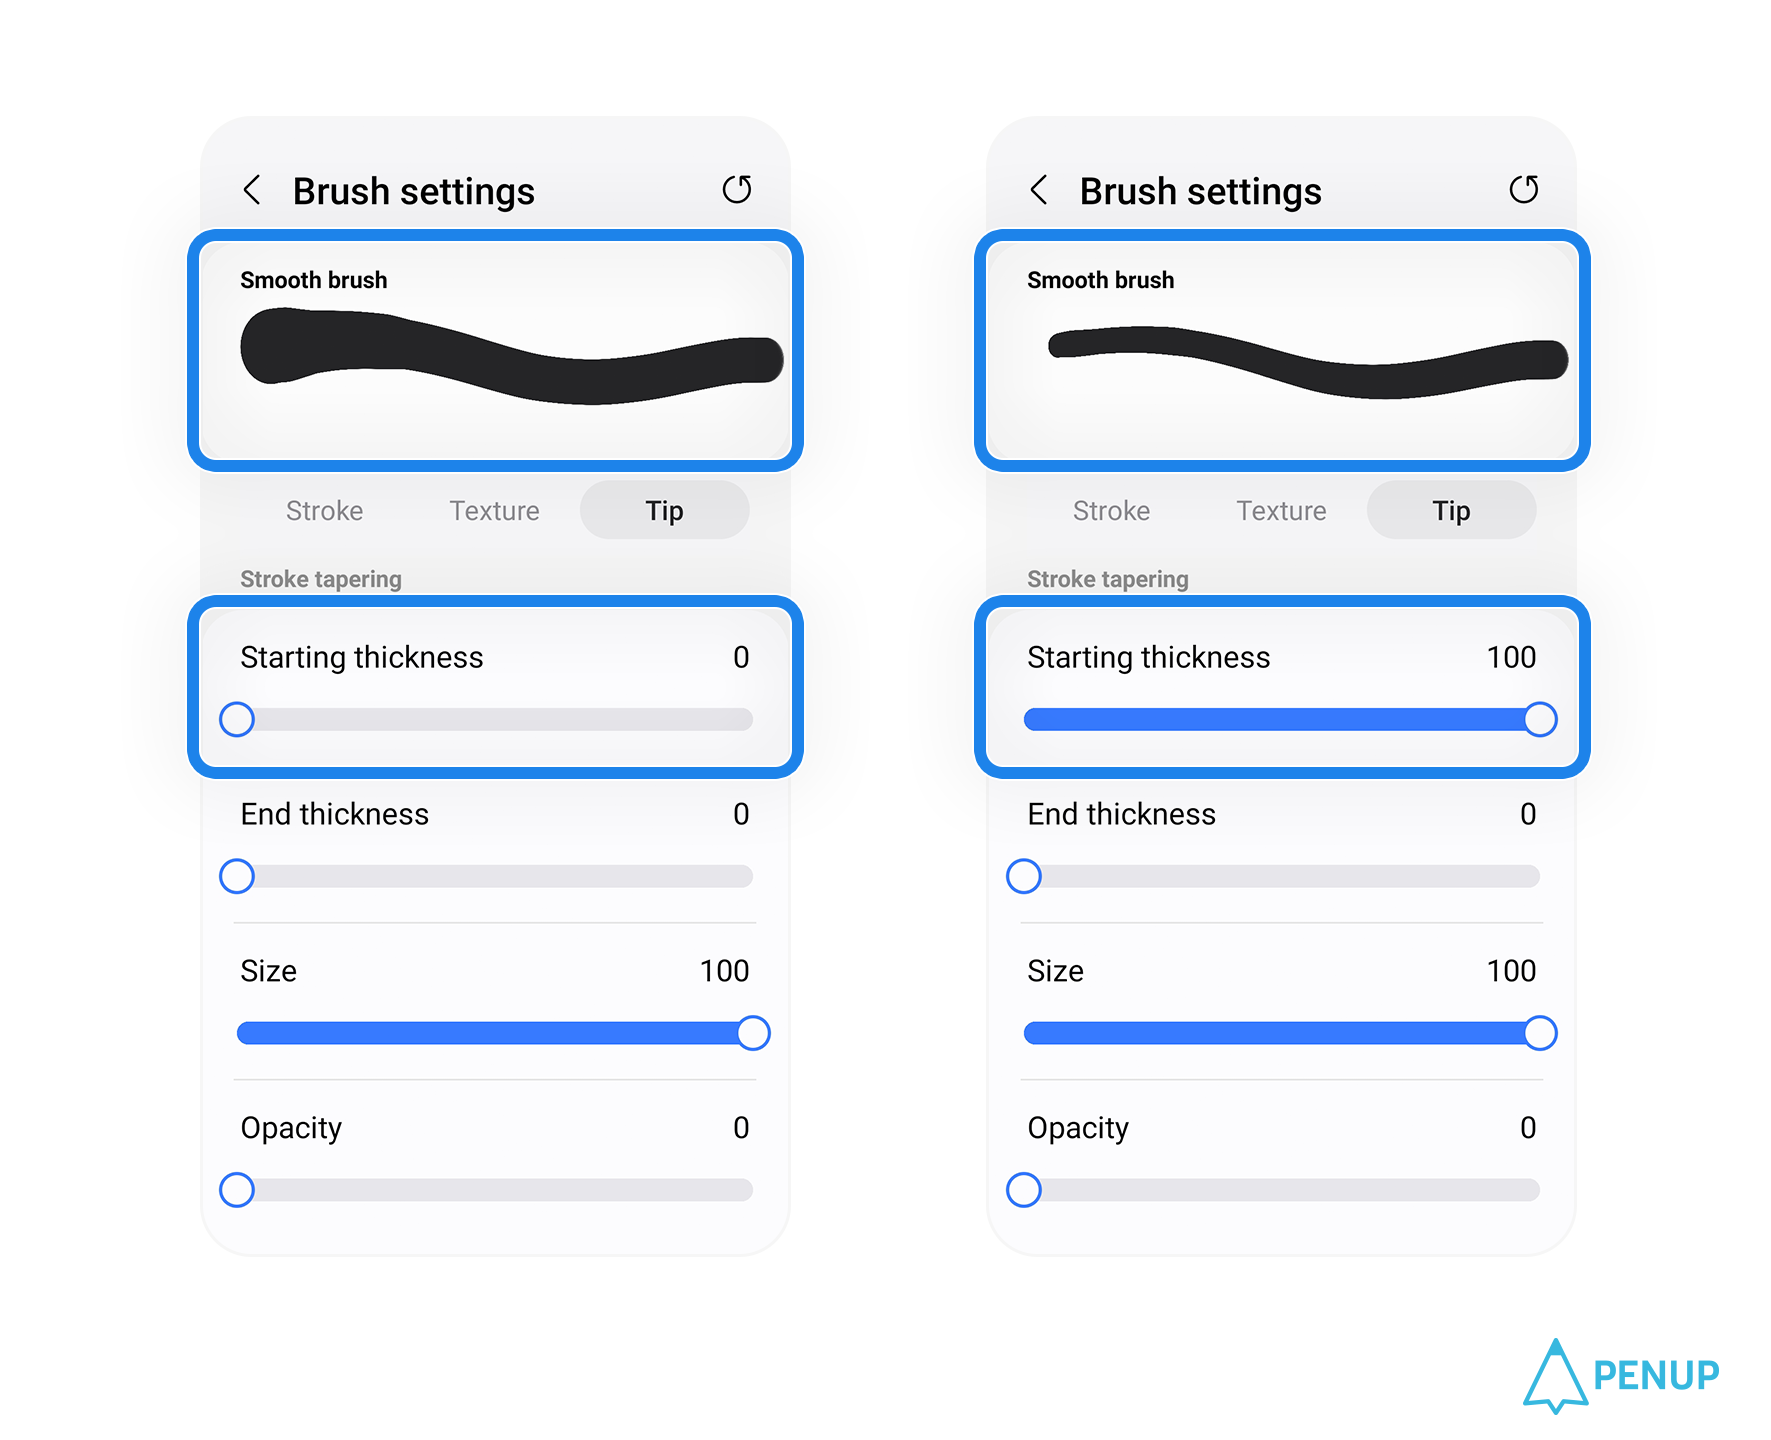
If you adjust the
'Starting thickness'
and 'End thickness'
in 'Stroke tapering',
you can make both ends
of your stroke thinner.
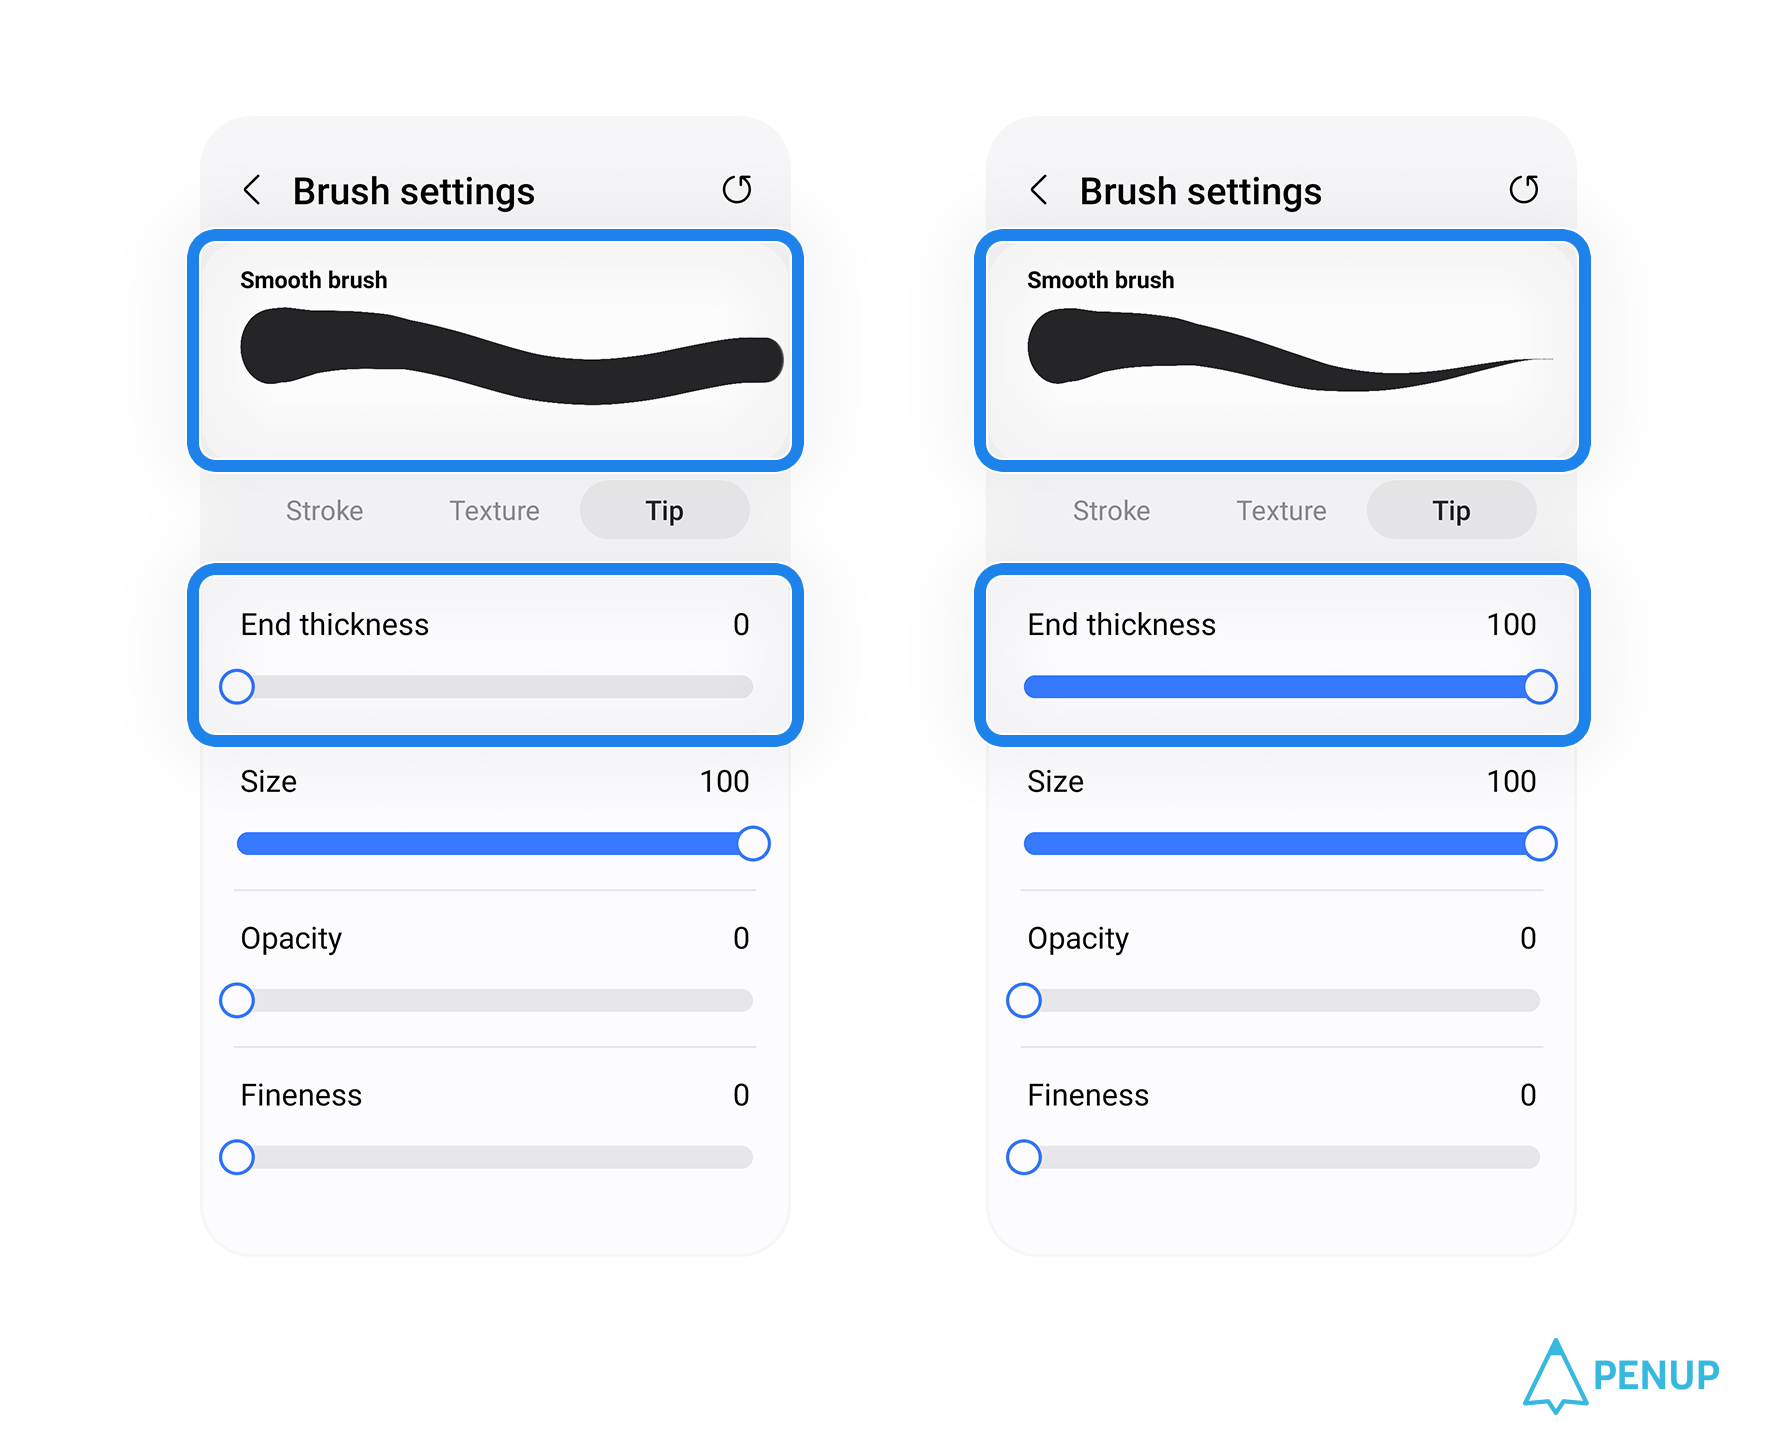
You can set thickness from 1 to 100,
with a value closer to 100
resulting in a thinner start
or end to your stroke.
The ‘Size’ in Stroke tapering
adjusts the final thickness
of each end of your stroke.
If Size is 0,
nothing happens to the thickness.
But if you increase the Size
closer to 100,
the start or end of each stroke
will become thinner.
If the Starting Thickness
or End Thickness is 0,
adjusting the ‘Size’ will not
have any effect on the stroke.
Adjusting the ‘Opacity’
also requires having a value
other than 0 specified for
starting Thickness and end Thickness.
You can adjust the opacity on both
ends from 0 to 100.
The closer it is to 100,
the more transparent the ends become.
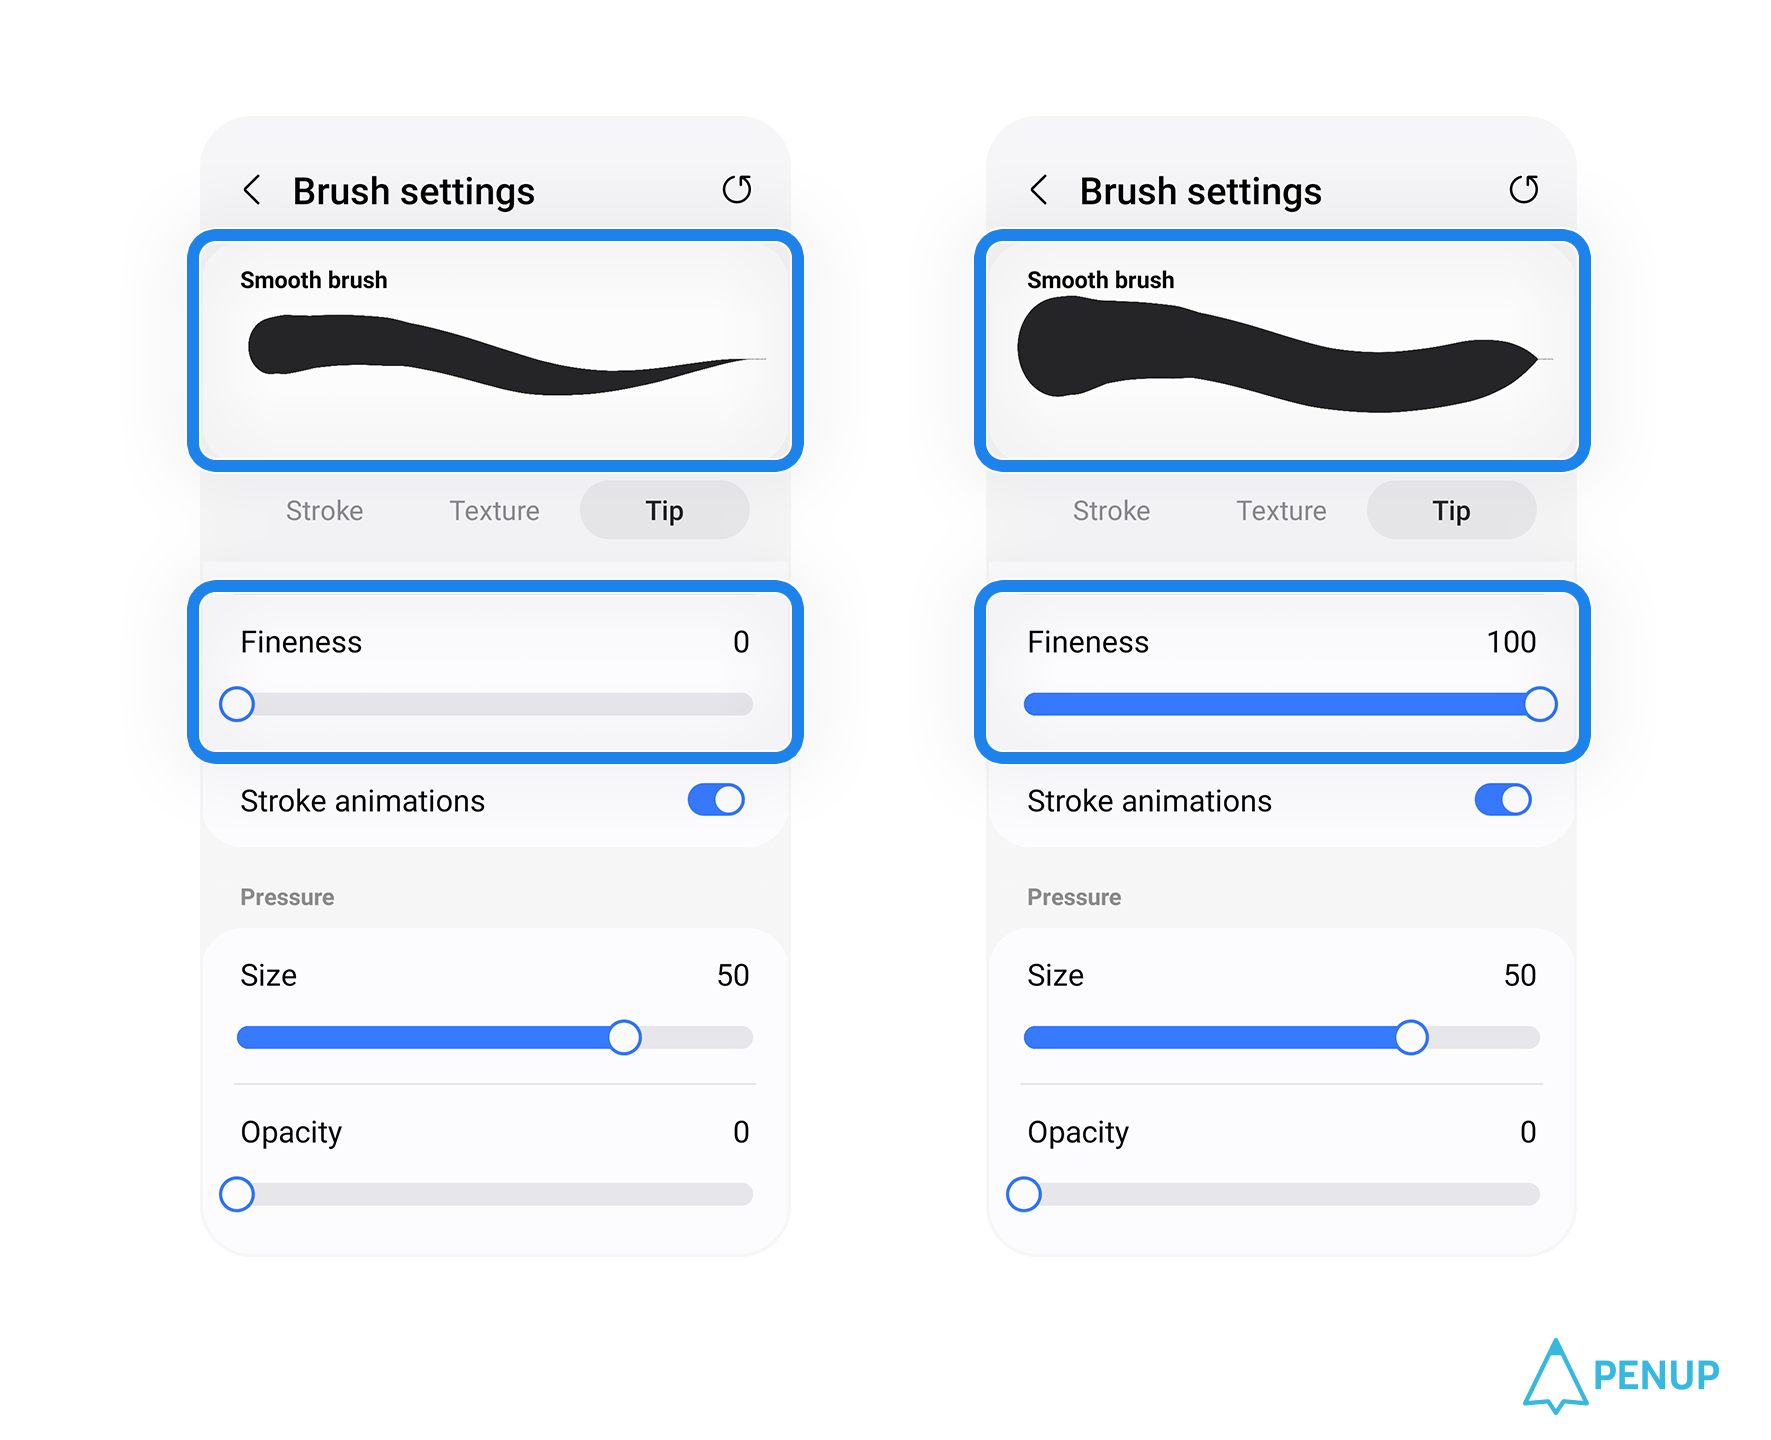
‘Fineness’ helps accurately create
thinner and thicker strokes
depending on the pressure you apply,
just like when drawing
with a real brush.
Fineness can be adjusted
from 0 to 100.
A value closer to 0 mimics
a thinner brush,
whereas a value closer to 100 mimics
a thicker brush.
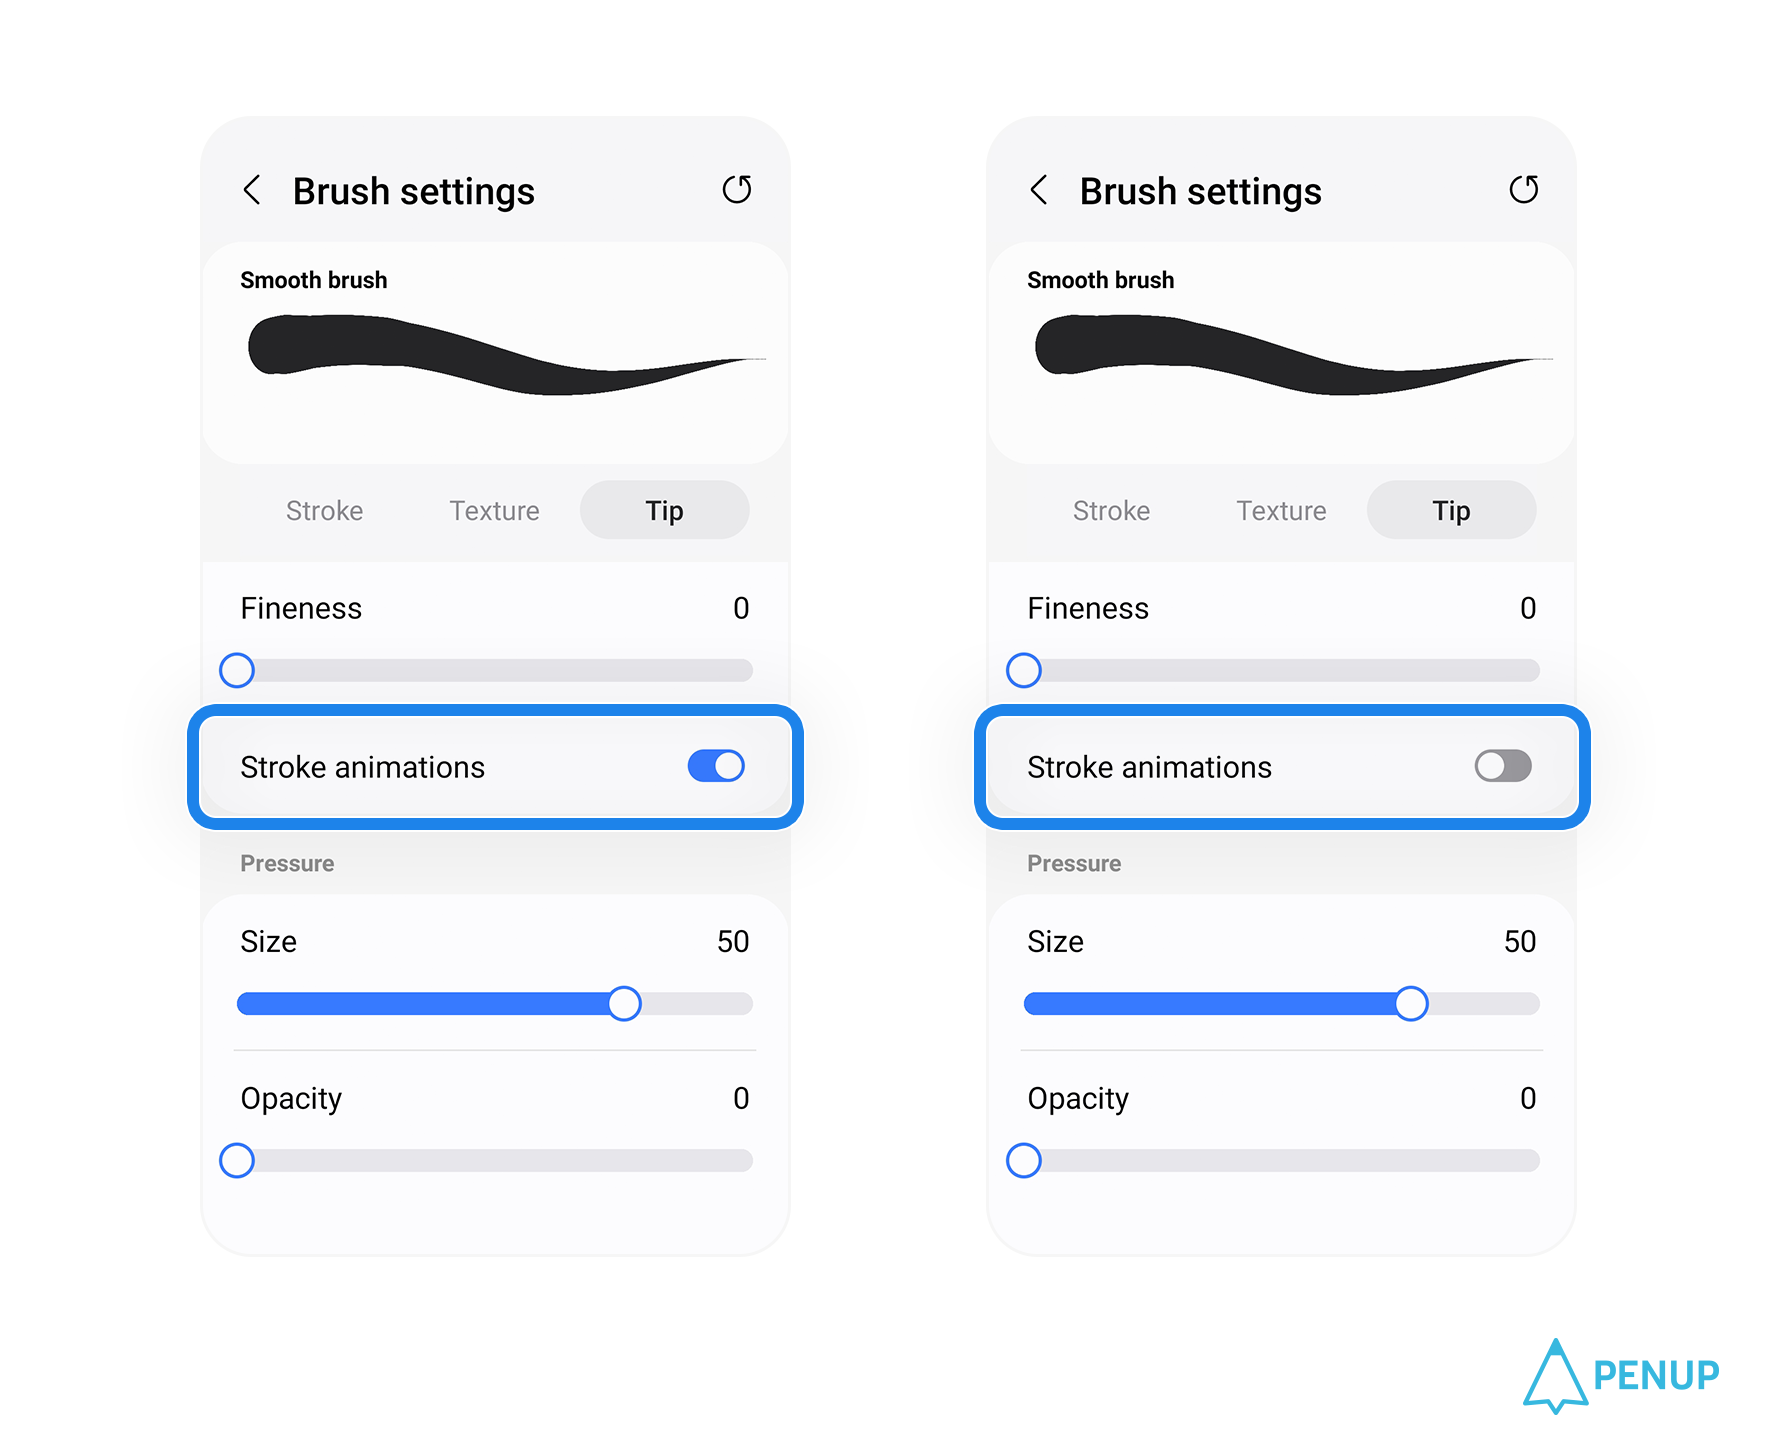
Lastly, ‘Stroke animations’
is a function you can either
turn it on or off.
If you turn stroke animations on,
your settings will apply
in real-time with
every brush stroke you make.
If you turn it off,
your strokes will first appear
without any of the changes
you've made to your brush.
3-2 Pressure
‘Pressure’ allows you
to adjust your brush
depending on the pressure
you apply to the screen,
which is why you need an S Pen
to use this feature.
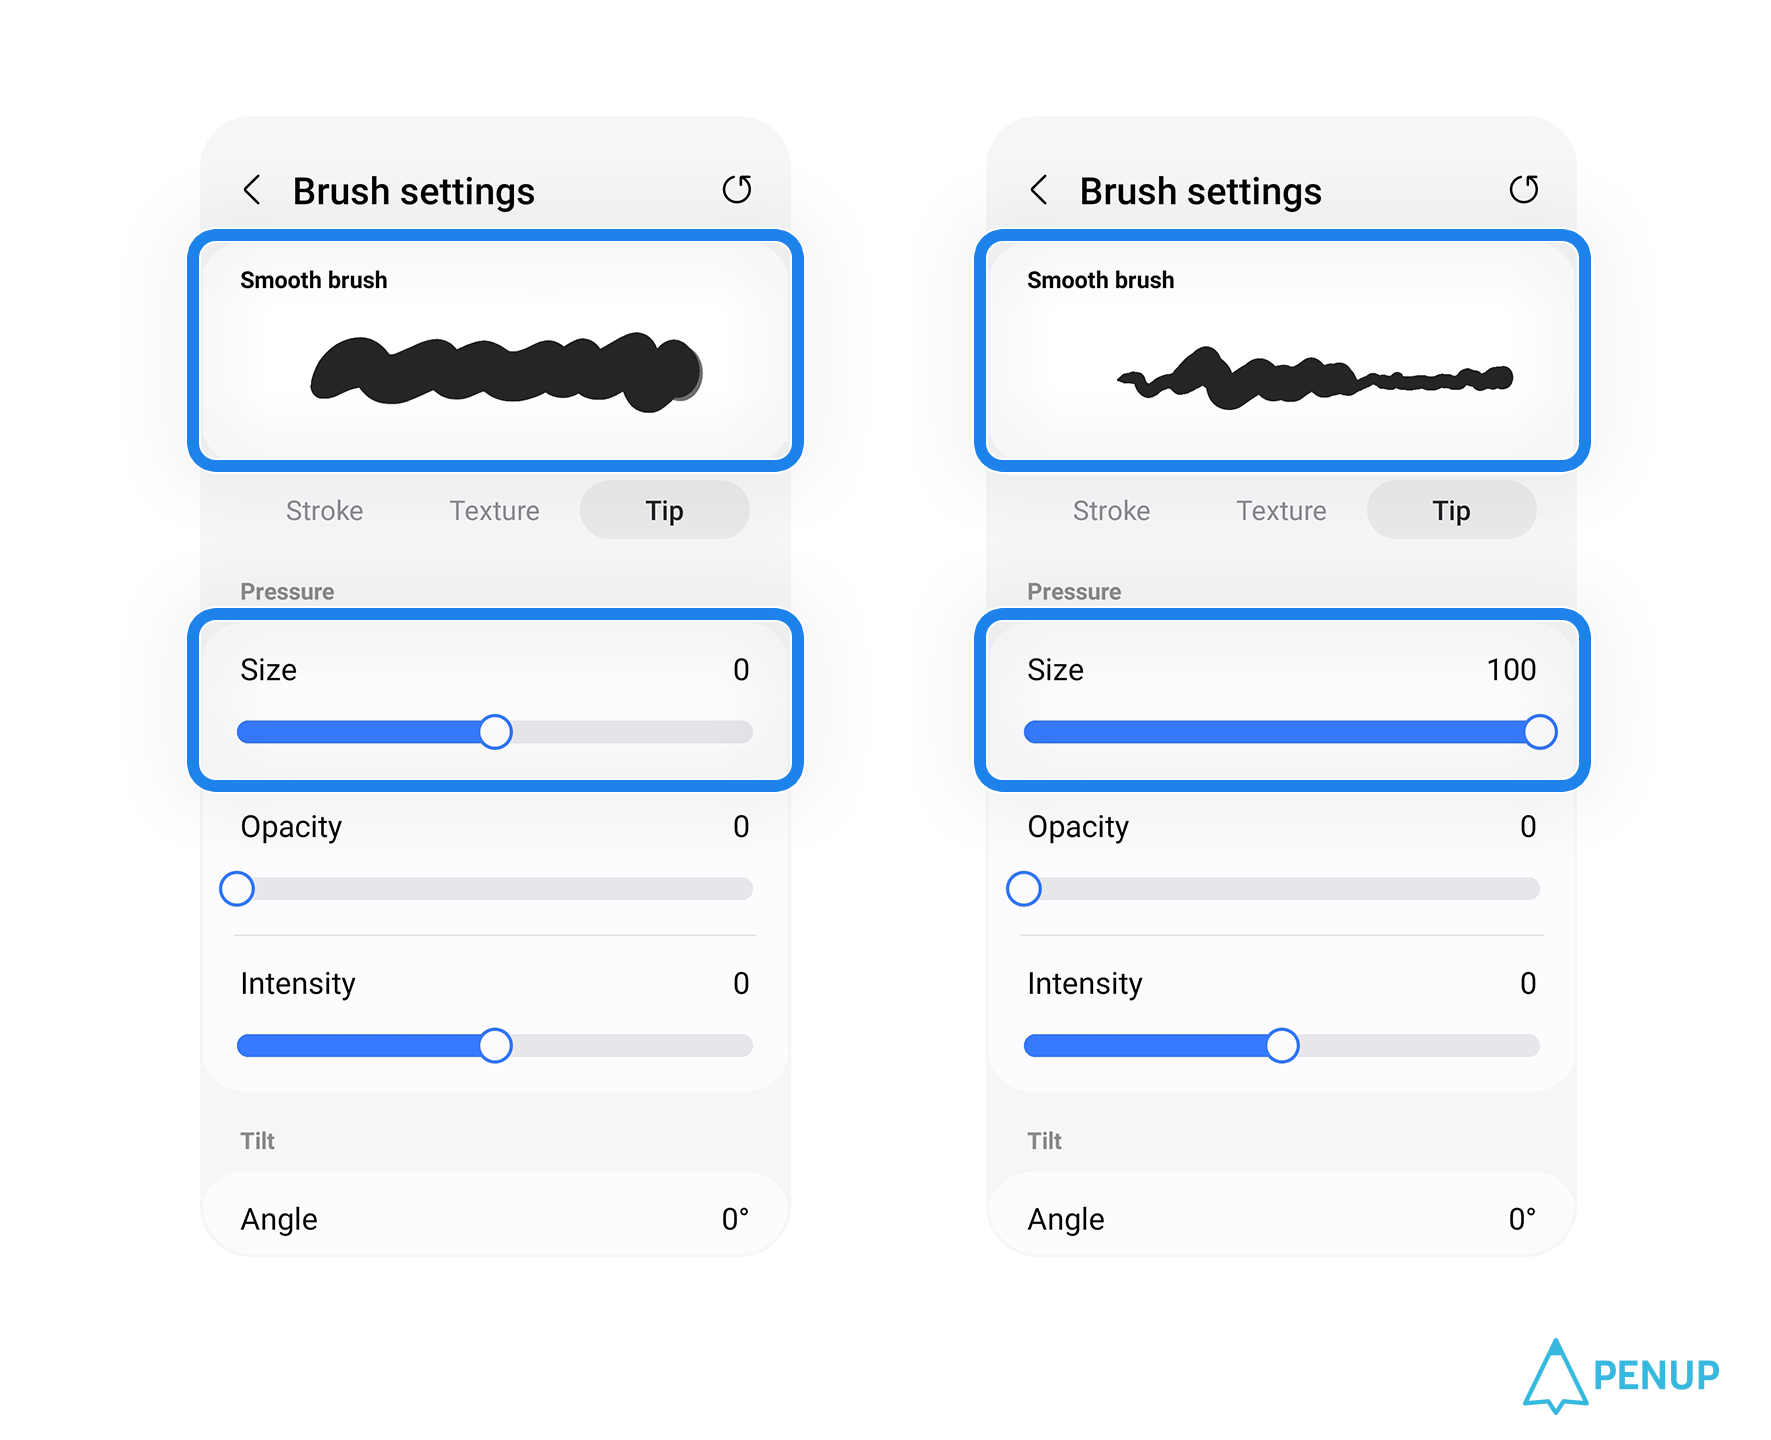
With Pressure,
you can choose between -100 and 100,
If you set it to 0,
applying Pressure won’t change
your Stroke at all.
But if you increase the ‘Size’
(value is a positive number),
more pressure will make
the brush thicker,
and less pressure
will make the brush thinner.
If you choose a negative number,
the lower the pressure,
the thicker the brush becomes,
and the higher the pressure,
the thinner the brush will be.
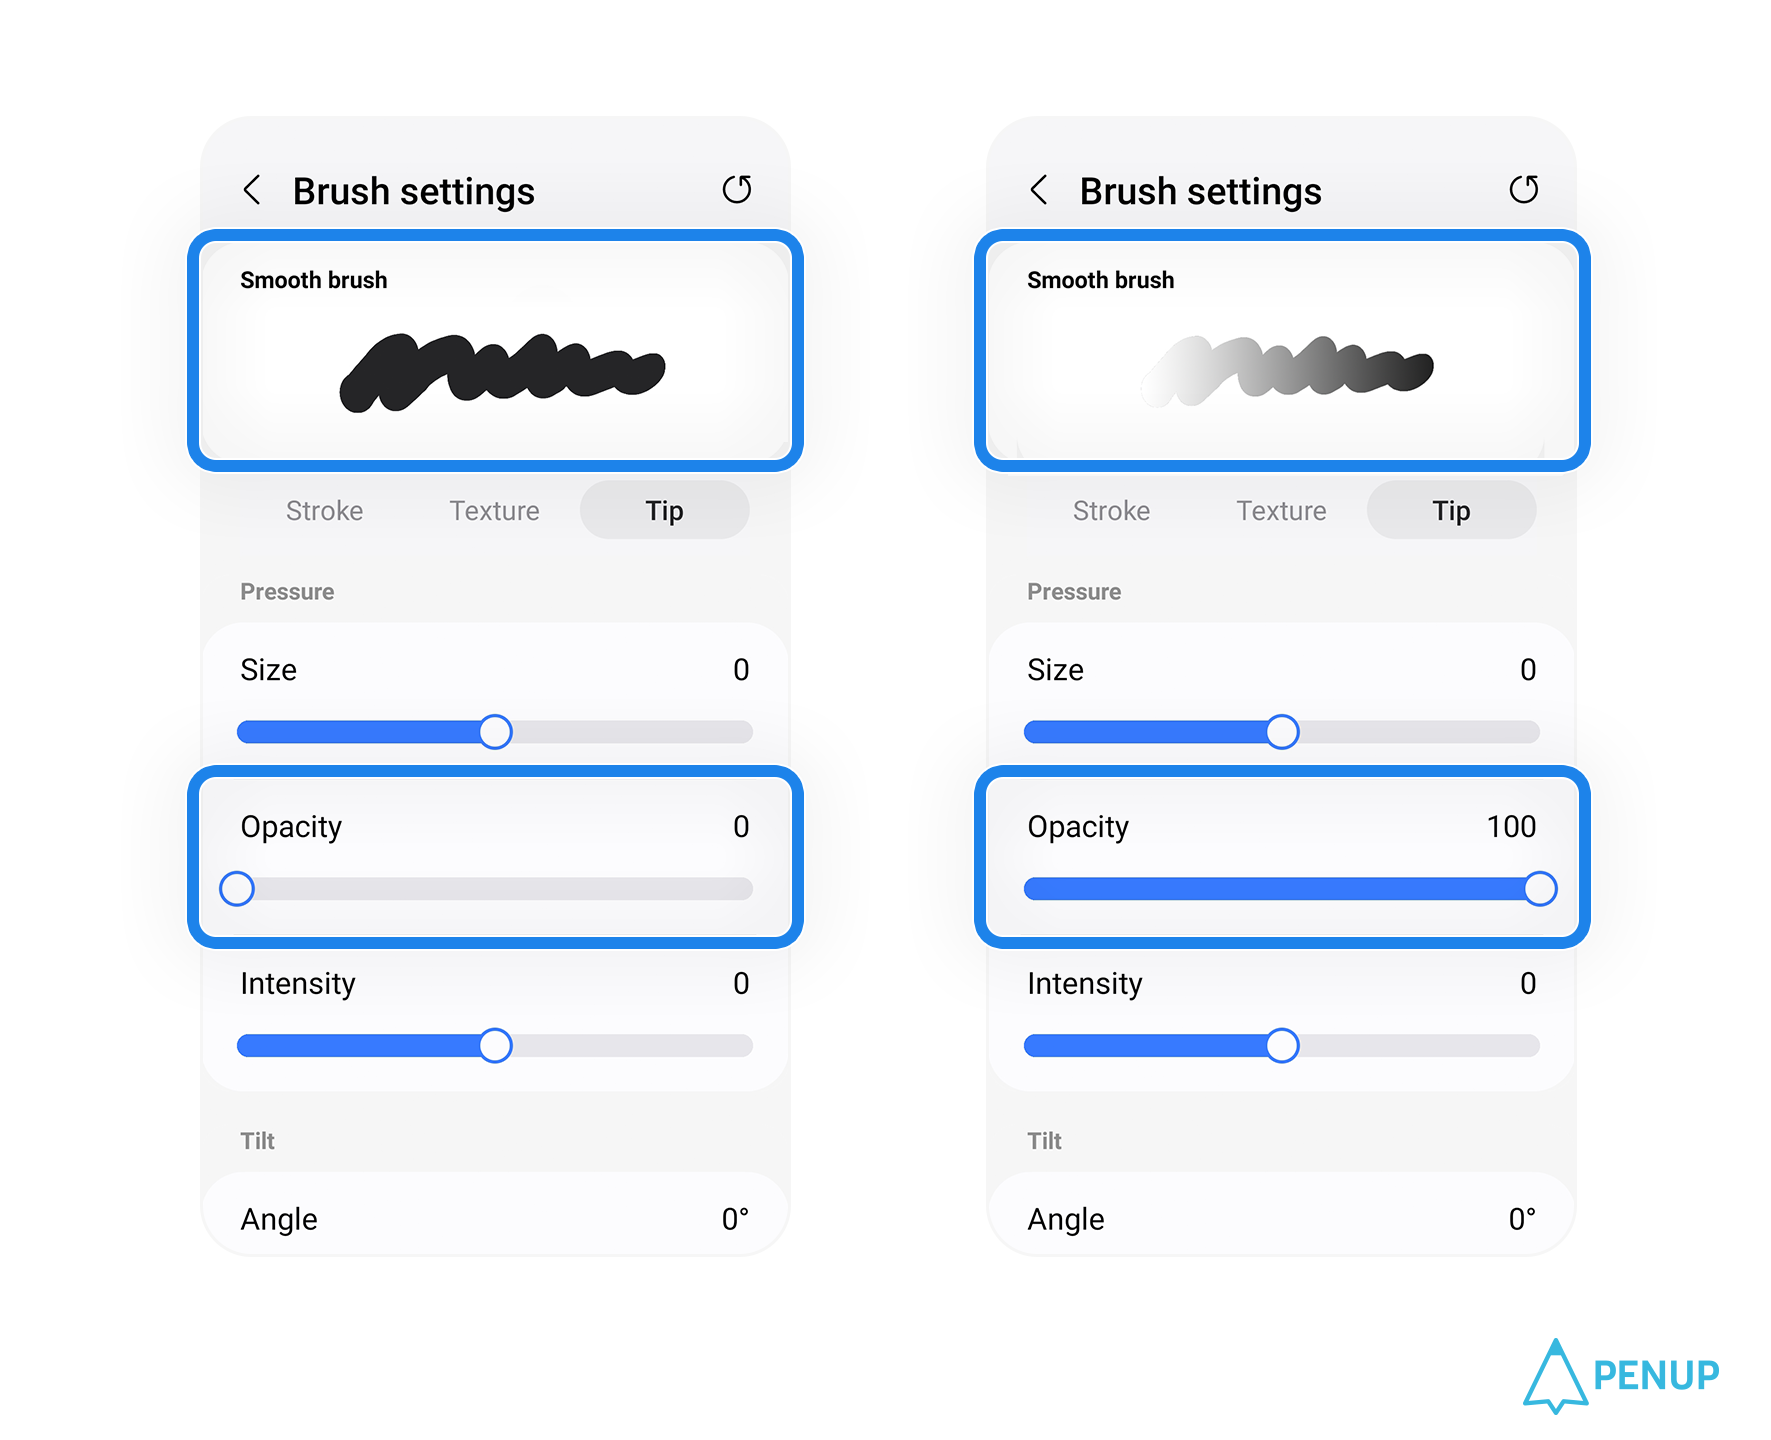
For ‘Opacity’,
the pressure delivered to the screen
through your S Pen
will determine the opacity
of your stroke.
Set to 0,
and Opacity will not
have any effect.
Set closer to 100,
and you’ll be able to create
more transparent lines
with smaller and smaller Pressure.
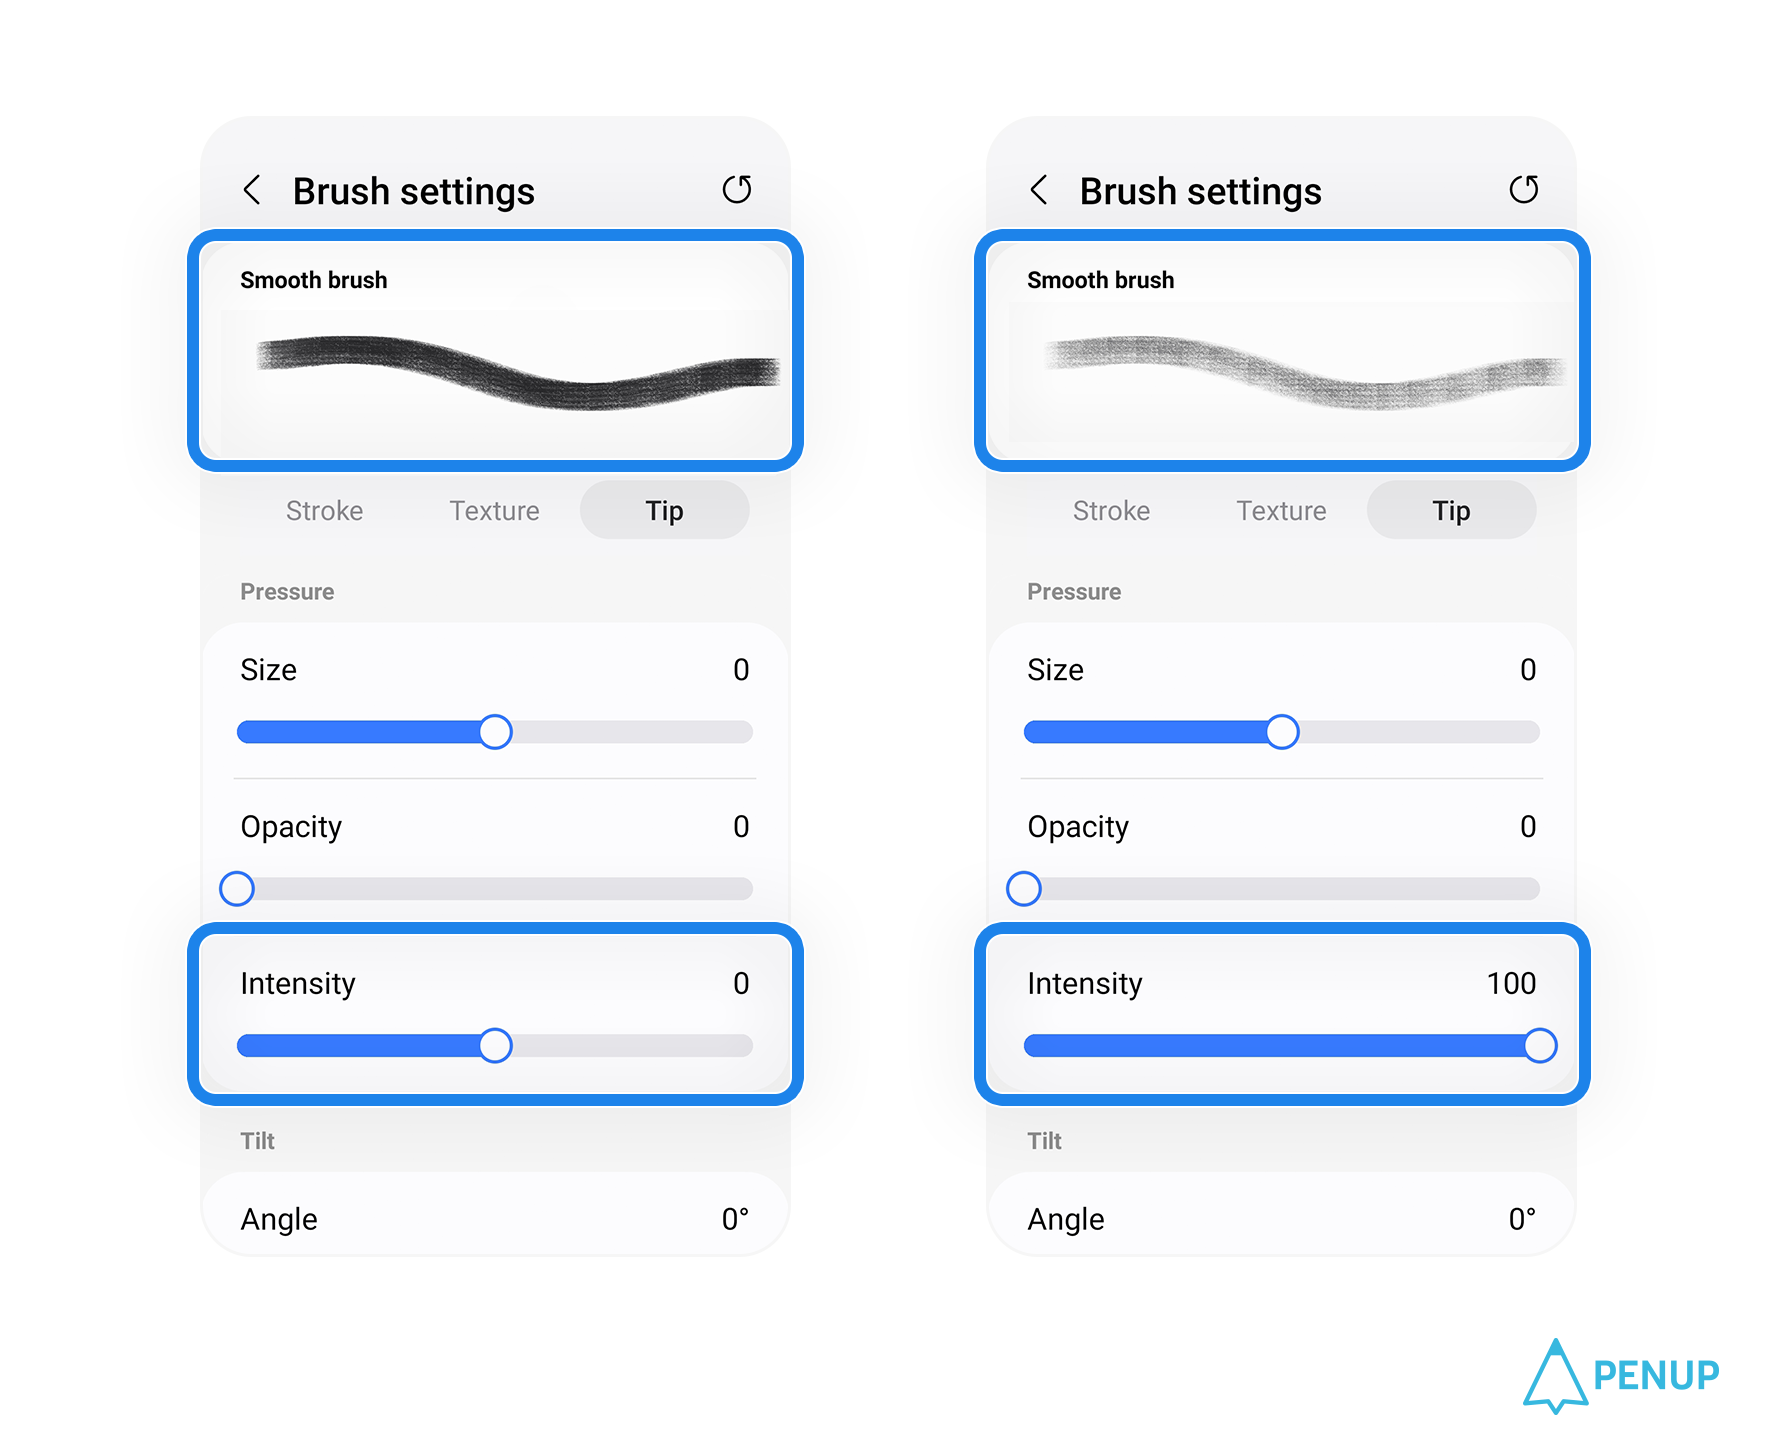
Meanwhile,
you can also adjust
the ‘Intensity’ of your strokes
by varying your Pressure level.
A positive number will help you
increase Intensity
with more Pressure,
and a negative number
will increase Intensity
with lower Pressure.
3-3 Tilt
Each parameter in ‘Tilt’
also requires an S Pen.
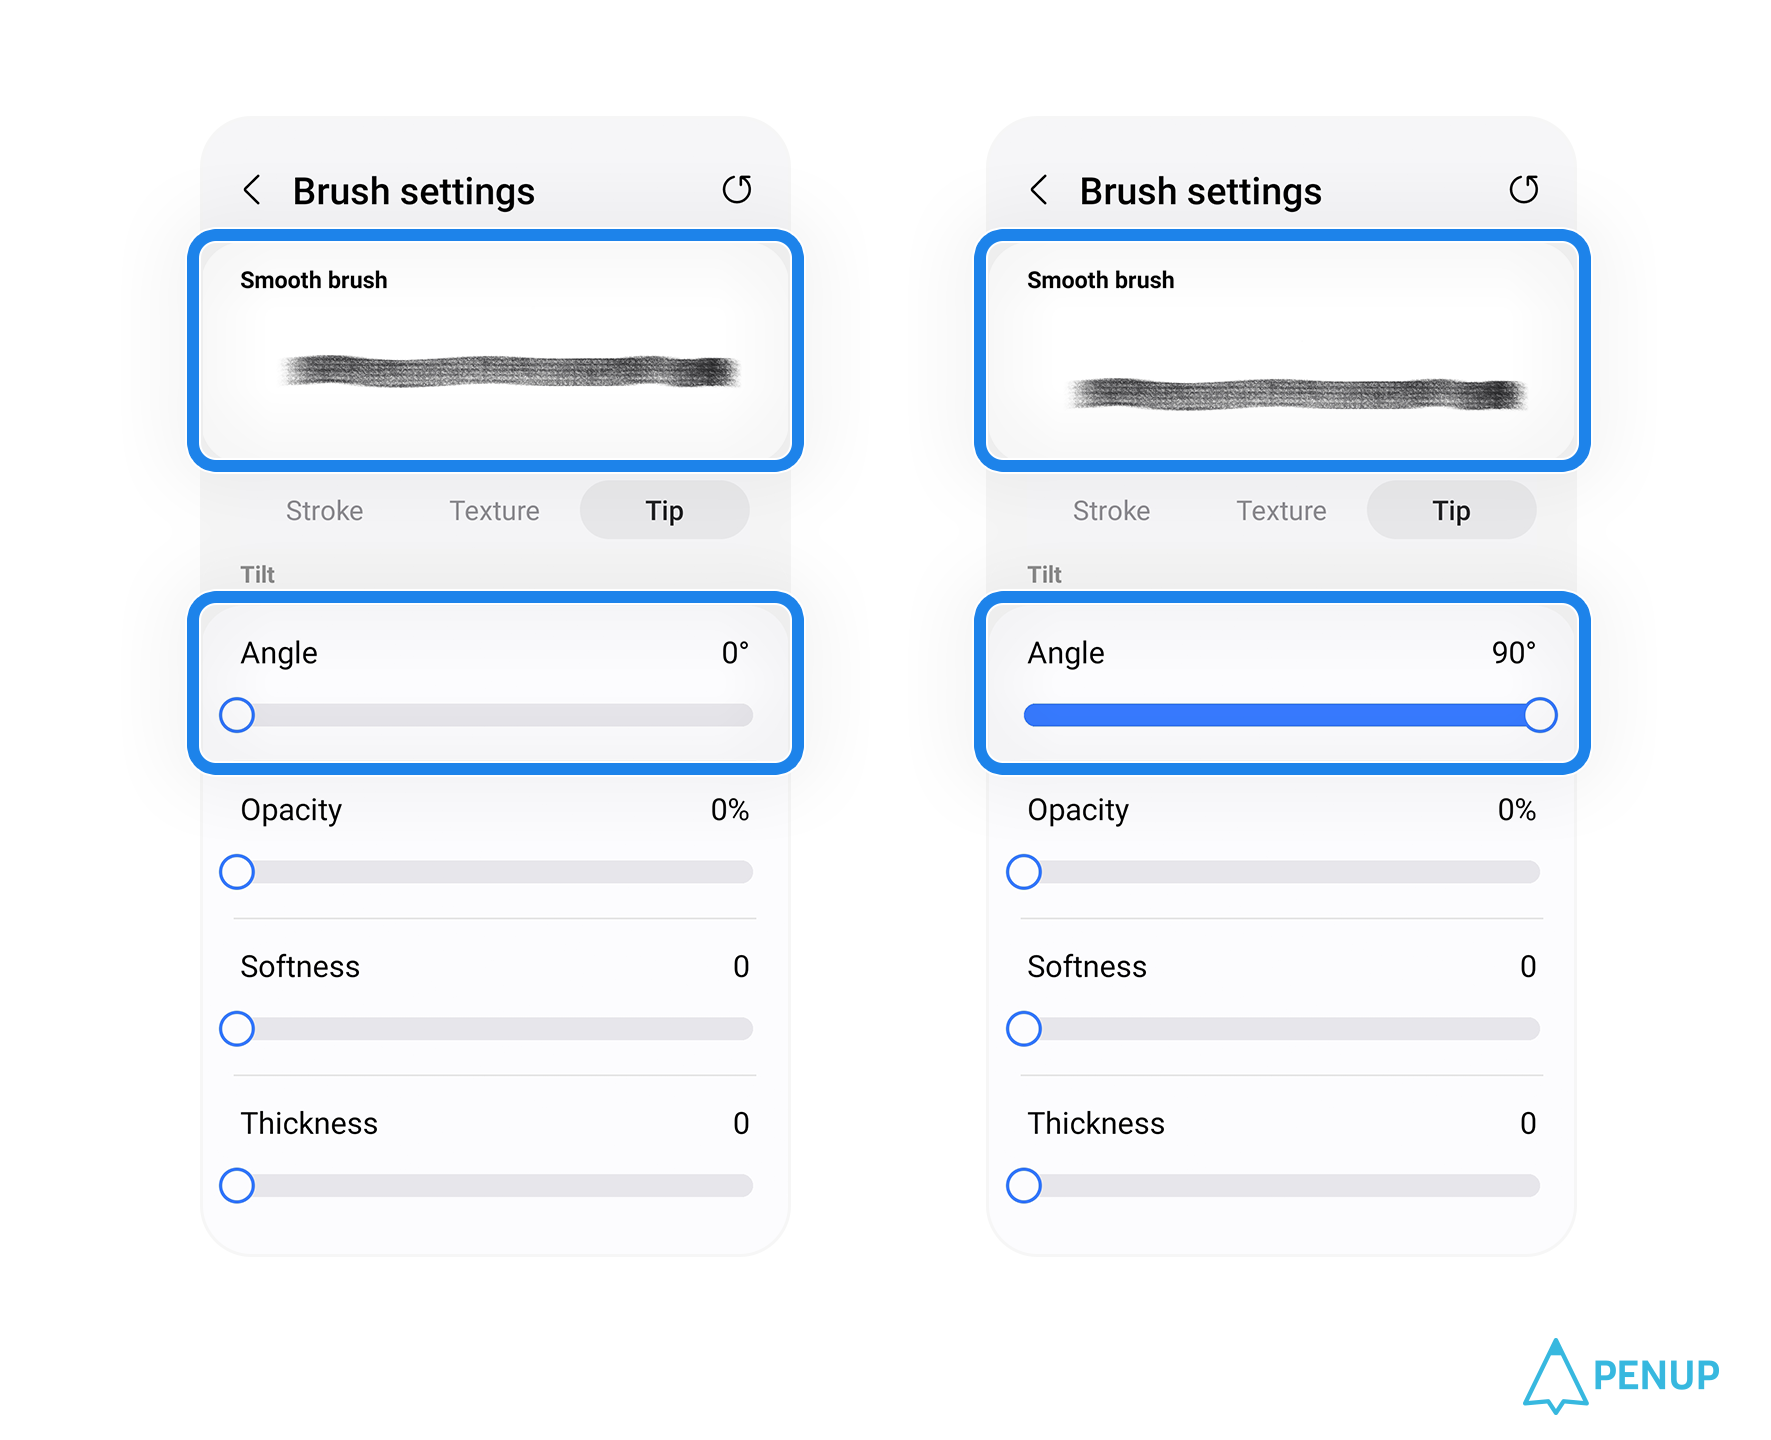
First, with ‘Angle’,
you can adjust it
from 0 to 90 degrees.
With the other parameters,
‘Opacity’, ‘Softness’,
and ‘Thickness’,
you can adjust them
to achieve different effects
when using your S Pen.
However,
if these values are set to 0,
adjusting your Angle
will only adjust the specific point
your brush starts its stroke,
and nothing else will happen
with your brush.
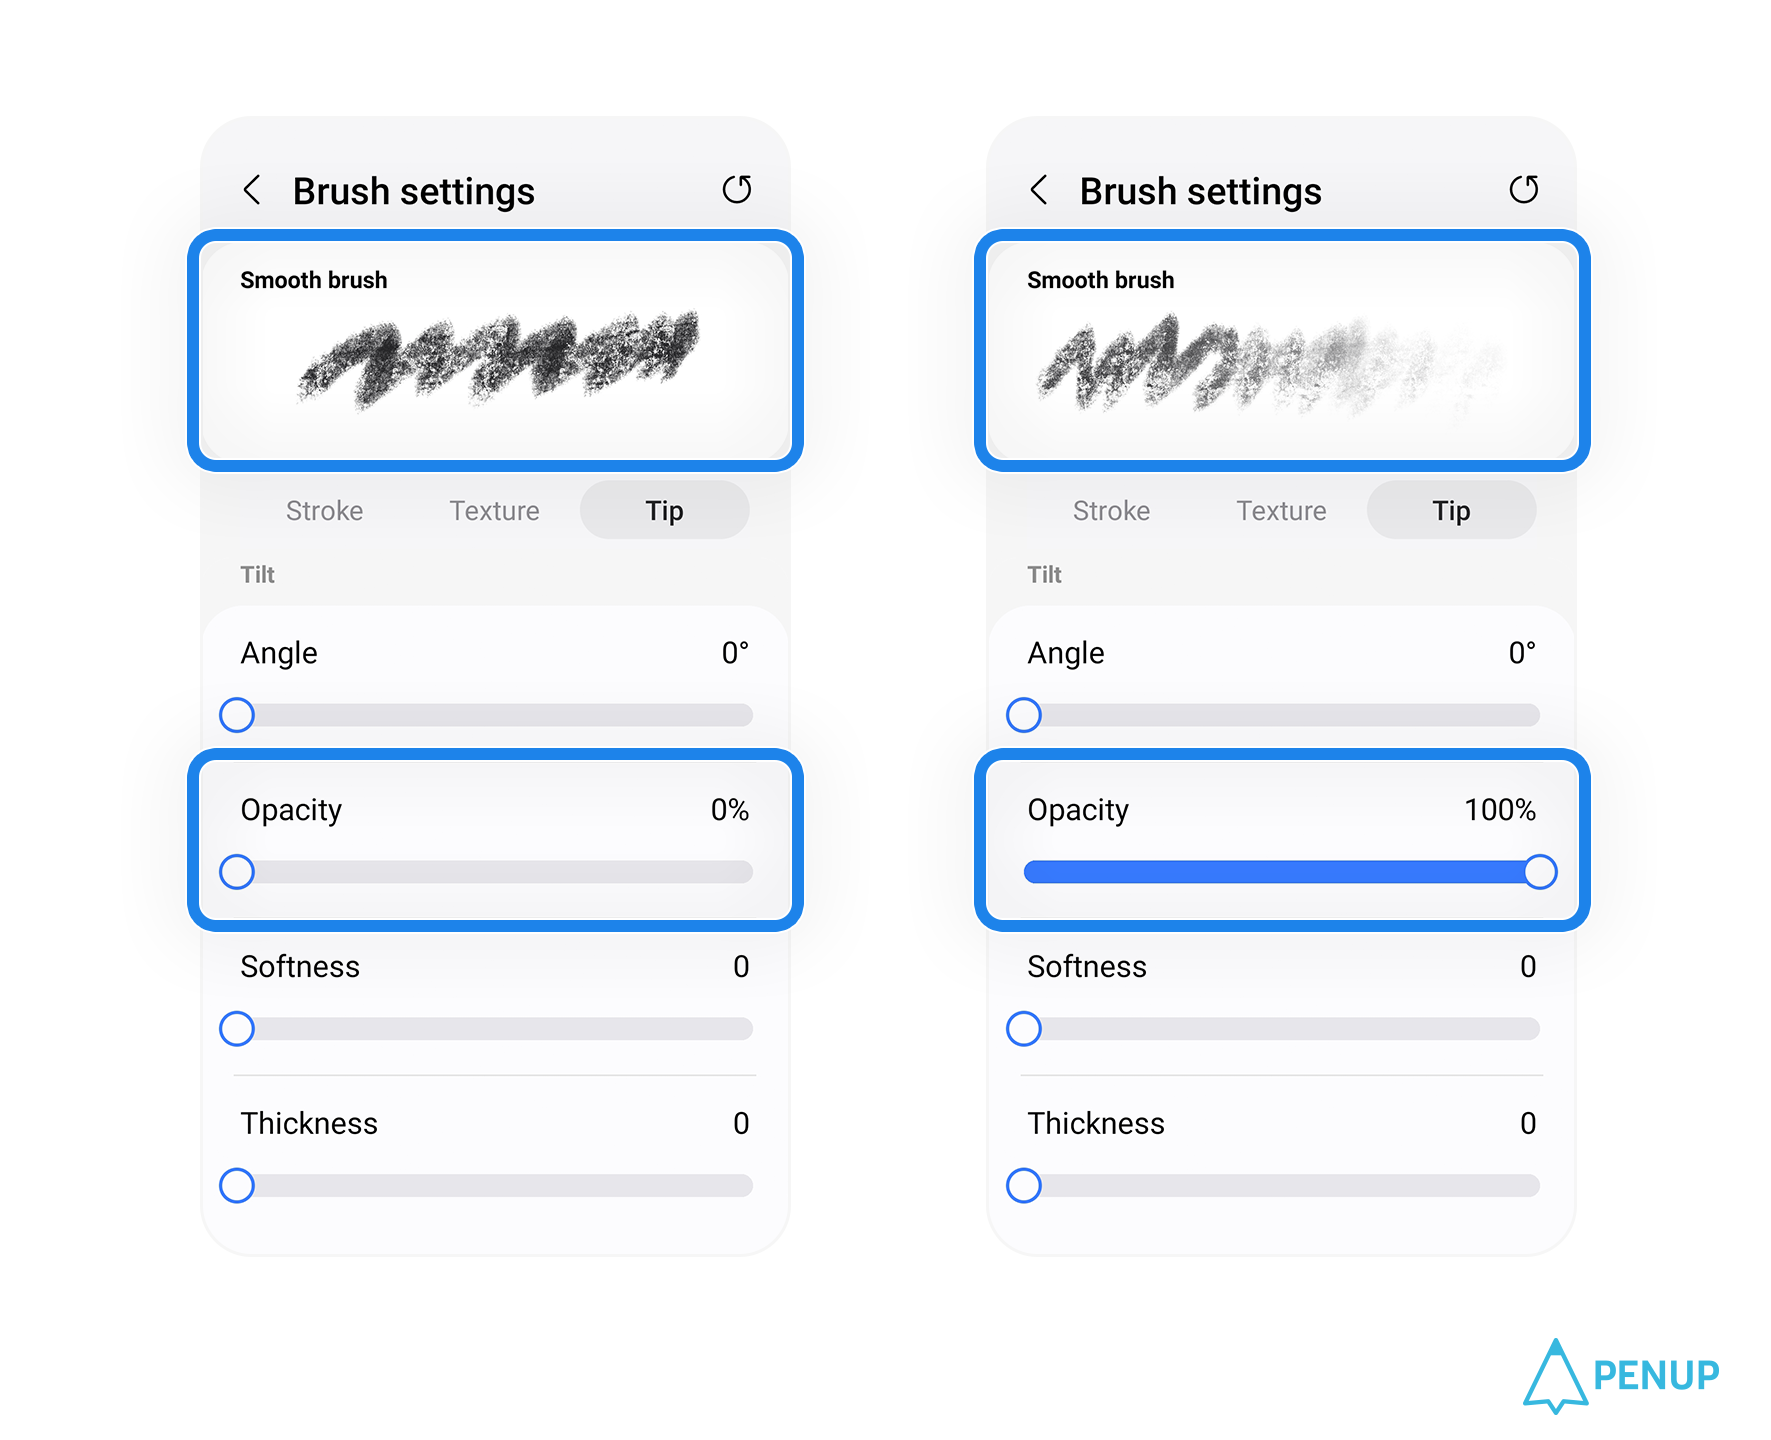
From ‘Tilt’, a higher ‘Opacity’
means the side where the S Pen
is tilted toward becomes
increasingly transparent.
Opacity can be adjusted
from 0 to 100.
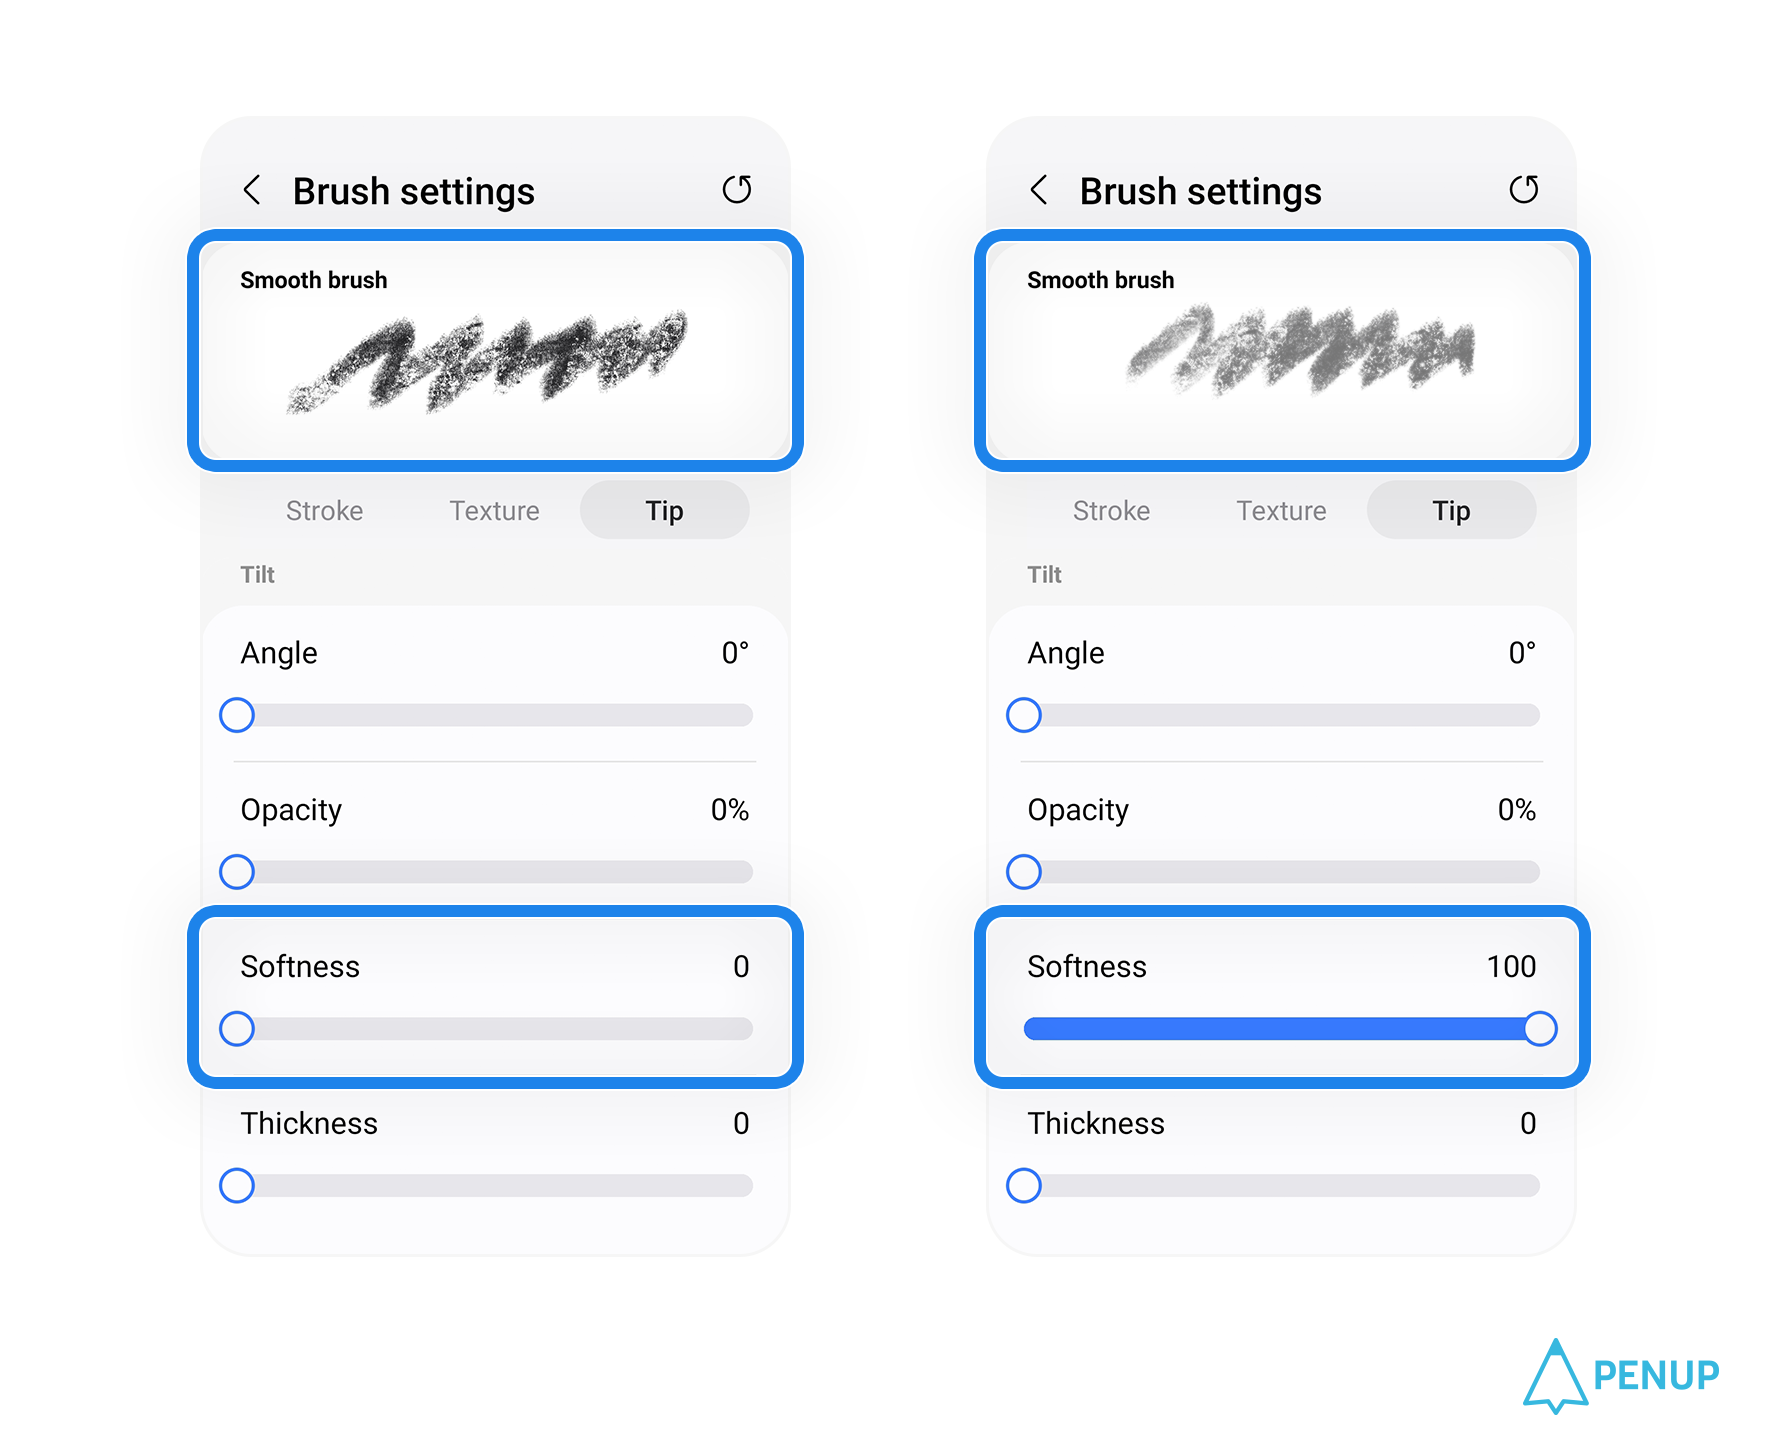
For ‘Softness’,
you can choose from 0 to 100,
with a higher value
creating a smoother stroke
depending on the ‘Angle’.
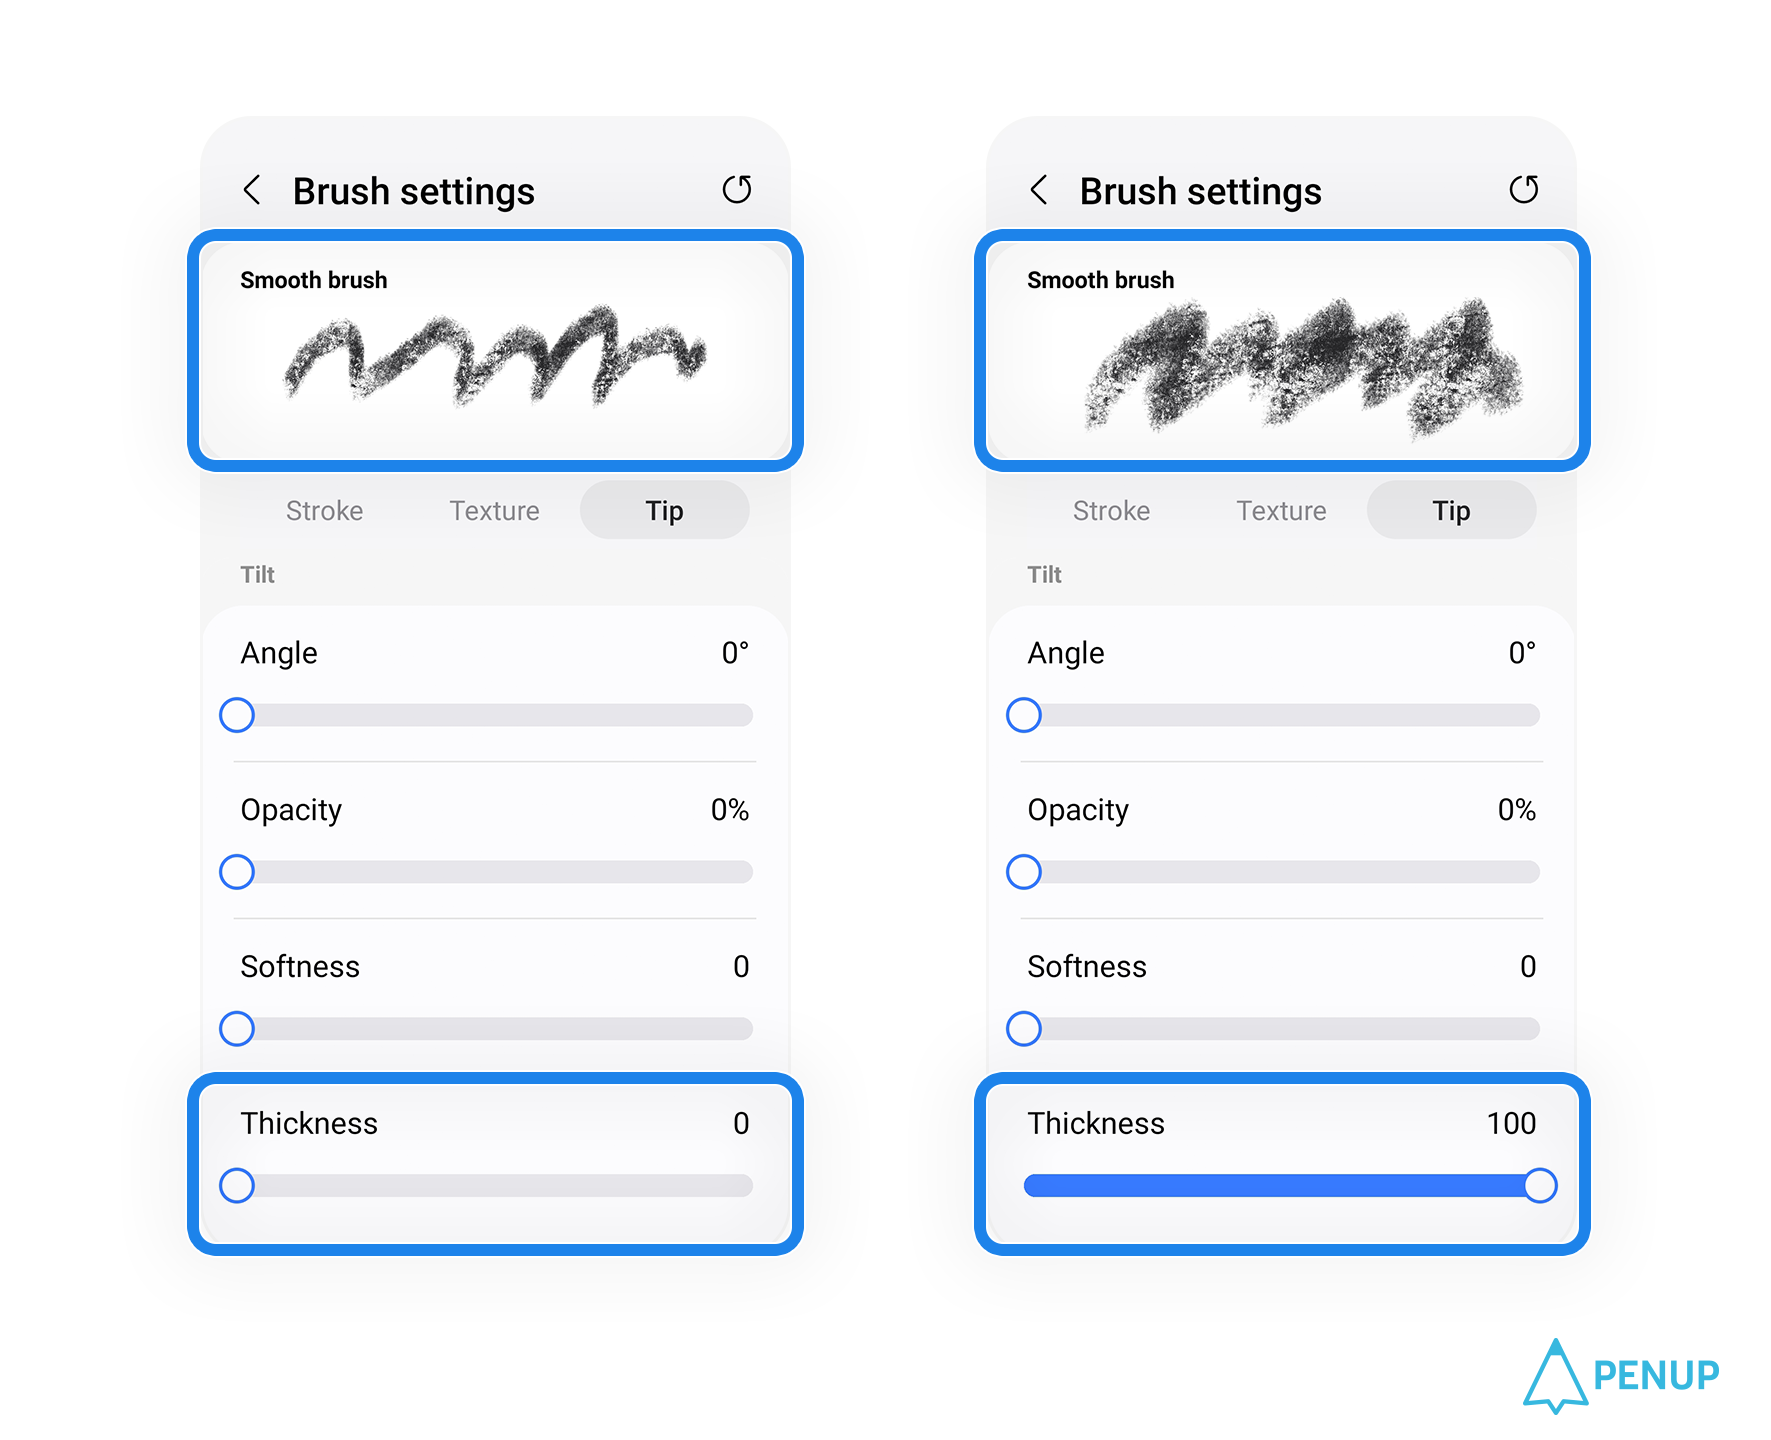
Lastly, in the case of ‘Thickness’,
depending on how tilted
your S Pen is,
the stroke will become thicker.
You can adjust Thickness
from 0 to 100.
The closer it is to 100,
the stroke will be wider
depending on how much you’ve tilted
your S Pen.
Today, we went through
some of our newly updated
brush settings available on PENUP.
We do have more changes
coming to our brushes,
so please keep an eye out
for any updates going forward.
As always, all of us at PENUP
will do our best
to offer you the most entertaining
and easy-to-use drawing app
experience in the world.
Thank you.
Fun, Express, Share!
PENUP - Share your drawings!
https://www.penup.com
-The PENUP Team
 |
|